天呐,我居然可以隔空作画了
作者:互联网
摘要:本案例将使用YOLOX、SCNet两个模型,实现一个简单的隔空作画趣味应用
本文分享自华为云社区《ModelBox开发案例 - 隔空作画》,作者:吴小鱼。
本案例将使用 YOLOX、SCNet 两个模型,实现一个简单的隔空作画趣味应用,最终效果如下所示:

案例所需资源(代码、模型、测试数据等)均可从obs桶下载。
模型训练
我们使用面向开发者的一站式AI开发平台ModelArts进行模型的训练:
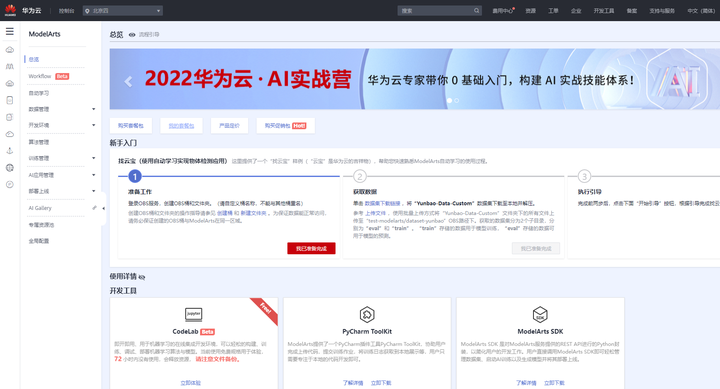
ModelArts提供了包括数据标注,训练环境,预置算法在内的丰富的功能,甚至可以通过订阅预置算法实现0代码的模型训练工作。当然你也可以在本地训练自己的模型。我们假设你现在已经拥有了训练好的模型,接下来我们需要将训练好的模型转换成为可以在开发板上运行的模型。
模型转换
我们发布了开发板模型转换案例,参见RK3568模型转换验证案例 :
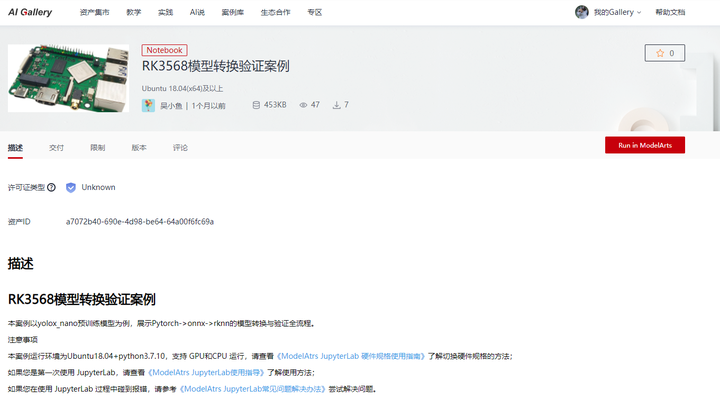
在这个案例中我们演示了从环境适配到模型的转换验证的全流程样例代码,开发者可以通过“Run in ModelArts”一键将Notebook案例在ModelArts控制台快速打开、运行以及进行二次开发等操作。
开发环境部署
使用开发板进行ModelBox AI应用开发有两种方式,一是开发板连接显示器和键盘鼠标,安装Ubuntu桌面,直接在开发板上进行开发;二是使用远程连接工具(如VS Code中的Remote-SSH)从PC端登录开发板进行开发。这里我们推荐第二种方式,因为PC端可以使用功能更丰富、界面更友好的IDE。
1.配置网络
PC连接开发板需要知道开发板的ip,但是开发板默认没有固定ip,我们提供了ModelBox PC Tool,可以自动为开发板配置ip,也可以在推理阶段很方便的进行视频推流拉流。
PC Tool位于SDK的connect_wizard目录中:
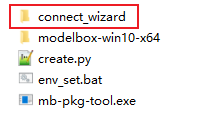
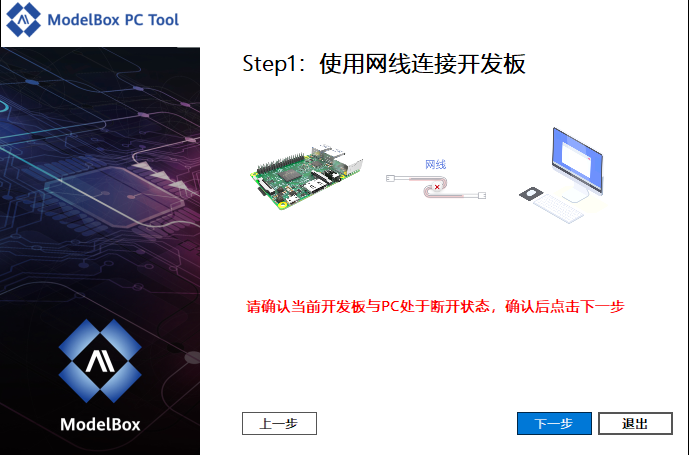
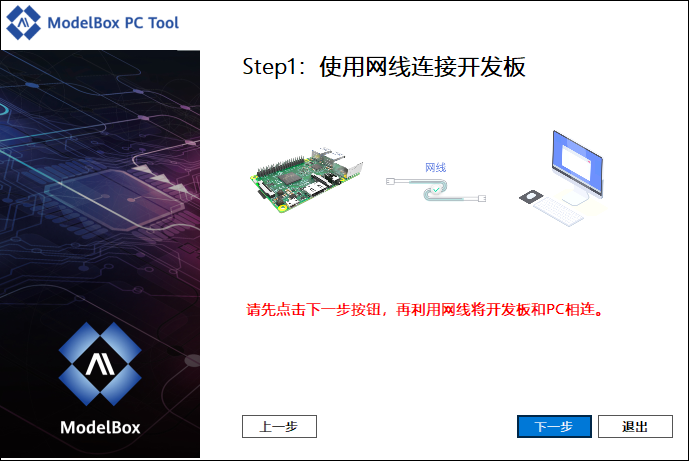
双击connect_wizard.exe,在页面中可以看到有两种开发板连接方式,我们使用网线连接开发板的方式:
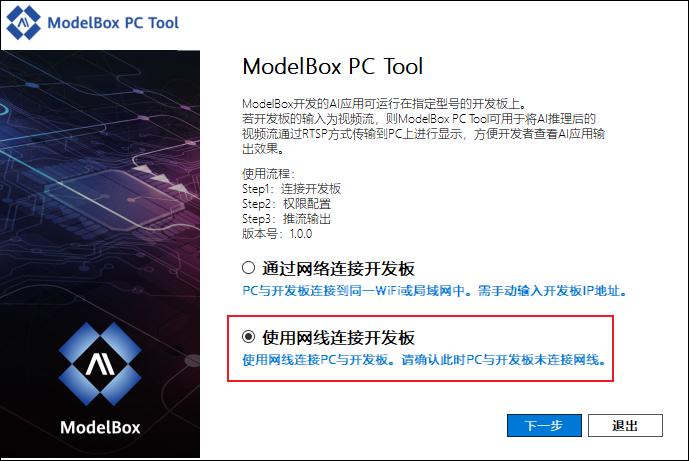
按照指引断开或连接网线:

等待一小段时间,可以看到来到了第三步,此时开发板已设置为默认ip:192.168.2.111,PC使用该ip即可SSH登录:

2. 远程连接开发板
我们推荐在PC端使用VS Code远程连接开发板来对设备操作。
使用VS Code连接开发板可以参考我们发布的ModelBox 端云协同AI开发套件(RK3568)上手指南。同时,上手指南也介绍了如何将开发板注册到HiLens管理控制台进行更方便的在线管理。
应用开发
接下来我们会以隔空作画demo为例,介绍如何使用ModelBox开发一个AI应用。
1.创建工程
SDK提供了工程脚本create.py,可以使用./create.py -h查看脚本帮助:
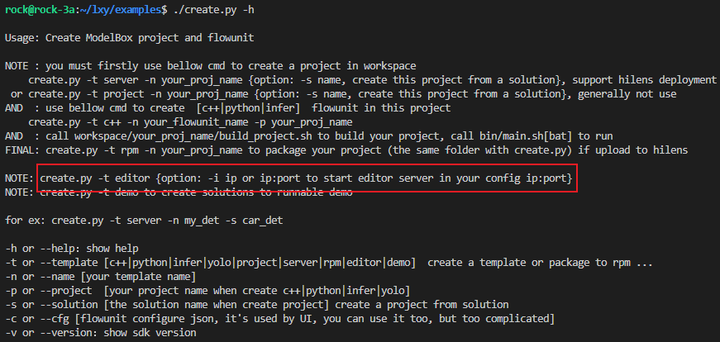
ModelBox提供了可视化图编排工具:Editor,可以使用./create.py -t editor开启图编排服务:

服务默认ip即为192.168.2.111,如需配置其他ip或端口,可以通过-i ip:port参数进行配置。
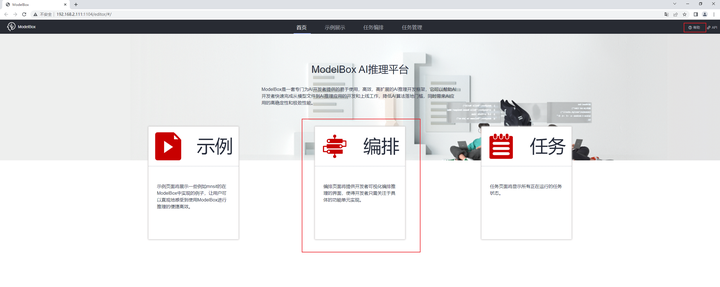
点击链接即可进入可视化编辑界面,我们点击编排进入工程开发界面,如果进一步了解ModelBox相关内容,可以点击右上角帮助:
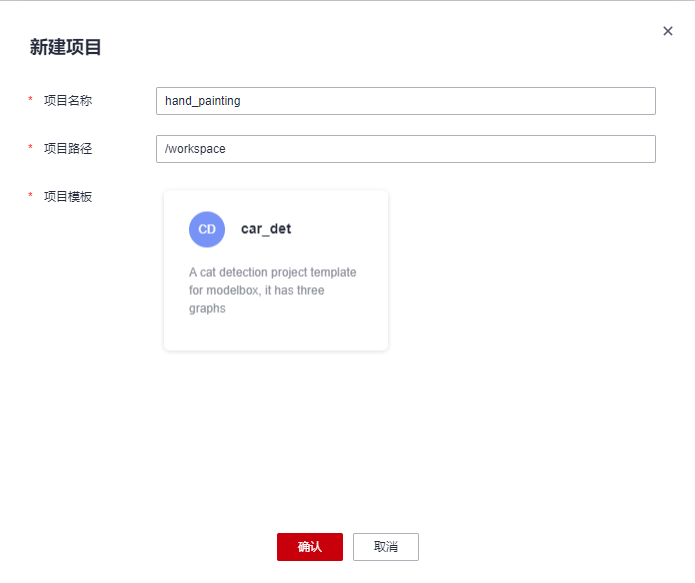
进入编排界面,点击右上角新建项目:
项目路径填写workspace,项目名称填写hand_painting, 确认:
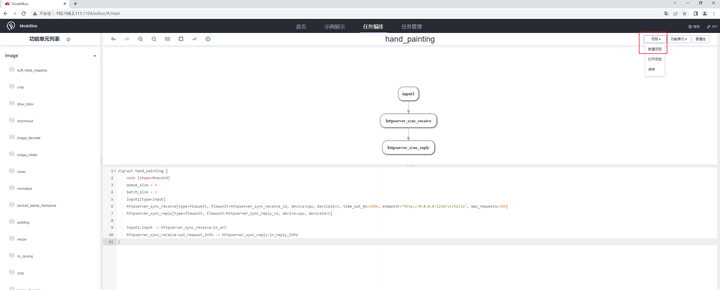
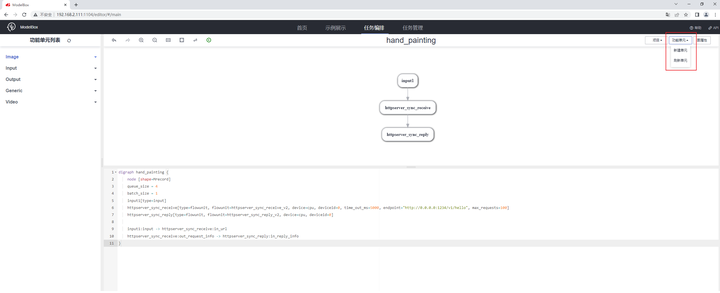
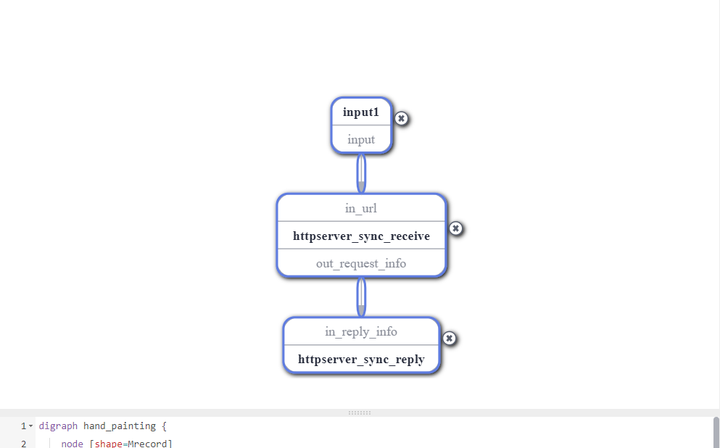
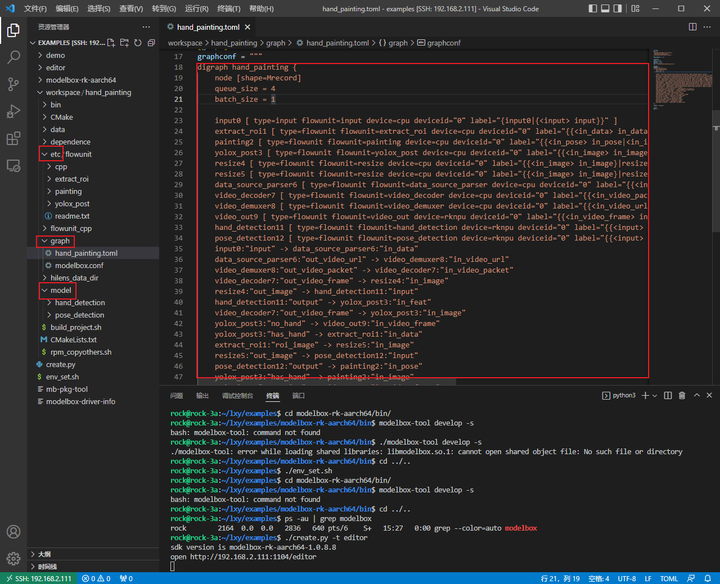
可以看到我们已经拥有了一个带有http收发单元的默认图:
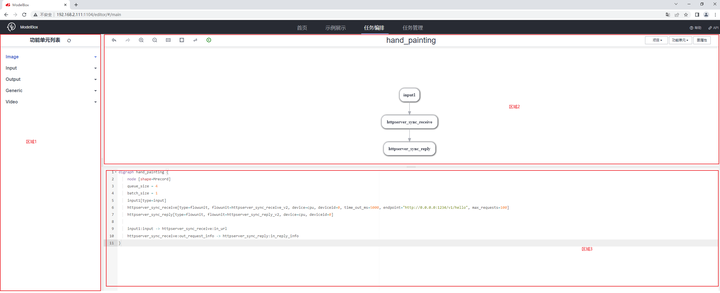
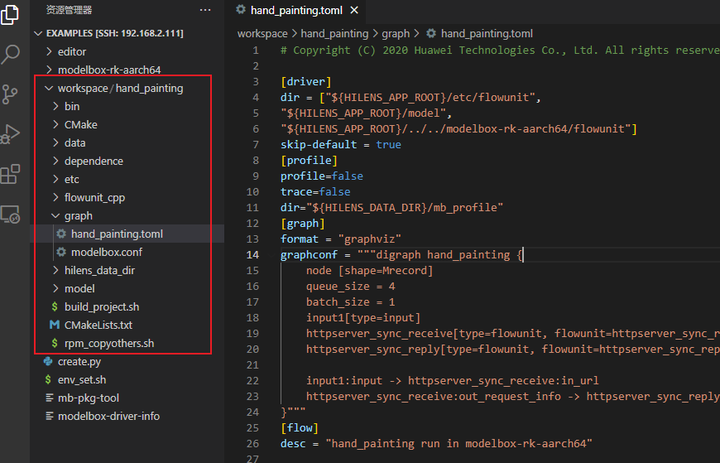
其中,区域1为SDK预置的高性能通用流单元,区域2为可视化编排界面,区域3为对应的图配置文件内容。同时,VS Code对应目录下也出现了hand_painting项目:
2.创建推理功能单元
接下来,我们创建推理流单元:
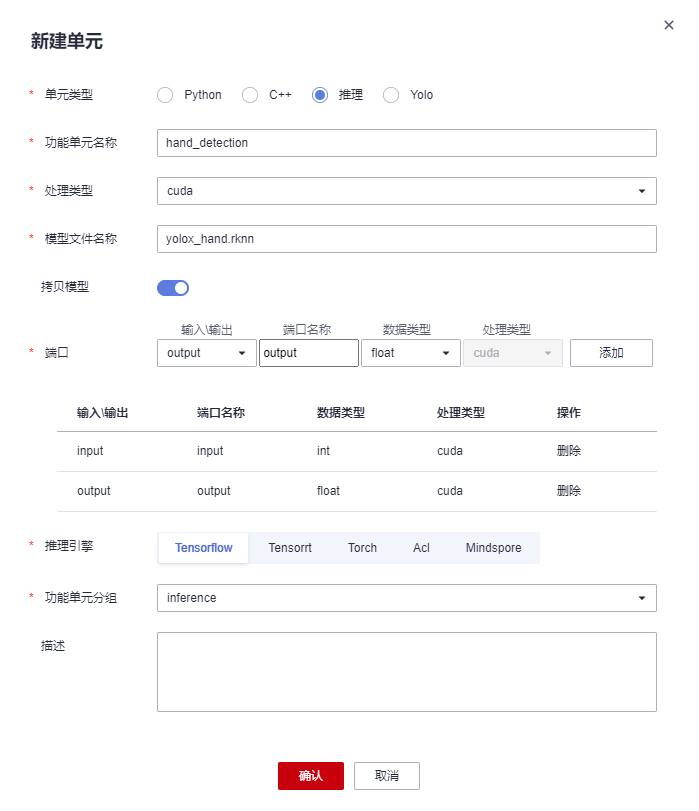
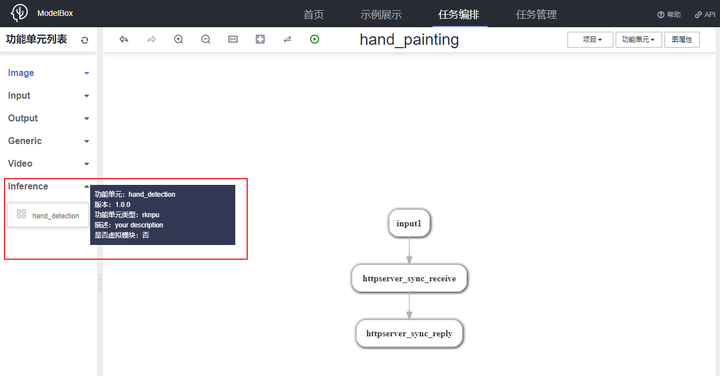
对于手检测模型,我们将流单元命名为hand_detection,模型文件名即为转换好的检测模型名:yolox_hand.rknn,此模型输入为image,输出为feature map,所以我们添加int类型的输入端口与float类型的输出端口。关于开发板的推理流单元创建,在处理类型时我们选择cuda,即为npu推理,推理引擎可选任意一款,目前开发板SDK可以自动进行识别转换。最后将功能单元分组修改为inference,点击确认,即可看到,在右侧inference页签下出现了:
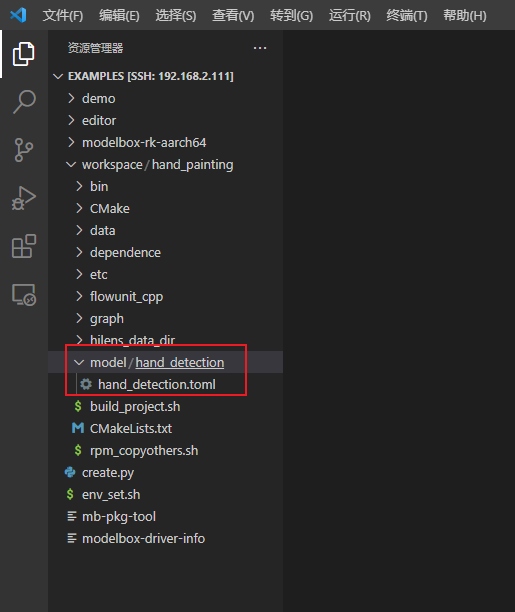
同时,在VS Code工程model目录下可以看到创建好的推理流单元:
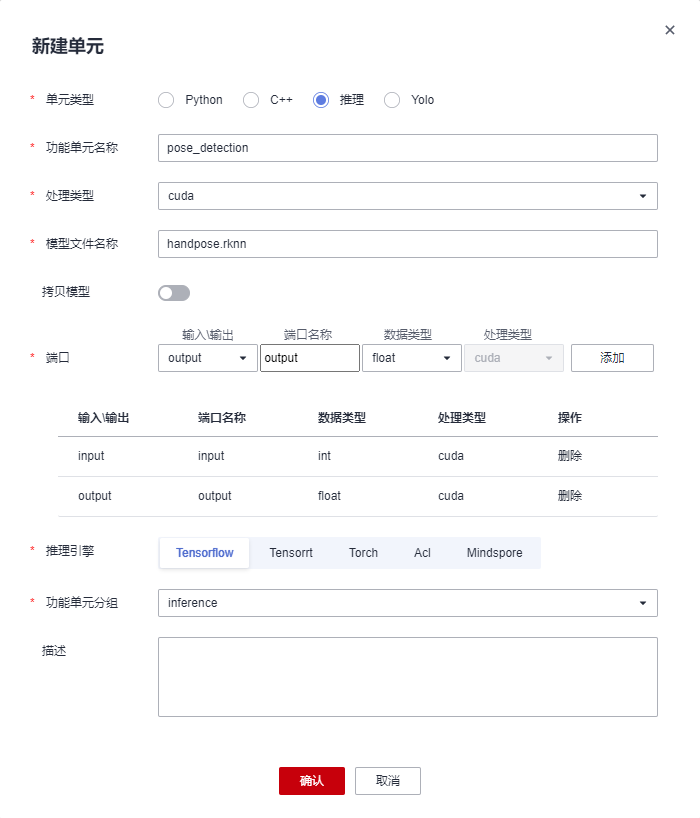
同样的,我们创建pose_detection推理流单元:
3.创建后处理功能单元
除了推理流单元外,隔空作画demo还需要一些通用功能单元:检测后处理单元、感兴趣区域提取单元、作画单元,我们新建三个python功能单元来满足上述需求。
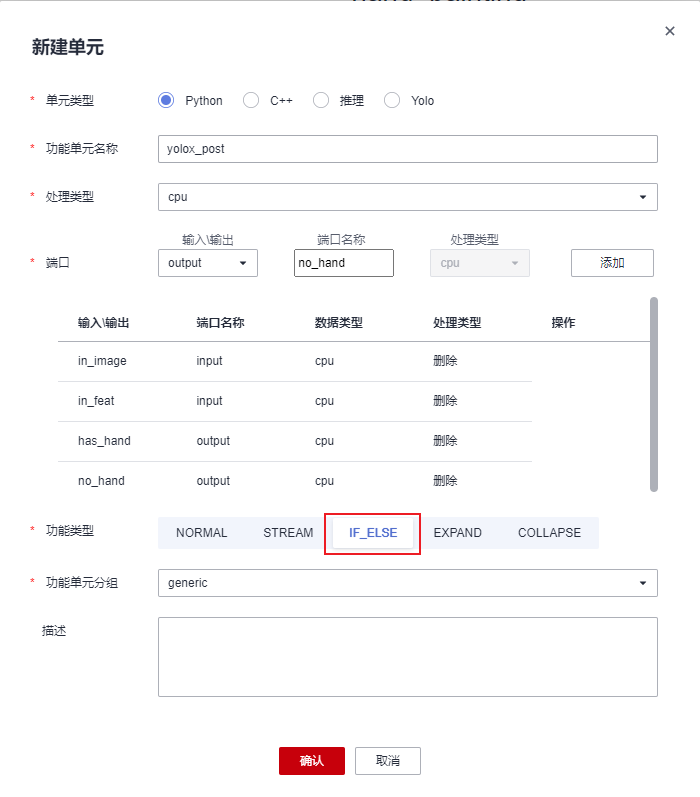
对于检测后处理单元,我们希望通过原图和hand_detection的输出解码出手检测框,所以该单元应该有两个输入。此外,对于画幅中有手或者没有检测到手两种状态,我们希望该功能单元分情况处理,检测到手时,将检测结果送入感兴趣区域提取单元,没有检测到手时,直接返回,因此功能单元类型选择:IF_ELSE。新建单元如下:
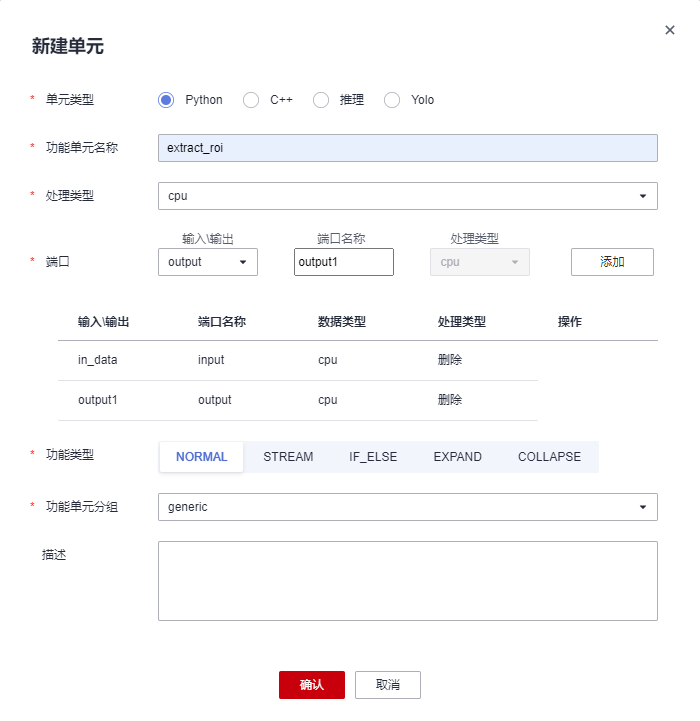
同样的,根据输入输出与功能单元状态,我们创建extract_roi和painting两个功能单元:

4.流程图编排
拖拽
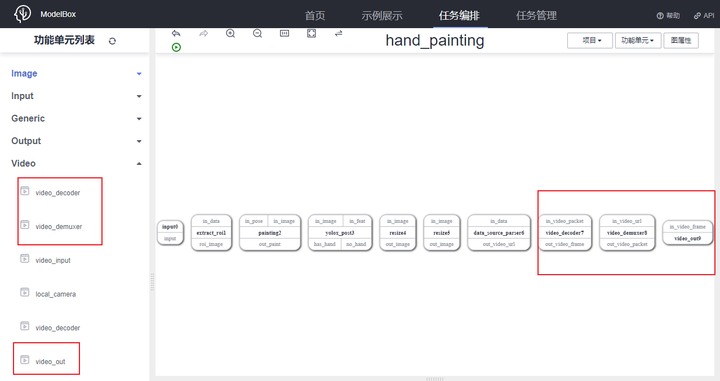
需要的功能单元全部创建好后,我们可以着手编排流程图,我们编排一个视频处理的图,暂时不需要http收发单元,可以删除不需要的单元:
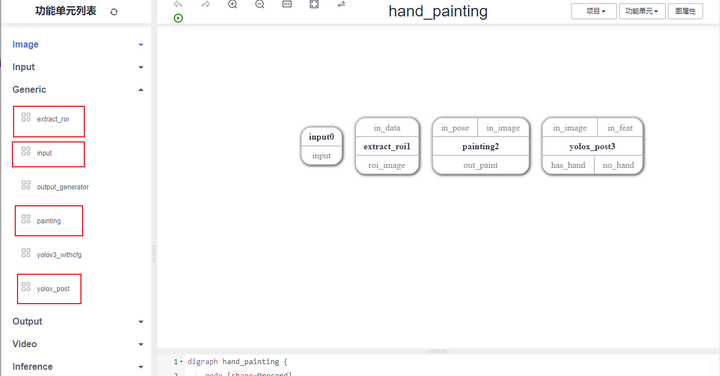
在Generic列表下将虚拟输入单元input和我们刚刚创建的三个功能单元拖入画布:
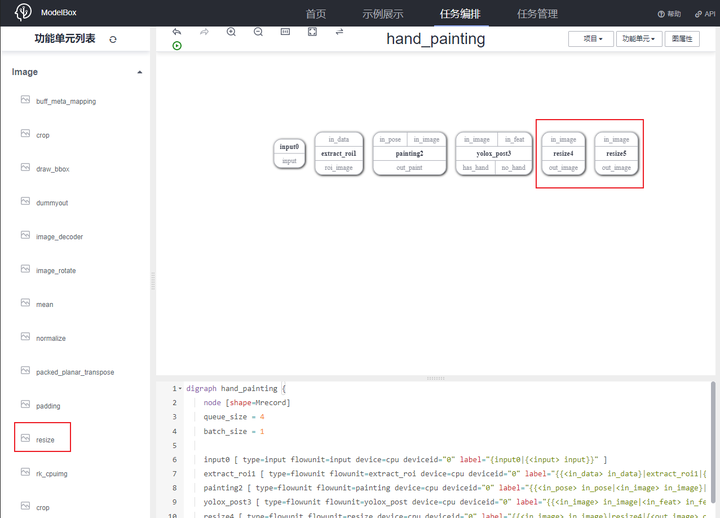
在Image列表下将模型推理需要用到的预处理单元resize拖入画布,因为我们需要两个resize单元,所以重复拖入:
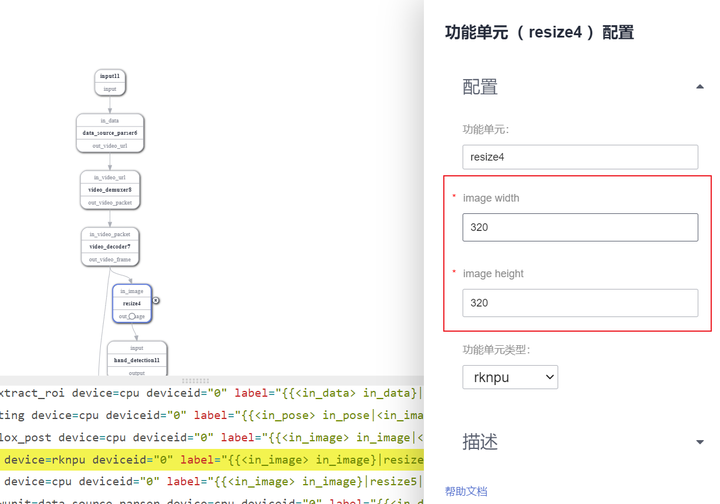
值得注意的是,resize单元需要配置参数,需要点击该单元进行配置:
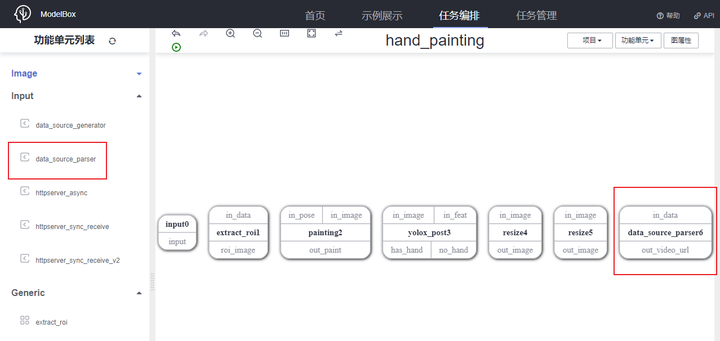
在Input列表下拖入输入解析单元data_source_parser:
在Video列表下拖入视频处理需要的单元video_demuxer、video_decoder、video_out:
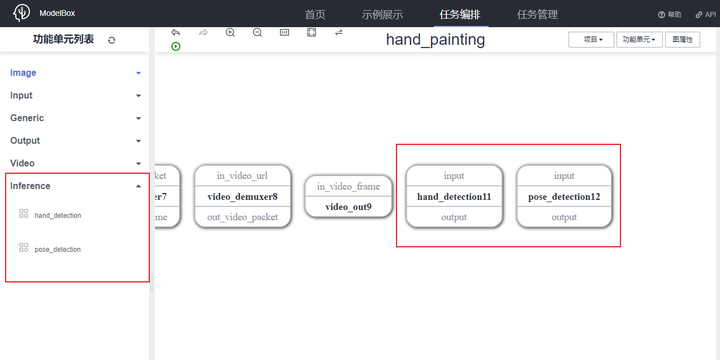
最后,在Inference列表下拖入我们创建的两个推理单元:
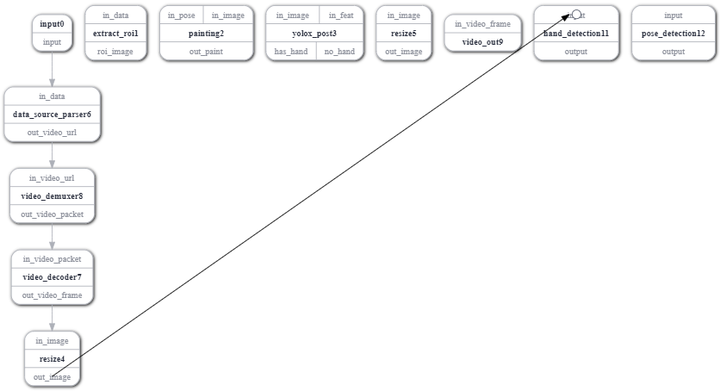
编排
将功能单元按照处理逻辑进行连接:虚拟输入input连接输入解析data_source_parser,解析后送入视频解包与解码单元:

解码输出送入预处理后可直接进行推理:
推理后处理需要输入原图与推理结果,没有结果则直接连接视频输入单元,有结果则连接感兴趣区域提取单元:
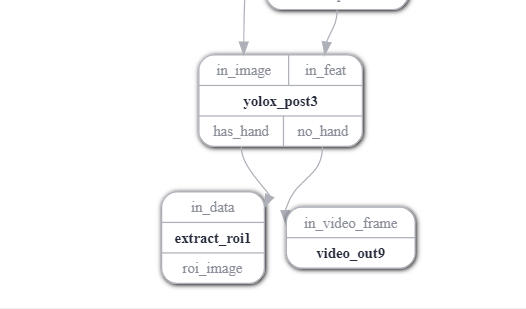
提取结果送入预处理与推理:
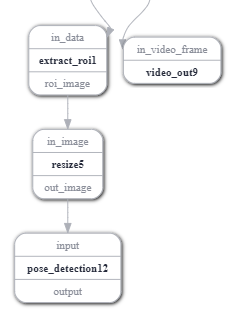
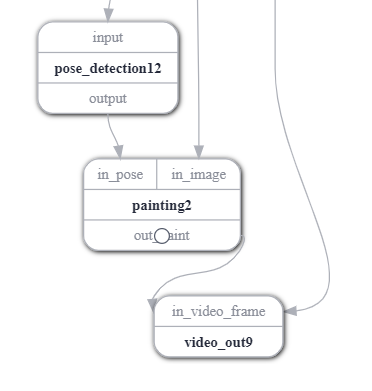
最后,得到的关键点结果与原图送入作画单元,作画结果送入视频输出单元进行保存:
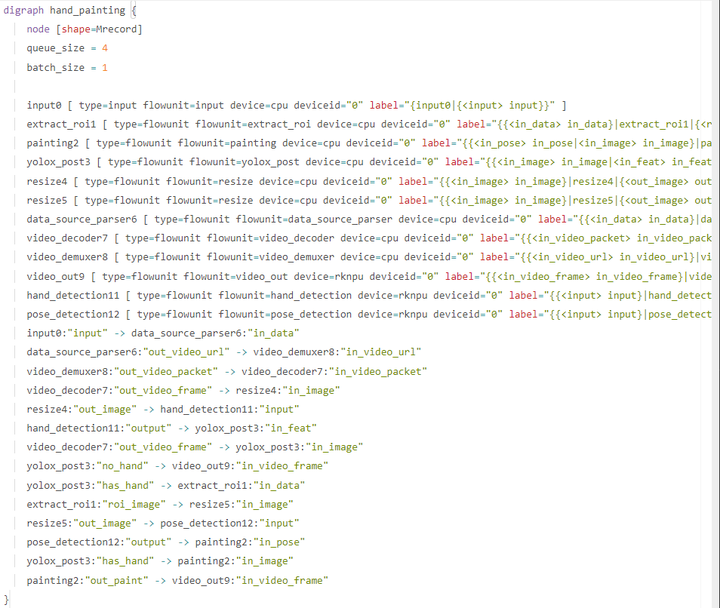
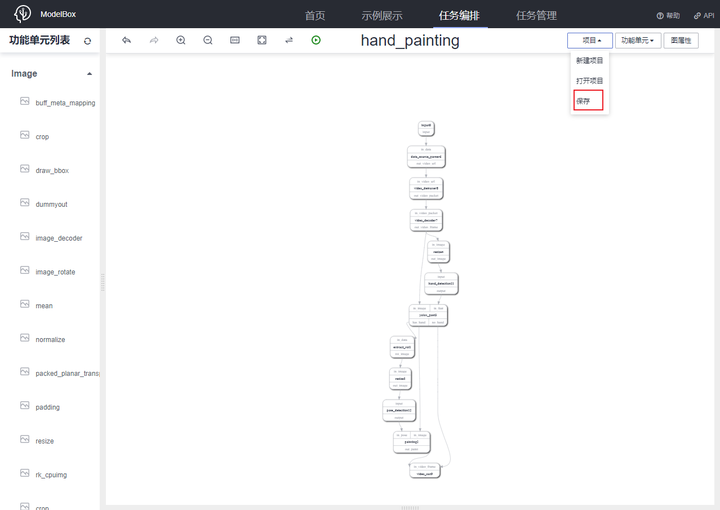
这样,我们就完成了流程图的编排,可以看到在GraphViz区域也出现了完整的图表述:
保存项目,转到VS Code进行每个单元的代码实现:
5.代码补全
可视化编排中,创建的推理单元位于项目的model目录下,通用单元位于etc/flowunit目录下,流程图位于graph目录下,可以看到创建的单元与图都已同步过来:
其中,video_decoder需要指定类型:
video_decoder7 [ type=flowunit flowunit=video_decoder device=rknpu, deviceid="0", pix_fmt=bgr label="{{<in_video_packet> in_video_packet}|video_decoder7|{<out_video_frame> out_video_frame}}" ]
推理单元
首先完善推理单元,对于推理功能单元,只需要提供独立的toml配置文件,指定推理功能单元的基本属性即可,目录结构为:
[flowunit-name]
 |---[flowunit-name].toml #推理功能单元配置
 |---[model].rknn #模型文件
 |---[infer-plugin].so       #推理自定义插件
ModelBox框架在初始化时,会扫描目录中的toml后缀的文件,并读取相关的推理功能单元信息。[infer-plugin].so是推理所需插件,推理功能单元支持加载自定义插件,开发者可以实现自定义算子。
将模型拷入对应文件夹,以hand_detection为例我们看一下推理功能单元配置文件:
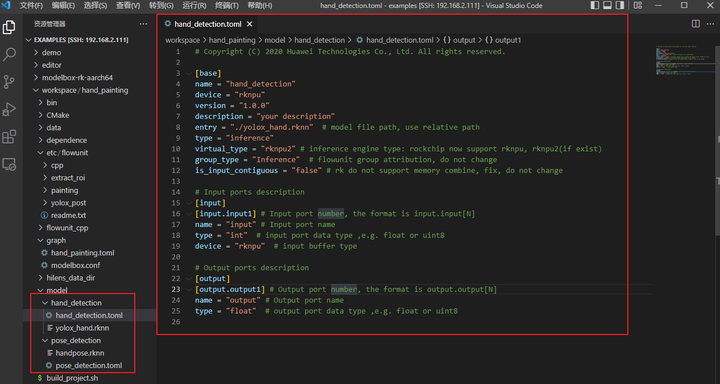
配置文件中有一些单元类型、模型名称、输入输出的基本配置,可以酌情修改。
通用单元
Python通用单元需要提供独立的toml配置文件,指定python功能单元的基本属性。一般情况,目录结构为:
[FlowUnitName]
 |---[FlowUnitName].toml
 |---[FlowUnitName].py
 |---xxx.py
相较于推理单元而言,通用单元不但有配置文件,还需要完善具体的功能代码,以yolox_post为例,首先是功能单元配置文件:
# Copyright (c) Huawei Technologies Co., Ltd. 2022. All rights reserved.
# Basic config
[base]
name = "yolox_post" # The FlowUnit name
device = "cpu" # The flowunit runs on cpu
version = "1.0.0" # The version of the flowunit
type = "python" # Fixed value, do not change
description = "description" # The description of the flowunit
entry = "yolox_post@yolox_postFlowUnit" # Python flowunit entry function
group_type = "generic"  # flowunit group attribution, change as input/output/image ...
# Flowunit Type
stream = false # Whether the flowunit is a stream flowunit
condition = true # Whether the flowunit is a condition flowunit
collapse = false # Whether the flowunit is a collapse flowunit
collapse_all = false # Whether the flowunit will collapse all the data
expand = false #  Whether the flowunit is a expand flowunit
# The default Flowunit config
[config]
item = "value"
# Input ports description
[input]
[input.input1] # Input port number, the format is input.input[N]
name = "in_image" # Input port name
type = "uint8"  # input port data type ,e.g. float or uint8
device = "cpu"  # input buffer type
[input.input2] # Input port number, the format is input.input[N]
name = "in_feat" # Input port name
type = "uint8"  # input port data type ,e.g. float or uint8
device = "cpu"  # input buffer type
# Output ports description
[output]
[output.output1] # Output port number, the format is output.output[N]
name = "has_hand" # Output port name
type = "float"  # output port data type ,e.g. float or uint8
[output.output2] # Output port number, the format is output.output[N]
name = "no_hand" # Output port name
type = "float"  # output port data type ,e.g. float or uint8
Basic config是一些单元名等基本配置,Flowunit Type是功能单元类型,yolox_post是一个条件单元,所以可以看到condition为true,此外还有一些展开、归拢等性质,可以在AI Gallery ModelBox)板块下看到更多案例。
config为单元需要配置的一些属性,如本单元需要一些特征图size、阈值等信息,所以在配置文件中修改config为:
[config]
net_h = 320
net_w = 320
num_classes = 2
conf_threshold = 0.5
iou_threshold = 0.5
此外,输入输出type根据实际逻辑可能进行一些修改:
# Input ports description
[input]
[input.input1] # Input port number, the format is input.input[N]
name = "in_image" # Input port name
type = "uint8"  # input port data type ,e.g. float or uint8
device = "cpu"  # input buffer type
[input.input2] # Input port number, the format is input.input[N]
name = "in_feat" # Input port name
type = "float"  # input port data type ,e.g. float or uint8
device = "cpu"  # input buffer type
# Output ports description
[output]
[output.output1] # Output port number, the format is output.output[N]
name = "has_hand" # Output port name
type = "uint8"  # output port data type ,e.g. float or uint8
[output.output2] # Output port number, the format is output.output[N]
name = "no_hand" # Output port name
type = "uint8"  # output port data type ,e.g. float or uint8
接下来,我们查看yolox_post.py,可以看到创建单元时已经生成了基本接口:
# Copyright (c) Huawei Technologies Co., Ltd. 2022. All rights reserved.
#!/usr/bin/env python
# -*- coding: utf-8 -*-
import _flowunit as modelbox
class yolox_postFlowUnit(modelbox.FlowUnit):
 # Derived from modelbox.FlowUnit
 def __init__(self):
 super().__init__()
 def open(self, config):
 # Open the flowunit to obtain configuration information
 return modelbox.Status.StatusCode.STATUS_SUCCESS
 def process(self, data_context):
 # Process the data
 in_data = data_context.input("in_1")
 out_data = data_context.output("out_1")
 # yolox_post process code.
 # Remove the following code and add your own code here.
 for buffer in in_data:
            response = "Hello World " + buffer.as_object()
            result = response.encode('utf-8').strip()
 add_buffer = modelbox.Buffer(self.get_bind_device(), result)
 out_data.push_back(add_buffer)
 return modelbox.Status.StatusCode.STATUS_SUCCESS
 def close(self):
 # Close the flowunit
 return modelbox.Status()
 def data_pre(self, data_context):
 # Before streaming data starts
 return modelbox.Status()
 def data_post(self, data_context):
 # After streaming data ends
 return modelbox.Status()
 def data_group_pre(self, data_context):
 # Before all streaming data starts
 return modelbox.Status()
 def data_group_post(self, data_context):
 # After all streaming data ends
 return modelbox.Status()
如果功能单元的工作模式是stream = false时,功能单元会调用open、process、close接口;如果功能单元的工作模式是stream = true时,功能单元会调用open、data_group_pre、data_pre、process、data_post、data_group_post、close接口;用户可根据实际需求实现对应接口。
根据单元性质,我们主要需要完善open、process接口:
import _flowunit as modelbox
import numpy as np
from yolox_utils import postprocess, expand_bboxes_with_filter, draw_color_palette
class yolox_postFlowUnit(modelbox.FlowUnit):
 # Derived from modelbox.FlowUnit
 def __init__(self):
 super().__init__()
 def open(self, config):
 self.net_h = config.get_int('net_h', 320)
 self.net_w = config.get_int('net_w', 320)
 self.num_classes = config.get_int('num_classes', 2)
 self.num_grids = int((self.net_h / 32) * (self.net_w / 32)) * (1 + 2*2 + 4*4)
 self.conf_thre = config.get_float('conf_threshold', 0.3)
 self.nms_thre = config.get_float('iou_threshold', 0.4)
 return modelbox.Status.StatusCode.STATUS_SUCCESS
 def process(self, data_context):
 modelbox.info("YOLOX POST")
 in_image = data_context.input("in_image")
 in_feat = data_context.input("in_feat")
 has_hand = data_context.output("has_hand")
 no_hand = data_context.output("no_hand")
 for buffer_img, buffer_feat in zip(in_image, in_feat):
            width = buffer_img.get('width')
            height = buffer_img.get('height')
            channel = buffer_img.get('channel')
 img_data = np.array(buffer_img.as_object(), copy=False)
 img_data = img_data.reshape((height, width, channel))
 feat_data = np.array(buffer_feat.as_object(), copy=False)
 feat_data = feat_data.reshape((self.num_grids, self.num_classes + 5))
            ratio = (self.net_h / height, self.net_w / width)
 bboxes = postprocess(feat_data, (self.net_h, self.net_w), self.conf_thre, self.nms_thre, ratio)
            box = expand_bboxes_with_filter(bboxes, width, height)
 if box:
 buffer_img.set("bboxes", box)
 has_hand.push_back(buffer_img)
 else:
 draw_color_palette(img_data)
 img_buffer = modelbox.Buffer(self.get_bind_device(), img_data)
 img_buffer.copy_meta(buffer_img)
 no_hand.push_back(img_buffer)
 return modelbox.Status.StatusCode.STATUS_SUCCESS
 def close(self):
 # Close the flowunit
 return modelbox.Status()
可以看到,在open中我们进行了一些参数获取,process进行逻辑处理,输入输出可以通过data_context来获取,值得注意的是输出时我们返回的是图,在检测到手时为图附加了检测框信息,该信息可以被下一单元获取。
同样的,完善其余通用功能单元,具体可以参考我们提供的代码。
应用运行
我们需要准备一个mp4文件拷贝到data文件夹下,我们提供了测试视频hand.mp4,然后打开工程目录下bin/mock_task.toml文件,修改其中的任务输入和任务输出配置为如下内容:
# 任务输入,mock模拟目前仅支持一路rtsp或者本地url
# rtsp摄像头,type = "rtsp", url里面写入rtsp地址
# 其它用"url",比如可以是本地文件地址, 或者httpserver的地址,(摄像头 url = "0")
[input]
type = "url"
url = "../data/hand.mp4"
# 任务输出,目前仅支持"webhook", 和本地输出"local"(输出到屏幕,url="0", 输出到rtsp,填写rtsp地址)
# (local 还可以输出到本地文件,这个时候注意,文件可以是相对路径,是相对这个mock_task.toml文件本身)
[output]
type = "local"
url = "../hilens_data_dir/paint.mp4"
配置好后在工程路径下执行build_project.sh进行工程构建:
rock@rock-3a:~/lxy/examples$ cd workspace/hand_painting/
rock@rock-3a:~/lxy/examples/workspace/hand_painting$ ./build_project.sh
dos2unix: converting file /home/rock/lxy/examples/workspace/hand_painting/graph/hand_painting.toml to Unix format...
dos2unix: converting file /home/rock/lxy/examples/workspace/hand_painting/graph/modelbox.conf to Unix format...
dos2unix: converting file /home/rock/lxy/examples/workspace/hand_painting/etc/flowunit/extract_roi/extract_roi.toml to Unix format...
dos2unix: converting file /home/rock/lxy/examples/workspace/hand_painting/etc/flowunit/painting/painting.toml to Unix format...
dos2unix: converting file /home/rock/lxy/examples/workspace/hand_painting/etc/flowunit/yolox_post/yolox_post.toml to Unix format...
dos2unix: converting file /home/rock/lxy/examples/workspace/hand_painting/model/hand_detection/hand_detection.toml to Unix format...
dos2unix: converting file /home/rock/lxy/examples/workspace/hand_painting/model/pose_detection/pose_detection.toml to Unix format...
dos2unix: converting file /home/rock/lxy/examples/workspace/hand_painting/bin/mock_task.toml to Unix format...
build success: you can run main.sh in ./bin folder
rock@rock-3a:~/lxy/examples/workspace/hand_painting$
构建完成后运行项目:
rock@rock-3a:~/lxy/examples/workspace/hand_painting$ ./bin/main.sh
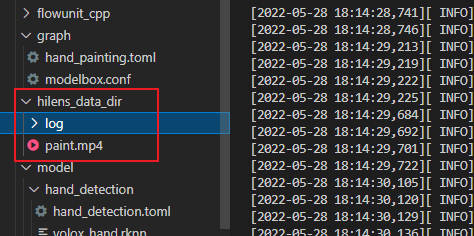
等待稍许即可以在hilens_data_dir文件夹下看到运行结果:
除了mp4外我们也支持很多其他类型的输入输出,ModelBox PC TOOL也提供了推流与拉流功能,选择输入实时视频流,启动:
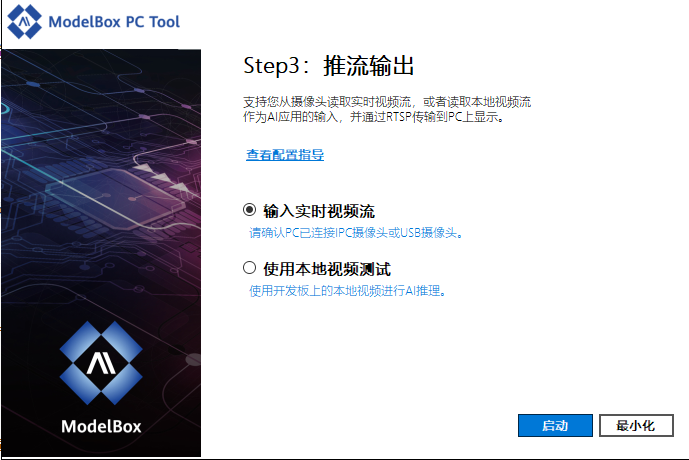
运行程序时配置输出地址为推流地址,即可在本机网页中查看到运行结果:

如果需要对应用进行性能评估,只需要在流程图配置文件中开启profile:
[profile]
profile=true # 启用profile
trace=true # 启用traceing
dir="/tmp/modelbox/perf" # 设置跟踪文件路径
配置启动后,启动运行流程图,profile会每隔60s记录一次统计信息,trace会在任务执行过程中和结束时,输出统计信息。
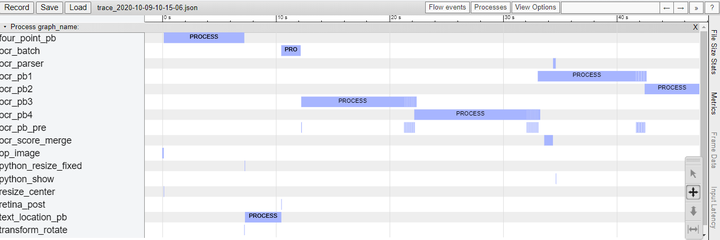
运行流程图后,会生成性能相关的json文件,通过将json文件加载到浏览器中即可查看timeline信息。
- 打开chrome浏览器。
- 浏览器中输入chrome://tracing/。
- 点击界面中的Load按钮,加载trace的json文件。
- 加载成功后,将看到类似下面的timeline视图:
打包部署
打包
调试完成后,同样可以通过create.py脚本将应用打包发布:
./create.py -t rpm -n hand_painting
控制台中输出:
sdk version is modelbox-rk-aarch64-1.0.8.8
call mb-pkg-tool pack [folder] > [rpm file] to building rpm, waiting...
success: create hand_painting.rpm in /home/rock/lxy/examples/workspace/hand_painting
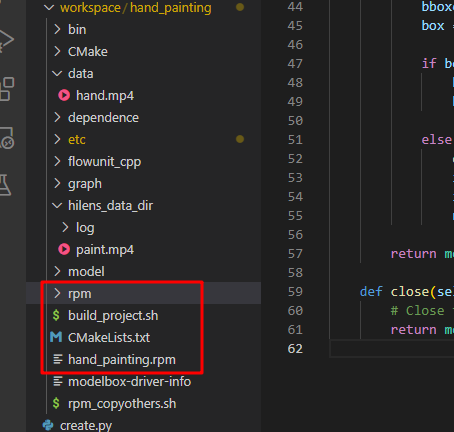
等待稍许,可以看到项目工程下已经生成了rpm文件夹和打包好的应用:
部署
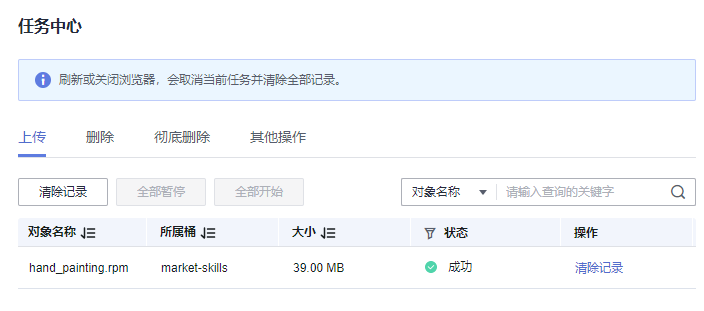
将打包好的应用上传至华为云账号下的obs桶中:
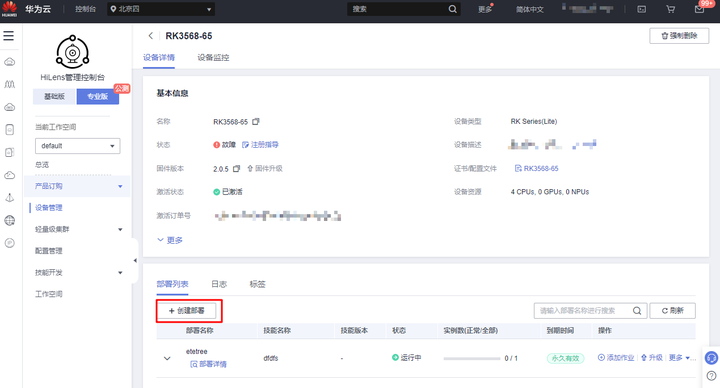
在专业版设备管理中找到开发板,点击创建部署:
技能包选择刚刚上传的应用:
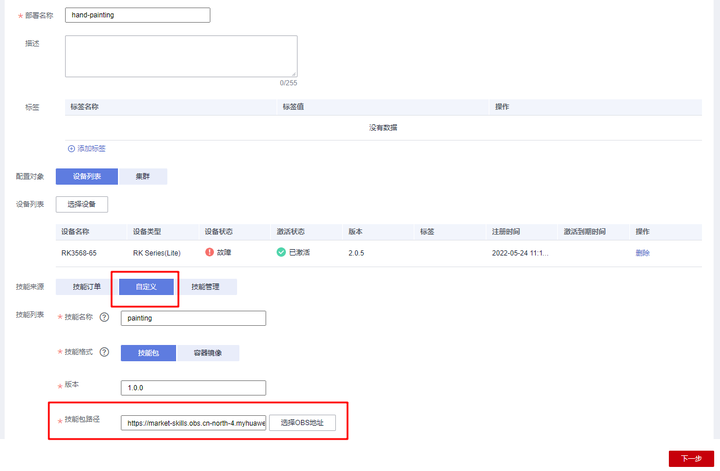
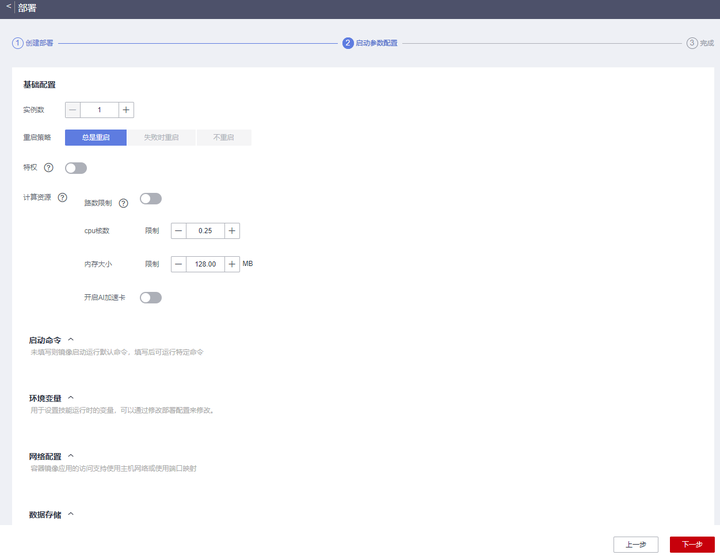
如果需要,可以配置一些启动参数,否则默认完成即可:
这样我们就已经完成了一个AI应用,从模型训练到转换到开发到部署的全部流程。关于ModelBox核心概念、功能单元和流程图开发的更多介绍,可查看ModelBox手册。
标签:隔空,天呐,self,作画,hand,type,input,data,单元 来源: https://www.cnblogs.com/huaweiyun/p/16658152.html