django自带的序列化组件,批量数据操作,分页器,Forms组件
作者:互联网
SweetAlert前端插件
Github仓库:https://github.com/lipis/bootstrap-sweetalert(可能会很慢)

官网:https://sweetalert.js.org/

CDN:<script src="https://unpkg.com/sweetalert/dist/sweetalert.min.js"></script>(官方的CDN)

弹出一个alert的写法:
    swal("恭喜","添加成功","success"); 第一个参数是title,第二个参数是text,第三个参数是提
醒类型(success,error,warning,input),三个参数皆非必写项。最简便写法:swal("");就弹出一个
框,上面有个确定按钮。不可写成:swal();
第二种写法:
       swal({
                title:"恭喜",
                text:"添加成功",
                type:"success"

        });
html代码
基本信息:<button id="demo1">试一试</button>  <br />

带有文字的标题:<button id="demo2">试一试</button>  <br />

成功提示:<button id="demo3">试一试</button>  <br />

带有“确认”按钮的功能的警告消息:<button id="demo4">试一试</button>  <br />

通过传递参数,您可以执行一些其他的事情比如“取消”。:<button id="demo5">试一试</button>  <br />

一个有自定义图标的消息:<button id="demo6">试一试</button>  <br />

自定义HTML信息:<button id="demo7">试一试</button>  <br />

自动关闭模态框:<button id="demo8">试一试</button>  <br />

更换“提示”功能: <button id="demo9">试一试</button>  <br />

使用加载程序(例如,用于AJAX请求): <button id="demo10">试一试</button>  <br />
JS代码
document.getElementById("demo1").onclick = function() {
	swal("这是一个信息提示框!")
};

document.getElementById("demo2").onclick = function() {
	swal("这是一个信息提示框!", "很漂亮,不是吗?")
};

document.getElementById("demo3").onclick = function() {
	swal("干得好", "你点击了按钮!", "success")
};

document.getElementById("demo4").onclick = function() {
	swal({
		title: "你确定?",
		text: "您将无法恢复这个虚构的文件!",
		type: "warning",
		showCancelButton: true,
		confirmButtonColor: "#DD6B55",
		confirmButtonText: "是的,删除!",
		closeOnConfirm: false
	}, function() {
		swal("删除!", "您的虚构文件已被删除!", "success")
	})
};

document.getElementById("demo5").onclick = function() {
	swal({
		title: "你确定?",
		text: "您将无法恢复这个虚构的文件!",
		type: "warning",
		showCancelButton: true,
		confirmButtonColor: "#DD6B55",
		confirmButtonText: "是的,删除!",
		cancelButtonText: "不,取消",
		closeOnConfirm: false,
		closeOnCancel: false
	}, function(isConfirm) {
		if (isConfirm) {
			swal("删除!", "您的虚构文件已被删除!", "success")
		} else{
			swal("取消!", "您的虚构文件是安全的!", "error")
		}
	})
};

document.getElementById("demo6").onclick = function() {
	swal({
		title: "Sweet!",
		text: "这里是自定义图像!",
		imageUrl: "img/thumbs-up.jpg"
	})
};

document.getElementById("demo7").onclick = function() {
	swal({
		title: "HTML <small>标题</small>!",
		text: "A custom <span style='color:pink'>html<span> message.",
		html: true
	})
};

document.getElementById("demo8").onclick = function() {
	swal({
		title: "自动关闭警报!",
		text: "2秒后自动关闭",
		timer: 2000,
		showConfirmButton: false
	})
};

document.getElementById("demo9").onclick = function() {
	swal({
		title: "请输入!",
		text: "填写一些信息",
		type: "input",
		showCancelButton: true,
		closeOnConfirm: false,
		animation: "slide-from-top",
		inputPlaceholder: "请输入..."
	}, function(inputValue) {
		if (inputValue === false) {
			return false;
		}
		if (inputValue === "") {
			swal.showInputError("内容不能为空!");
			return false;
		}

		swal("Nice!", "你输入的是:" + inputValue, "success")
	})
};

document.getElementById("demo10").onclick = function() {
	swal({
		title: "AJAX请求实例",
		text: "提交运行Ajax请求",
		type: "info",
		showCancelButton: true,
		closeOnConfirm: false,
		showLoaderOnConfirm: true
	}, function() {
		setTimeout(function() {
			swal("AJAX请求完成!");
		}, 2000)
	})
};
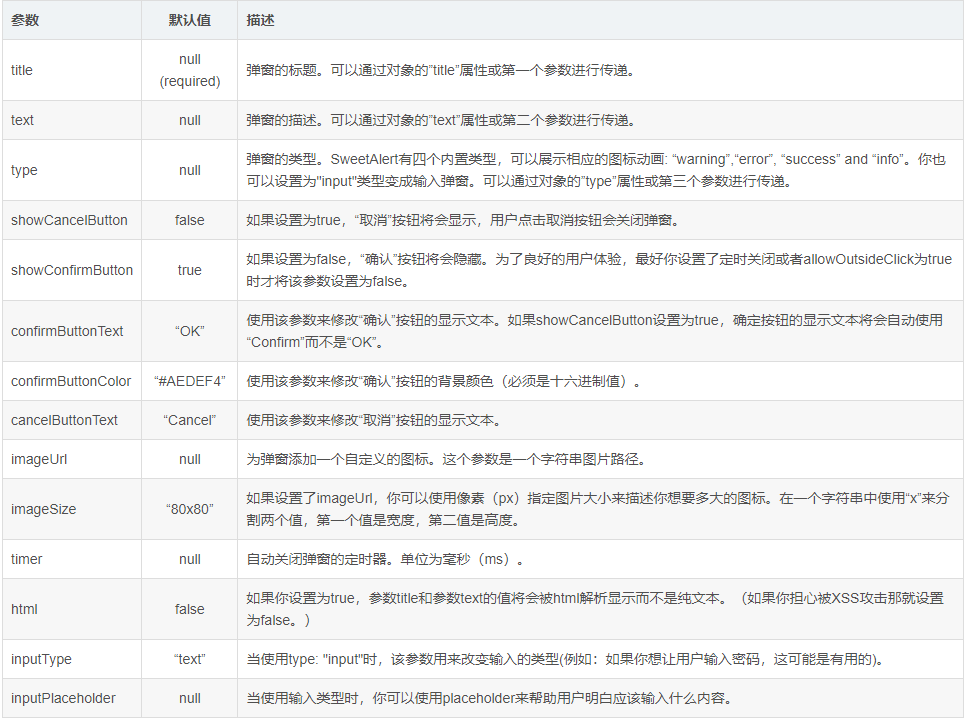
参数:

Django序列化组件Serializers
序列化:从Django数据库—Django的模型—JSON/XML等文本格式
  例如:我们在django的ORM中获取到的数据默认是模型对象,但是模型对象数据无法直接提供给前
端或别的平台使用,所以我们需要把数据进行序列化,变成字符串或者json数据,提供给别人。

反序列化:上面过程的反方向
  例如:前端js提供过来的json数据,对于python而言就是字符串,我们需要进行反序列化换
成模型类对象,这样我们才能把数据保存到数据库中。
1.导入模块
  from django.core import serializers
后端:
  def ser(request):
    # 前后端分离之后django orm产生的queryset无法直接被前端识别 还是需要json格式数据(硬通货)
    # user_obj = models.User.objects.all()
    # data = []
    # for i in user_obj:
    #     data.append([{
    #         'id' : i.id,
    #         'username':i.username,
    #         'password':i.password,
    #     }])
    # return JsonResponse(data,safe=False)
    '''
        没使用序列化前,我们需要先将使用的数据对象查询出来,然后再定义一个列表,再将每一
        个数据对象的信息封装在字典中,然后添加到列表中,最后再通过JsonResponse传给前端。
    '''
    user_obj = models.User.objects.all()
    res = serializers.serialize('json',user_obj)
    return render(request,'serializers.html',locals())
Django批量保存数据bulk_create方法
每创建一个对象都保存一次数据,会增加开销,如果先批量创建对象,最后保存一次到数据库,就使用bulk_create方法
    '''批量插入'''
def many_data(request):
    book_list = []
    for i in range(100000):
        # 先用类产生一个对象
        source_book_obj = models.Books(title=f'第{i}本书')
        # 将对象追加到列表中
        book_list.append(source_book_obj)
    models.Books.objects.bulk_create(book_list)  # 批量插入
    messages.info(request, '批量添加{}条数据完成!'.format(nums))
    book_queryset = models.Books.objects.all()
    return render(request,'many_data.html',locals())
自定义分页器
代码封装
class Pagination(object):
    def __init__(self, current_page, all_count, per_page_num=2, pager_count=11):
        """
        封装分页相关数据
        :param current_page: 当前页
        :param all_count:    数据库中的数据总条数
        :param per_page_num: 每页显示的数据条数
        :param pager_count:  最多显示的页码个数
        """
        try:
            current_page = int(current_page)
        except Exception as e:
            current_page = 1

        if current_page < 1:
            current_page = 1

        self.current_page = current_page

        self.all_count = all_count
        self.per_page_num = per_page_num

        # 总页码
        all_pager, tmp = divmod(all_count, per_page_num)
        if tmp:
            all_pager += 1
        self.all_pager = all_pager

        self.pager_count = pager_count
        self.pager_count_half = int((pager_count - 1) / 2)

    @property
    def start(self):
        return (self.current_page - 1) * self.per_page_num

    @property
    def end(self):
        return self.current_page * self.per_page_num

    def page_html(self):
        # 如果总页码 < 11个:
        if self.all_pager <= self.pager_count:
            pager_start = 1
            pager_end = self.all_pager + 1
        # 总页码  > 11
        else:
            # 当前页如果<=页面上最多显示11/2个页码
            if self.current_page <= self.pager_count_half:
                pager_start = 1
                pager_end = self.pager_count + 1

            # 当前页大于5
            else:
                # 页码翻到最后
                if (self.current_page + self.pager_count_half) > self.all_pager:
                    pager_end = self.all_pager + 1
                    pager_start = self.all_pager - self.pager_count + 1
                else:
                    pager_start = self.current_page - self.pager_count_half
                    pager_end = self.current_page + self.pager_count_half + 1

        page_html_list = []
        # 添加前面的nav和ul标签
        page_html_list.append('''
                    <nav aria-label='Page navigation>'
                    <ul class='pagination'>
                ''')
        first_page = '<li><a href="?page=%s">首页</a></li>' % (1)
        page_html_list.append(first_page)

        if self.current_page <= 1:
            prev_page = '<li class="disabled"><a href="#">上一页</a></li>'
        else:
            prev_page = '<li><a href="?page=%s">上一页</a></li>' % (self.current_page - 1,)

        page_html_list.append(prev_page)

        for i in range(pager_start, pager_end):
            if i == self.current_page:
                temp = '<li class="active"><a href="?page=%s">%s</a></li>' % (i, i,)
            else:
                temp = '<li><a href="?page=%s">%s</a></li>' % (i, i,)
            page_html_list.append(temp)

        if self.current_page >= self.all_pager:
            next_page = '<li class="disabled"><a href="#">下一页</a></li>'
        else:
            next_page = '<li><a href="?page=%s">下一页</a></li>' % (self.current_page + 1,)
        page_html_list.append(next_page)

        last_page = '<li><a href="?page=%s">尾页</a></li>' % (self.all_pager,)
        page_html_list.append(last_page)
        # 尾部添加标签
        page_html_list.append('''
                                           </nav>
                                           </ul>
                                       ''')
        return ''.join(page_html_list)
后端
from utils import mypage
#获取数据对象
book_queryset = models.Books.objects.all()
# 产生分页器对象
#current_page:用户想要查看的页码
#all_count:查询出数据的数量
page_obj = mypage.Pagination(current_page=request.GET.get('page'),all_count=book_queryset.count())
# 产生分页数据对象
page_queryset = book_queryset[page_obj.start:page_obj.end]
return render(request,'many_data.html',locals())
前端
'''使用了Bootstrap'''
<div class="container">
    <div class="row">
        <div class="col-md-8 col-md-offset-2">
            {% for book in page_queryset %}
            <p>{{ book.title }}</p>
            {% endfor %}
            {{ page_obj.page_html|safe }}
        </div>
    </div>
</div>
Forms组件
应用场景:网页注册页面,获取用户输入的用户名和密码,判断用户名和密码中不能包含规定的字段和字符(比如:黄,赌,毒),如果有,不给予页面跳转并提示错误
使用
models.py
首先,创建一个类
from django import forms

class MyRegForm(forms.form):
    #froms 里面的max_length代表的意思是最大8位数,min_ength代表的意思是最小3位数
    username = forms.CharField(max_length=8,min_length=3)
    password = forms.CharField(max_length=8,min_length=3)
    #email字段必须填写符合邮箱格式的数据
    email = forms.EmailField()
校验数据
# 1.传入待校验的数据  用自己写的类 传入字典格式的待校验的数据
form_obj = views.MyRegForm({'username':'jason','password':'12','email':'123456'})

# 2.判断数据是否符合校验规则
form_obj.is_valid()  # 该方法只有在所有的数据全部符合校验规则才会返回True
False

# 3.如何获取校验之后通过的数据
form_obj.cleaned_data
{'username': 'jason'}

# 4.如何获取校验失败及失败的原因
form_obj.errors
{
    'password': ['Ensure this value has at least 3 characters (it has 2).'],
    'email': ['Enter a valid email address.']
}

# 5.注意 forms组件默认所有的字段都必须传值 也就意味着传少了是肯定不行的 而传多了则没有任何关系 只校验类里面写的字段 多传的直接忽略了
form_obj = views.MyRegForm({'username':'jason','password':'123456'})
form_obj.is_valid()
Out[12]: False
form_obj.errors
Out[18]: {'email': ['This field is required.']}
form_obj = views.MyRegForm({'username':'jason','password':'123456',"email":'123@qq.com',"hobby":'hahahaha'})
form_obj.is_valid()
Out[14]: True
form_obj.cleaned_data
Out[15]: {'username': 'jason', 'password': '123456', 'email': '123@qq.com'}
form_obj.errors
Out[16]: {}
渲染页面
#forms组件只帮你渲染获取用户输入(输入 选择 下拉 文件)的标签 不渲染按钮和form表单标签
#渲染出来的每一个input提示信息都是类中字段首字母大写

1.
<p>第一种渲染方式:多个p标签  本地测试方便 封装程度太高了 不便于扩展</p>
    {{ form_obj.as_p }}
    {{ form_obj.as_ul }}
    {{ form_obj.as_table }}


2.
<p>第二种渲染方式:  扩展性较高 书写较为繁琐</p>
{{ form_obj.username.label}} # 文本提示
{{ form_obj.username }}# 获取用户数据的标签
{{ form_obj.password.label }} # 文本提示
{{ form_obj.password }}# 获取用户数据的标签
{{ form_obj.email.label }} # 文本提示
{{ form_obj.email }}# 获取用户数据的标签

3.
<p>第三种渲染方式  推荐使用</p>
{% for form in form_obj %}
<p> {{ form.label }}{{ form }}</p>
{% endfor %}
展示信息
"""
forms类中填写的校验性参数前端浏览器会识别并添加校验操作
但是前端的校验是可有可无的 不能指望它!!!   后端必须要有

form表单可以取消浏览器自动添加校验功能的操作
	<form action="" method="post" novalidate></form>
"""
#如何渲染错误信息
#前端
<form action="" method="post" novalidate>
{% for form in form_obj %}
<p>
{{ form.label }}{{ form }}
<span>{{ form.errors.0 }}</span>  # 这个是模板语法 索引不会出现超出报错
</p>
{% endfor %}
<input type="submit">
</form>

#后端
def reg(request):
    # 1 先生成一个空的类对象
    form_obj = MyRegForm()
    if request.method == 'POST':
        # 3 获取用户数据并交给forms组件校验  request.POST
        form_obj = MyRegForm(request.POST)
        # 4 获取校验结果
        if form_obj.is_valid():
            return HttpResponse('数据没问题')
        else:
            # 5 获取校验失败的字段和提示信息
            print(form_obj.errors)

    # 2 直接将该对象传给前端页面
    return render(request,'reg.html',locals())

提示信息可以自定义
	username = forms.CharField(min_length=3,max_length=8,label='用户名',
               error_messages={
                         'min_length':'用户名最短3位',
                          'max_length':'用户名最长8位',
                          'required':'用户名必填'
               })
标签:obj,form,swal,self,django,组件,序列化,pager,page 来源: https://www.cnblogs.com/chunyouqudongwuyuan/p/16293219.html