springboot整合分布式任务调度xxl-job
作者:互联网
此 demo 主要演示了 Spring Boot 如何集成 XXL-JOB 实现分布式定时任务,并提供绕过 xxl-job-admin 对定时任务的管理的方法,包括定时任务列表,触发器列表,新增定时任务,删除定时任务,停止定时任务,启动定时任务,修改定时任务,手动触发定时任务。
xxl-job-admin调度中心
-
克隆 调度中心代码
$ git clone https://github.com/xuxueli/xxl-job.git
-
修改 application.properties
  server.port=8084
  spring.datasource.url=jdbc:mysql://127.0.0.1:3306/xxl_job?Unicode=true&characterEncoding=UTF-8&useSSL=false
  spring.datasource.username=root
  spring.datasource.password=root
启动xxl-job-admin调度中心
Run XxlJobAdminApplication
在浏览器输入: http://localhost:8084/xxl-job-admin
默认用户名密码:admin/admin
编写执行器项目
pom.xml
<dependency>
        <groupId>org.springframework.boot</groupId>
        <artifactId>spring-boot-starter-web</artifactId>
    </dependency>
    <dependency>
        <groupId>org.springframework.boot</groupId>
        <artifactId>spring-boot-configuration-processor</artifactId>
        <optional>true</optional>
    </dependency>
    <dependency>
        <groupId>com.xuxueli</groupId>
        <artifactId>xxl-job-core</artifactId>
        <version>2.1.2</version>
    </dependency>
    <!-- https://mvnrepository.com/artifact/org.springframework.cloud/spring-cloud-commons -->
    <dependency>
        <groupId>org.springframework.cloud</groupId>
        <artifactId>spring-cloud-commons</artifactId>
        <version>2.1.1.RELEASE</version>
    </dependency>
    <dependency>
        <groupId>org.apache.commons</groupId>
        <artifactId>commons-lang3</artifactId>
        <version>3.7</version>
    </dependency>
    <dependency>
        <groupId>org.projectlombok</groupId>
        <artifactId>lombok</artifactId>
        <optional>true</optional>
    </dependency>
    <!--改造成API的方式时需要-->
    <dependency>
        <groupId>cn.hutool</groupId>
        <artifactId>hutool-all</artifactId>
        <version>5.1.0</version>
    </dependency>
    <dependency>
        <groupId>com.google.guava</groupId>
        <artifactId>guava</artifactId>
        <version>28.2-jre</version>
    </dependency>
编写配置类
- XxlJobProps
/**
 * Created by haoxiaoyong on 2020/1/10 下午 4:52
 * e-mail: hxyHelloWorld@163.com
 * github:https://github.com/haoxiaoyong1014
 * Blog: www.haoxiaoyong.cn
 */
@Data
@ConfigurationProperties(prefix = "xxl.job")
public class XxlJobProps {

    /**
     * 调度中心配置
     */
    private XxlJobAdminProps admin;

    /**
     * 执行器配置
     */
    private XxlJobExecutorProps executor;

    /**
     * 与调度中心交互的accessToken
     */
    private String accessToken;

    @Data
    public static class XxlJobAdminProps {
        /**
         * 调度中心地址
         */
        private String address;
    }
    @Data
    public static class XxlJobExecutorProps {
        /**
         * 执行器名称
         */
        private String appName;

        /**
         * 执行器 IP
         */
        private String ip;

        /**
         * 执行器端口
         */
        private int port;

        /**
         * 执行器日志
         */
        private String logPath;

        /**
         * 执行器日志保留天数
         */
        private int logRetentionDays;
    }

}
- 配置文件
# web port
server:
  port: 8082

### xxl-job admin address list, such as "http://address" or "http://address01,http://address02"
xxl:
  job:
    # 执行器通讯TOKEN [选填]:非空时启用;
    access-token:
    admin:
     # 调度中心部署跟地址 [选填]:如调度中心集群部署存在多个地址则用逗号分隔。执行器将会使用该地址进行"执行器心跳注册"和"任务结果回调";为空则关闭自动注册;
      address: http://127.0.0.1:8084/xxl-job-admin
    executor:
      # 执行器AppName [选填]:执行器心跳注册分组依据;为空则关闭自动注册
      app-name: xxl-job-executor-sample
      # 执行器IP [选填]:默认为空表示自动获取IP,多网卡时可手动设置指定IP,该IP不会绑定Host仅作为通讯实用;地址信息用于 "执行器注册" 和 "调度中心请求并触发任务";
      ip:
      # 执行器端口号 [选填]:小于等于0则自动获取;默认端口为9999,单机部署多个执行器时,注意要配置不同执行器端口;
      port: 9999
      # 执行器运行日志文件存储磁盘路径 [选填] :需要对该路径拥有读写权限;为空则使用默认路径;
      log-path: /data/applogs/xxl-job/jobhandler
      # 执行器日志保存天数 [选填] :值大于3时生效,启用执行器Log文件定期清理功能,否则不生效;
      log-retention-days: 30
- 编写自动装配类 JobConfig.java
@Slf4j
@Configuration
@EnableConfigurationProperties(XxlJobProps.class)
@RequiredArgsConstructor(onConstructor_ = @Autowired)
public class JobConfig {

    private final XxlJobProps xxlJobProps;
    private final InetUtils inetUtils;

    @Bean
    public XxlJobSpringExecutor xxlJobExecutor() {
        log.info(">>>>>>>>>>> xxl-job config init.");
        XxlJobSpringExecutor xxlJobSpringExecutor = new XxlJobSpringExecutor();
        xxlJobSpringExecutor.setAdminAddresses(xxlJobProps.getAdmin().getAddress());
        xxlJobSpringExecutor.setAppName(xxlJobProps.getExecutor().getAppName());
        String ip = xxlJobProps.getExecutor().getIp();
        if (StringUtils.isBlank(ip)) {
            ip = inetUtils.findFirstNonLoopbackHostInfo().getIpAddress();
        }
        log.info("IP地址为: " + ip);
        log.info("AdminAddresses地址为: " + xxlJobProps.getAdmin().getAddress());
        xxlJobSpringExecutor.setIp(ip);
        xxlJobSpringExecutor.setPort(xxlJobProps.getExecutor().getPort());
        xxlJobSpringExecutor.setAccessToken(xxlJobProps.getAccessToken());
        xxlJobSpringExecutor.setLogPath(xxlJobProps.getExecutor().getLogPath());
        xxlJobSpringExecutor.setLogRetentionDays(xxlJobProps.getExecutor().getLogRetentionDays());
        return xxlJobSpringExecutor;
    }
}
编写具体的定时逻辑 TestJobHandler
@Component
public class TestJobHandler {

    @Autowired
    private InService inService;

    @XxlJob("jobHandler")
    public ReturnT<String> execute(String param) throws InterruptedException {
        for (int i = 0; i < 5; i++) {
            XxlJobLogger.log("beat at:" + i);
            TimeUnit.SECONDS.sleep(2);
        }

        inService.xxl();
       return ReturnT.SUCCESS;
    }
}
@Service
public class InService {

    public void xxl(){
        System.out.println("Hello World......");
    }

}
启动执行器 JobApplication
-
将启动的执行器添加到调度中心
执行器管理 - 新增执行器
-
添加定时任务
任务管理 - 新增 - 保存
这里的JobHandler要和@XxlJob()注解中的值一致;
-
点击操作,执行一次任务,控制台输出Hello World… 你也可以在ui界面中查看日志
使用API添加定时任务
实际场景中,如果添加定时任务都需要手动在 xxl-job-admin 去操作,这样可能比较麻烦,用户更希望在自己的页面,添加定时任务参数、定时调度表达式,然后通过 API 的方式添加定时任务
克隆调度中心代码
git clone https://github.com/xuxueli/xxl-job/
改造xxl-job-admin
- 在
JobGroupController中新增
	// 添加执行器列表
	@RequestMapping("/list")
	@ResponseBody
    // 去除权限校验
	@PermissionLimit(limit = false)
	public ReturnT<List<XxlJobGroup>> list(){
		return  new ReturnT<>(xxlJobGroupDao.findAll());
	}
-
修改 JobInfoController
// 分别在 pageList、add、update、remove、pause、start、triggerJob 方法上添加注解,去除权限校验
@PermissionLimit(limit = false)
改造执行器项目
-
添加手动触发类
/**
 * Created by haoxiaoyong on 2020/1/11 下午 3:39
 * e-mail: hxyHelloWorld@163.com
 * github:https://github.com/haoxiaoyong1014
 * Blog: www.haoxiaoyong.cn
 */
@Slf4j
@RestController
@RequestMapping("/xxl-job")
@RequiredArgsConstructor(onConstructor_ = @Autowired)
public class ManualOperateController {
    private final static String baseUri = "http://127.0.0.1:8084/xxl-job-admin";
    private final static String JOB_INFO_URI = "/jobinfo";
    private final static String JOB_GROUP_URI = "/jobgroup";

    /**
     * 任务组列表,xxl-job叫做触发器列表
     */
    @GetMapping("/group")
    public String xxlJobGroup() {
        HttpResponse execute = HttpUtil.createGet(baseUri + JOB_GROUP_URI + "/list").execute();
        log.info("【execute】= {}", execute);
        return execute.body();
    }

    /**
     * 分页任务列表
     *
     * @param page 当前页,第一页 -> 0
     * @param size 每页条数,默认10
     * @return 分页任务列表
     */
    @GetMapping("/list")
    public String xxlJobList(Integer page, Integer size) {
        Map<String, Object> jobInfo = Maps.newHashMap();
        jobInfo.put("start", page != null ? page : 0);
        jobInfo.put("length", size != null ? size : 10);
        jobInfo.put("jobGroup", 2);
        jobInfo.put("triggerStatus", -1);

        HttpResponse execute = HttpUtil.createGet(baseUri + JOB_INFO_URI + "/pageList").form(jobInfo).execute();
        log.info("【execute】= {}", execute);
        return execute.body();
    }

    /**
     * 测试手动保存任务
     */
    @GetMapping("/add")
    public String xxlJobAdd() {
        Map<String, Object> jobInfo = Maps.newHashMap();
        jobInfo.put("jobGroup", 2);
        jobInfo.put("jobCron", "0 0/1 * * * ? *");
        jobInfo.put("jobDesc", "手动添加的任务");
        jobInfo.put("author", "admin");
        jobInfo.put("executorRouteStrategy", "ROUND");
        jobInfo.put("executorHandler", "demoTask");
        jobInfo.put("executorParam", "手动添加的任务的参数");
        jobInfo.put("executorBlockStrategy", ExecutorBlockStrategyEnum.SERIAL_EXECUTION);
        jobInfo.put("glueType", GlueTypeEnum.BEAN);

        HttpResponse execute = HttpUtil.createGet(baseUri + JOB_INFO_URI + "/add").form(jobInfo).execute();
        log.info("【execute】= {}", execute);
        return execute.body();
    }

    /**
     * 测试手动触发一次任务
     */
    @GetMapping("/trigger")
    public String xxlJobTrigger() {
        Map<String, Object> jobInfo = Maps.newHashMap();
        jobInfo.put("id", 5);
        jobInfo.put("executorParam", JSONUtil.toJsonStr(jobInfo));

        HttpResponse execute = HttpUtil.createGet(baseUri + JOB_INFO_URI + "/trigger").form(jobInfo).execute();
        log.info("【execute】= {}", execute);
        return execute.body();
    }

    /**
     * 测试手动删除任务
     */
    @GetMapping("/remove")
    public String xxlJobRemove() {
        Map<String, Object> jobInfo = Maps.newHashMap();
        jobInfo.put("id", 4);

        HttpResponse execute = HttpUtil.createGet(baseUri + JOB_INFO_URI + "/remove").form(jobInfo).execute();
        log.info("【execute】= {}", execute);
        return execute.body();
    }

    /**
     * 测试手动停止任务
     */
    @GetMapping("/stop")
    public String xxlJobStop() {
        Map<String, Object> jobInfo = Maps.newHashMap();
        jobInfo.put("id", 4);

        HttpResponse execute = HttpUtil.createGet(baseUri + JOB_INFO_URI + "/stop").form(jobInfo).execute();
        log.info("【execute】= {}", execute);
        return execute.body();
    }

    /**
     * 测试手动启动任务
     */
    @GetMapping("/start")
    public String xxlJobStart() {
        Map<String, Object> jobInfo = Maps.newHashMap();
        jobInfo.put("id", 4);

        HttpResponse execute = HttpUtil.createGet(baseUri + JOB_INFO_URI + "/start").form(jobInfo).execute();
        log.info("【execute】= {}", execute);
        return execute.body();
    }
}
测试
以手动触发一次任务为例
-
启动 xxl-job-admin
-
启动执行器项目
-
访问
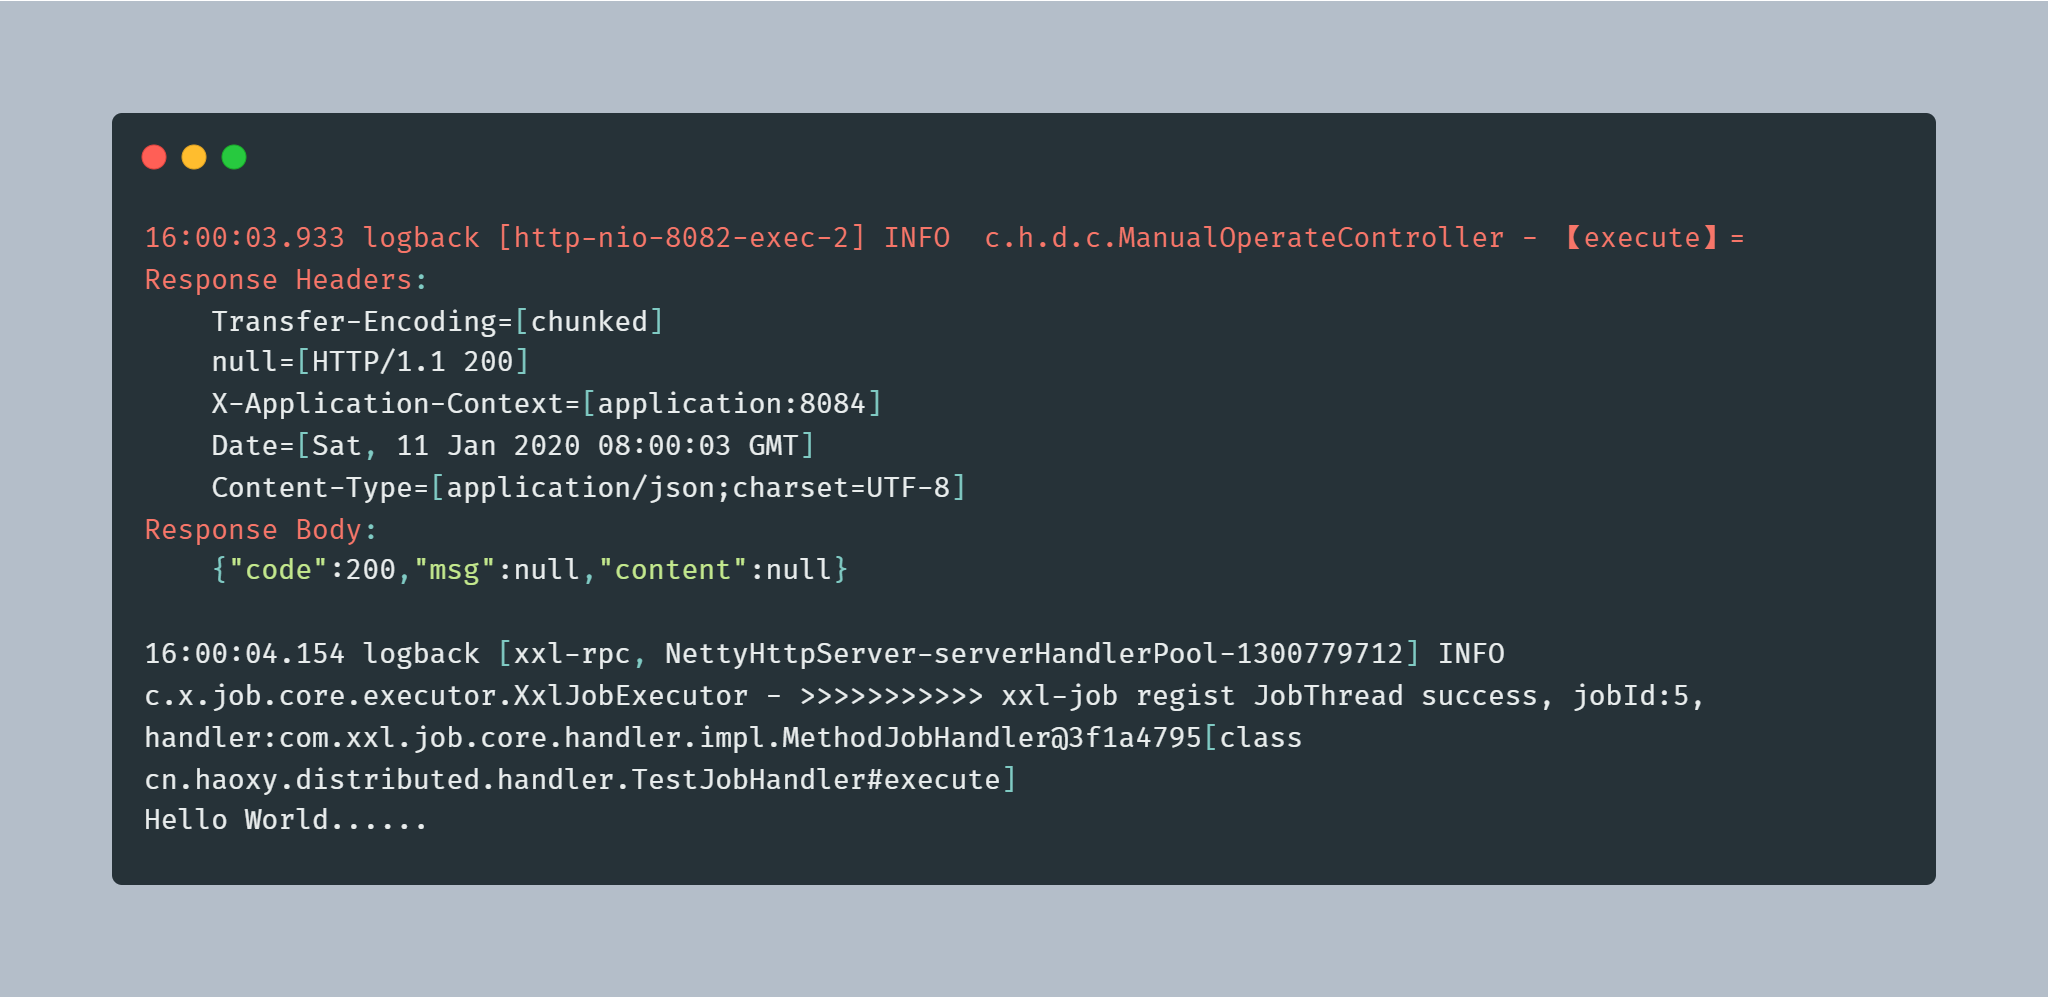
localhost:8082/xxl-job/trigger -
控制台日志

扩展:使用Docker 镜像方式搭建调度中心
使用docker镜像方式部署xxl-job-admin;
附上执行脚本: xxl-job.sh
不使用脚本也可以直接在命令窗口键入:
docker run -d --rm  -e PARAMS="--spring.datasource.url=jdbc:mysql://127.0.0.1:3306/xxl_job?Unicode=true&characterEncoding=UTF-8 --spring.datasource.use
rname=root --spring.datasource.password=123456"  -p 8680:8080  --name xxl-job-admin xuxueli/xxl-job-admin:2.1.1
配置好数据库名称以及密码即可!
 haoxiaoyong1014
发布了51 篇原创文章 · 获赞 45 · 访问量 14万+
私信
关注
标签:执行器,execute,springboot,job,jobInfo,任务调度,public,xxl 来源: https://blog.csdn.net/haoxiaoyong1014/article/details/103952527