前面介绍了如何使用ConstraintLayout,在用ConstraintLayout的时候千万要运行一下,在手机上看看结果,因为有时候在AS上面看是没问题的,但是运行到手机上面还是会又不一样的效果的。
然后本文将来介绍ConstraintLayout中的Chain也就是链条,还有ConstraintLayout辅助线Guideline的使用。
Chains
链条是什么?简单说就是一条链将同一轴(水平或者垂直)上面给连接起来,使他们能够统一行动。
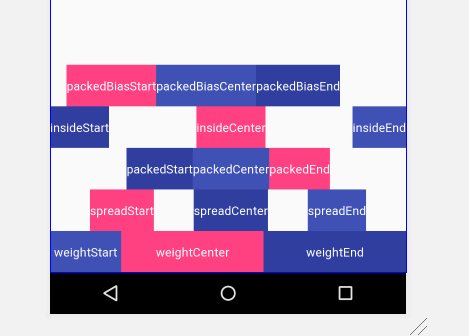
在了解链条之前,我们来写一个栗子,来见识下链条的作用和强大的功能,下面的布局是好几个不同的Tab组成的,每一行的Tab都是一个链条,每一行都是不同的style:
下面是实现的代码(省略了一些属性):
1
2
3
4
5
6
7
8
9
10
11
12
13
14
15
16
17
18
19
20
21
22
23
24
25
26
27
28
29
30
31
32
33
34
35
36
37
38
39
40
41
42
43
44
45
46
47
48
49
50
51
52
53
54
55
56
57
58
59
60
61
62
63
|
<TextView
    android:id="@+id/weightStart"
    android:layout_width="0dp"
    app:layout_constraintHorizontal_weight="1" />

<TextView
    android:id="@+id/weightCenter"
    android:layout_width="0dp"
    app:layout_constraintHorizontal_weight="2" />

<TextView
    android:id="@+id/weightEnd"
    android:layout_width="0dp"
    app:layout_constraintHorizontal_weight="2" />

<!-- spread chain-->
<TextView
    android:id="@+id/spreadStart"
    app:layout_constraintBottom_toTopOf="@id/weightStart"
    app:layout_constraintEnd_toStartOf="@id/spreadCenter"
    app:layout_constraintStart_toStartOf="parent" />

<TextView
    android:id="@+id/spreadCenter" />

<TextView
    android:id="@+id/spreadEnd" />

<!-- packed chain -->
<TextView
    android:id="@+id/packedStart"
    app:layout_constraintHorizontal_chainStyle="packed" />

<TextView
    android:id="@+id/packedCenter" />

<TextView
    android:id="@+id/packedEnd" />

<!-- spread_inside chain -->
<TextView
    android:id="@+id/insideStart"
    app:layout_constraintHorizontal_chainStyle="spread_inside" />

<TextView
    android:id="@+id/insideCenter"/>

<TextView
    android:id="@+id/insideEnd" />

<!-- packed chain with bias -->
<TextView
    android:id="@+id/packedBiasStart"
    app:layout_constraintHorizontal_bias="0.2"
    app:layout_constraintHorizontal_chainStyle="packed" />

<TextView
    android:id="@+id/packedBiasCenter" />

<TextView
    android:id="@+id/packedBiasEnd" />
|
可以看出,有五种不同的操作,而且每一行都是设置第一个控件的属性,然后每一行都是不同的显示,下面我们进入正题。。
Creating a chain
如何创建一个链条,当两个控件双向链接的时候,如下图所示,A和B里面的两条链,加上A和B两个控件,叫做一个链条。

下面的代码就是将两个按钮链接在一起,成为一个chain(省略一些属性):
1
2
3
4
5
6
7
8
9
10
11
| <Button
android:id="@+id/upload"
app:layout_constraintBottom_toBottomOf="parent"
app:layout_constraintEnd_toStartOf="@id/discard"
app:layout_constraintStart_toStartOf="parent" />
<Button
android:id="@+id/discard"
app:layout_constraintBottom_toBottomOf="parent"
app:layout_constraintEnd_toEndOf="parent"
app:layout_constraintStart_toEndOf="@id/upload" />
|

Chain heads

什么是链头,一个链条里面的第一个元素即为头,水平最左边,垂直最上边的控件,链头的作用是控制整个链条的属性,如上面的A控件就是链头。
Margins in chains
在链头上面设置margin,整个链条都会响应这个margin,比如设置链头的一个左边android:layout_marginStart="10dp",这整个链条都会响应这个margin:

Chain Style
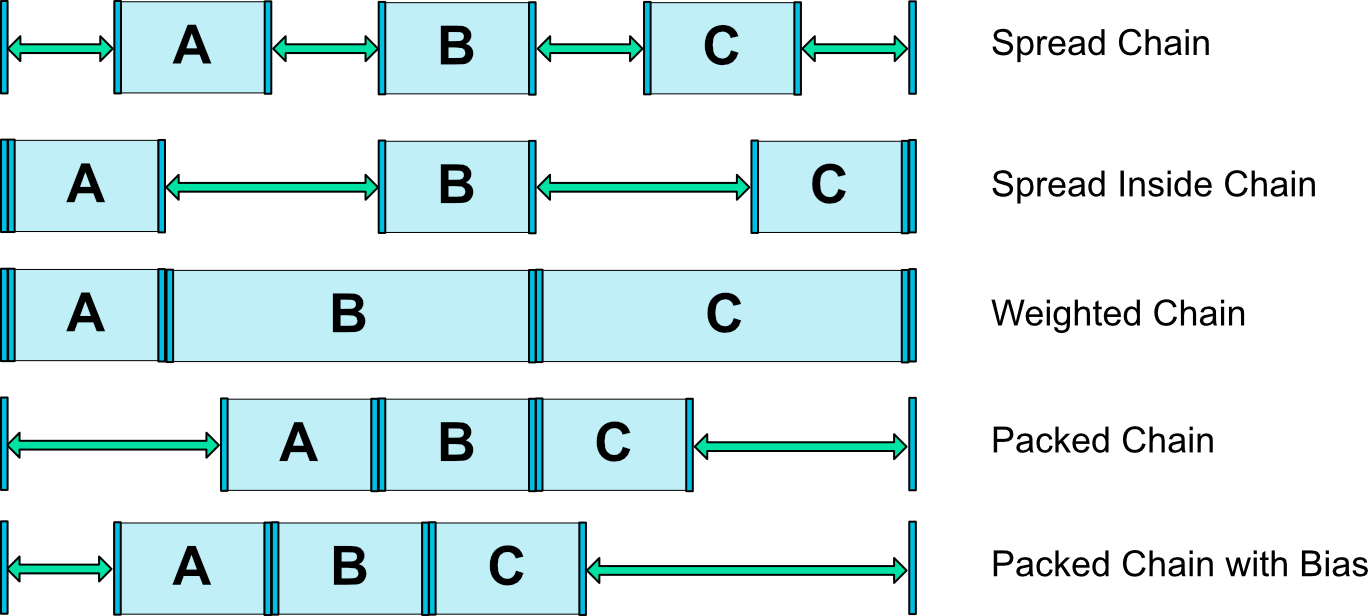
链条可以设置不同的style,通过设置下面两个属性分别设置水平或者垂直:
layout_constraintHorizontal_chainStylelayout_constraintVertical_chainStyle
而style包括三种:

spread_inside-与spread类似,只是链条的端点不会被分散


同时还有两种组合,在链条里面,可以使用weight和bias:

packed + bias- 前面说过bias是偏重的意思,这里就是将链条集体偏重。

在文章一开始,我们就写好了包含的所有的style,不明白的可以往上面重新看,至于省略的代码,写一下就出来了。
Guideline
Guideline是只能用在ConstraintLayout布局里面的一个工具类,用于辅助布局,类似为辅助线,可以设置android:orientation属性来确定是横向的还是纵向的。
- 当设置为
vertical的时候,Guideline的宽度为0,高度是parent也就是ConstraintLayout的高度
- 同样设置为
horizontal的时候,高度为0,宽度是parent的宽度
重要的是Guideline是不会显示到界面上的,默认是GONE的。
Guideline还有三个重要的属性,每个Guideline只能指定其中一个:
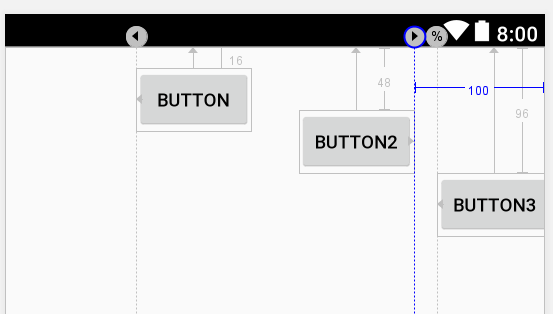
layout_constraintGuide_begin,指定左侧或顶部的固定距离,如100dp,在距离左侧或者顶部100dp的位置会出现一条辅助线layout_constraintGuide_end,指定右侧或底部的固定距离,如30dp,在距离右侧或底部30dp的位置会出现一条辅助线layout_constraintGuide_percent,指定在父控件中的宽度或高度的百分比,如0.8,表示距离顶部或者左侧的80%的距离。
通过一个栗子便能理解:
1
2
3
4
5
6
7
8
9
10
11
12
13
14
15
16
17
18
19
20
21
22
23
24
25
26
27
28
29
30
31
32
33
34
35
36
37
38
39
40
41
42
43
44
45
46
47
48
|
<android.support.constraint.Guideline
    android:layout_width="wrap_content"
    android:layout_height="wrap_content"
    android:id="@+id/guidelineBegin"
    app:layout_constraintGuide_begin="100dp"
    android:orientation="vertical"/>

<Button
    android:text="Button"
    android:layout_width="wrap_content"
    android:layout_height="wrap_content"
    android:id="@+id/button"
    app:layout_constraintLeft_toLeftOf="@+id/guidelineBegin"
    android:layout_marginTop="16dp"
    app:layout_constraintTop_toTopOf="parent" />

<android.support.constraint.Guideline
    android:layout_width="wrap_content"
    android:layout_height="wrap_content"
    android:id="@+id/guidelineEnd"
    app:layout_constraintGuide_end="100dp"
    android:orientation="vertical"/>

<Button
    android:text="Button2"
    android:layout_width="wrap_content"
    android:layout_height="wrap_content"
    android:id="@+id/buttonEnd"
    app:layout_constraintRight_toLeftOf="@+id/guidelineEnd"
    android:layout_marginTop="48dp"
    app:layout_constraintTop_toTopOf="parent" />

<android.support.constraint.Guideline
    android:id="@+id/guidelinePercent"
    android:layout_width="wrap_content"
    android:layout_height="wrap_content"
    android:orientation="vertical"
    app:layout_constraintGuide_percent="0.8" />

<Button
    android:text="Button3"
    android:layout_width="wrap_content"
    android:layout_height="wrap_content"
    android:id="@+id/buttonPercent"
    app:layout_constraintLeft_toLeftOf="@+id/guidelinePercent"
    android:layout_marginTop="96dp"
    app:layout_constraintTop_toTopOf="parent" />
|
预览:
当你要用一个控件占屏幕宽度的一半的时候,可以用layout_constraintGuide_percent,如下面代码:
1
2
3
4
5
6
7
8
9
10
11
12
13
14
15
16
17
| <android.support.constraint.Guideline
android:layout_width="wrap_content"
android:layout_height="wrap_content"
android:id="@+id/guidelineBegin"
app:layout_constraintGuide_percent="0.5"
app:layout_constraintStart_toStartOf="@id/button"
android:orientation="vertical"/>
<Button
android:text="Button"
android:layout_width="0dp"
android:layout_height="wrap_content"
android:id="@+id/button"
app:layout_constraintStart_toStartOf="parent"
app:layout_constraintEnd_toStartOf="@+id/guidelineBegin"
android:layout_marginTop="16dp"
app:layout_constraintTop_toTopOf="parent" />
|
效果图:
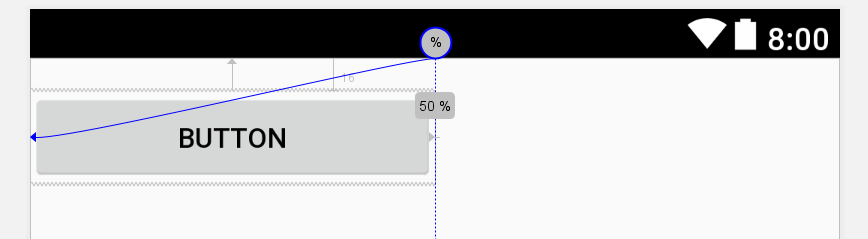
是不是很简单呢!!!
总结
链条能够很好的帮助我们将几个控件统一管理,同时Guideline能帮我们辅助布局,而不用添加一个其他的View并且设置GONE,Guideline都帮我们实现了。
感谢
标签:layout,app,ConstraintLayout,content,wrap,android,Guideline,Chains,id
来源: https://www.cnblogs.com/sanxiandoupi/p/11711041.html