此教程跟随慕课网实战课程进行:https://coding.imooc.com/class/117.html
环境搭建 开发全程使用的ide是idea,数据库使用的是MySQL,开发系统用的是linux centos7.3,前端的技术栈是vue,但是本课程只注重后端部分,前端部分不涉及
安装apache maven 请访问Maven的下载页面:http://maven.apache.org/download.html ,其中包含针对不同平台的各种版本的Maven下载文件。
解压apache-maven-3.5.4-bin.zip,并把解压后的文件夹下的apache-maven-3.5.4文件夹移动到C:Program Files
下。
添加环境变量 右键“计算机”,选择“属性”,之后点击“高级系统设置”,点击“环境变量”,来设置环境变量,有以下系统变量需要配置:
新建系统变量 MAVEN_HOME 变量值:C:Program Filesapache-maven-3.5.4
编辑系统变量 Path 添加变量值: ;%MAVEN_HOME%bin
测试安装 在cmd中使用mvn --version
命令,成功打印出版本即安装成功
换源 国内访问maven源很慢,因此我们需要将maven源改为阿里镜像,使用mvn -X
查找其中的mvn使用的settings文件,我们将默认的settings.xml
文件拷贝至用户目录下的.m2
文件夹,然后在镜像这一部分中加入:
1 2 3 4 5 6 7 8 <mirrors> <mirror> <id>alimaven</id> <name>aliyun maven</name> <url>http://maven.aliyun.com/nexus/content/groups/public/</url> <mirrorOf>central</mirrorOf> </mirror> </mirrors>
创建项目 通过idea创建项目,选择new->project->Spring Initializr
修改好域名和项目名称之后,选择java版本,点击下一步,选择web和mysql/jdbc,如果没有选择jdbc这个内容,就要在pom.xml
中配置jdbc
数据库设计 数据库主要包含四个表:
商品表
类目表
订单主表
订单详情表
构建数据库的SQL语句如下:
1 2 3 4 5 6 7 8 9 10 11 12 13 14 15 16 17 18 19 20 21 22 23 24 25 26 27 28 29 30 31 32 33 34 35 36 37 38 39 40 41 42 43 44 45 46 47 48 49 50 51 52 53 54 CREATE TABLE `product_info` ( `product_id` VARCHAR(32) NOT NULL, `product_name` VARCHAR(64) NOT NULL COMMENT '商品名称', `product_price` DECIMAL(8 , 2 ) NOT NULL COMMENT '单价', `product_stock` INT NOT NULL COMMENT '库存', `product_description` VARCHAR(64) COMMENT '描述', `product_icon` VARCHAR(512) COMMENT '小图', `product_status` TINYINT(3) COMMENT '商品状态,0正常,1下架', `category_type` INT NOT NULL COMMENT '类目编号', `create_time` TIMESTAMP NOT NULL DEFAULT CURRENT_TIMESTAMP COMMENT '创建时间', `update_time` TIMESTAMP NOT NULL DEFAULT CURRENT_TIMESTAMP ON UPDATE CURRENT_TIMESTAMP COMMENT '更新时间', PRIMARY KEY (`product_id`) ) COMMENT '商品表'; CREATE TABLE `product_category` ( `category_id` INT NOT NULL AUTO_INCREMENT, `category_name` VARCHAR(64) NOT NULL COMMENT '类目名称', `category_type` INT NOT NULL COMMENT '类目编号', `create_time` TIMESTAMP NOT NULL DEFAULT CURRENT_TIMESTAMP COMMENT '创建时间', `update_time` TIMESTAMP NOT NULL DEFAULT CURRENT_TIMESTAMP ON UPDATE CURRENT_TIMESTAMP COMMENT '更新时间', PRIMARY KEY (`category_id`), UNIQUE KEY `uqe_category_type` (`category_type`) COMMENT '建立索引' ) COMMENT '类目表'; CREATE TABLE `order_master` ( `order_id` VARCHAR(32) NOT NULL COMMENT '订单id', `buyer_name` VARCHAR(32) NOT NULL COMMENT '买家名字', `buyer_phone` VARCHAR(32) NOT NULL COMMENT '买家电话', `buyer_address` VARCHAR(128) NOT NULL COMMENT '买家地址', `buyer_openid` VARCHAR(64) NOT NULL COMMENT '买家微信openid', `order_amount` DECIMAL(8 , 2 ) NOT NULL COMMENT '订单总金额,8位整数,2位小数', `order_status` TINYINT(3) NOT NULL DEFAULT 0 COMMENT '订单状态,默认为0新下单', `pay_status` TINYINT(3) NOT NULL DEFAULT 0 COMMENT '支付状态,默认为0未支付', `create_time` TIMESTAMP NOT NULL DEFAULT CURRENT_TIMESTAMP COMMENT '创建时间', `update_time` TIMESTAMP NOT NULL DEFAULT CURRENT_TIMESTAMP ON UPDATE CURRENT_TIMESTAMP COMMENT '更新时间', PRIMARY KEY (`order_id`), KEY `idx_buyer_openid` (`buyer_openid`) ) COMMENT '订单主表'; CREATE TABLE `order_detail` ( `detail_id` VARCHAR(32) NOT NULL COMMENT '详情id', `order_id` VARCHAR(32) NOT NULL COMMENT '订单id', `product_id` VARCHAR(32) NOT NULL COMMENT '商品id', `product_name` VARCHAR(64) NOT NULL COMMENT '商品名称', `product_price` DECIMAL(8 , 2 ) NOT NULL COMMENT '商品价格', `product_quantity` INT NOT NULL COMMENT '商品数量', `product_icon` VARCHAR(512) COMMENT '商品小图', `create_time` TIMESTAMP NOT NULL DEFAULT CURRENT_TIMESTAMP COMMENT '创建时间', `update_time` TIMESTAMP NOT NULL DEFAULT CURRENT_TIMESTAMP ON UPDATE CURRENT_TIMESTAMP COMMENT '更新时间', PRIMARY KEY (`detail_id`), KEY `idx_order_id` (`order_id`) ) COMMENT '订单详情表';
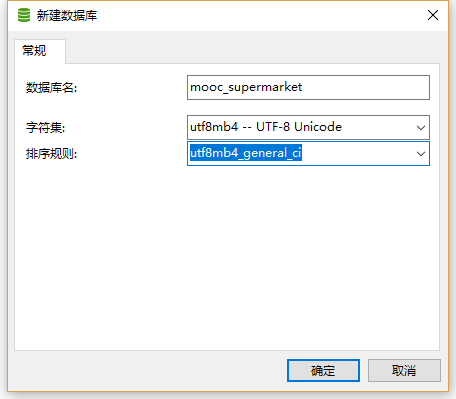
然后通过Navicat建立数据库连接,并新建数据库,注意这里的编码要选择utf8mb4,这个编码可以存储诸如emoji表情之类的特殊符号,而传统的utf-8编码则不能
建好之后通过Navicat运行上面的sql脚本,即可生成多个表
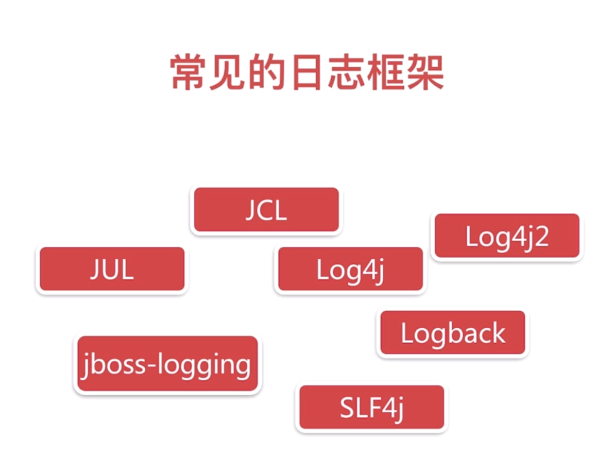
日志框架
JUL来自官方,但是很多问题,首先淘汰;jboss用得也不多,其次淘汰;log4j和logback是同一个作者,logback是log4j的升级版,logback更好用
log4j2性能很强,但是很多框架不支持,因此删掉
最后我们剩下的就是SLF4j(Simple Logging Facade for Java 简单的java日志外观),Logback
在测试文件夹中新建LoggerTest类
1 2 3 4 5 6 7 8 9 10 11 12 13 14 15 16 17 18 19 20 21 package com.imooc.sell; import org.junit.Test; import org.junit.runner.RunWith; import org.slf4j.Logger; import org.slf4j.LoggerFactory; import org.springframework.boot.test.context.SpringBootTest; import org.springframework.test.context.junit4.SpringRunner; (SpringRunner.class) @SpringBootTest public class { private final Logger logger = LoggerFactory.getLogger(LoggerTest.class); @Test public void test1(){ logger.debug("debug.........."); logger.info("info----"); logger.error("error......."); } }
运行测试函数,可以看到info和error这两条信息,但是debug没有看到,这是因为sl4j默认打印info以上的级别的日志,用ctrl+n
搜索类,找到sl4j里面的level类,发现有如下五个日志级别:
1 2 3 4 5 6 public enum Level { ERROR(40, "ERROR"), WARN(30, "WARN"), INFO(20, "INFO"), DEBUG(10, "DEBUG"), TRACE(0, "TRACE");
值越大的级别越高
另一种引用SLF4j的方法 在test类上面加入注解@Slf4j
,这要求你的idea有Lombok
插件,否则下面的log标记无法正常识别,这样就不用定义logger变量
引入Lombok的方法是在pom.xml
中添加:
1 2 3 4 5 6 <dependency> <groupId>org.projectlombok</groupId> <artifactId>lombok</artifactId> <version>1.18.2</version> <scope>test</scope> </dependency>
添加好之后就可以通过下面的方法来引用SLF4j
1 2 3 4 5 6 7 8 9 10 11 12 13 14 15 16 (SpringRunner.class) @SpringBootTest @Slf4j public class { // private final Logger logger = LoggerFactory.getLogger(LoggerTest.class); @Test public void test1(){ String name = "imooc"; String passwd = "1234"; log.debug("debug.........."); log.info("info----"); log.info("name:{},password:{}",name,passwd); log.error("error......."); } }
配置log文件 可以直接通过application.yml
配置SLF4j
1 2 3 4 logging: path: ./log/tomcat #配置存放地址,存放地址和文件名有一个即可 file: ./log/tomcat/sell.log #配置文件名 level: debug
或者是在resources目录下新建一个logback-spring.xml
,写入如下配置
1 2 3 4 5 6 7 8 9 10 11 12 13 14 15 16 17 18 19 20 21 22 23 24 25 26 27 28 29 30 31 32 33 34 35 36 37 38 39 40 41 42 43 44 45 46 47 48 49 50 51 <?xml version="1.0" encoding="utf-8" ?> <configuration> <appender name="consoleLog" class="ch.qos.logback.core.ConsoleAppender"> <layout class="ch.qos.logback.classic.PatternLayout"> <pattern> %d - %msg%n </pattern> </layout> </appender> <appender name="fileInfoLog" class="ch.qos.logback.core.rolling.RollingFileAppender"> <!--只存储info而过滤error,如果还是用ThresholdFilter,比error等级高的都会被输出出来,因此要用LevelFilter--> <filter class="ch.qos.logback.classic.filter.LevelFilter"> <level>ERROR</level> <onMatch>DENY</onMatch> <onMismatch>ACCEPT</onMismatch> </filter> <encoder> <pattern> %msg%n </pattern> </encoder> <!--文件存储策略--> <rollingPolicy class="ch.qos.logback.core.rolling.TimeBasedRollingPolicy"> <!--路径--> <fileNamePattern>./log/tomcat/sell/info.%d.log</fileNamePattern> </rollingPolicy> </appender> <appender name="fileErrorLog" class="ch.qos.logback.core.rolling.RollingFileAppender"> <filter class="ch.qos.logback.classic.filter.ThresholdFilter"> <level>ERROR</level> </filter> <encoder> <pattern> %msg%n </pattern> </encoder> <!--文件存储策略--> <rollingPolicy class="ch.qos.logback.core.rolling.TimeBasedRollingPolicy"> <!--路径--> <fileNamePattern>./log/tomcat/sell/error.%d.log</fileNamePattern> </rollingPolicy> </appender> <root level="info"> <appender-ref ref="consoleLog"/> <appender-ref ref="fileInfoLog"/> <appender-ref ref="fileErrorLog"/> </root> </configuration>
买家端开发 首先建立一个dataObject包用于存才各个数据表类
在其中建立ProductCategory类,创建id,名称,编号三个属性,最上面@entity
,然后设置好getter和setter方法,在id上面@Id
,@GeneratedValue
用于表示id和自增
1 2 3 4 5 6 7 8 9 10 11 12 13 14 15 16 17 18 19 20 21 22 23 24 25 26 27 28 29 30 31 32 33 34 35 36 37 38 39 40 41 42 43 44 45 46 47 48 49 50 51 52 53 54 55 56 package com.imooc.sell.dataObject; import javax.persistence.Entity; import javax.persistence.GeneratedValue; import javax.persistence.Id; @Entity public class ProductCategory { /** * 类目id **/ @Id @GeneratedValue private Integer categoryId; /*类目名称*/ private String categoryName; /*类目编号*/ private String categoryType; @Override public String toString() { return "ProductCategory{" + "categoryId=" + categoryId + ", categoryName='" + categoryName + ''' + ", categoryType='" + categoryType + ''' + '}'; } public Integer getCategoryId() { return categoryId; } public void setCategoryId(Integer categoryId) { this.categoryId = categoryId; } public String getCategoryName() { return categoryName; } public void setCategoryName(String categoryName) { this.categoryName = categoryName; } public String getCategoryType() { return categoryType; } public void setCategoryType(String categoryType) { this.categoryType = categoryType; } }
当然,如此多的getter和setter方法,可以通过lombok
这个包来省去这一步,包括tostring方法也可以省略了,首先在pom.xml中加入dependency
1 2 3 4 <dependency> <groupId>org.projectlombok</groupId> <artifactId>lombok</artifactId> </dependency>
然后在idea的插件中搜索lombok,安装之后重启idea
在productCategory里面加入一个@Data
注解
1 2 3 4 5 6 7 8 9 10 11 12 13 14 15 16 17 18 19 @Entity @DynamicUpdate @Data public class ProductCategory { //类目id @Id @GeneratedValue(strategy = GenerationType.IDENTITY) private Integer categoryId; /*类目名称*/ private String categoryName; /*类目编号*/ private String categoryType; private Date createTime; private Date updateTime; }
然后建立一个repository包,用于建立查询,新建ProductCategoryRepository.java
,其中的接口继承自JpaRepository
,然后后面两个参数是<ProductCategory,Integer>
,类名和id类型
1 2 3 4 5 6 7 package com.imooc.sell.repository; import com.imooc.sell.dataObject.ProductCategory; import org.springframework.data.jpa.repository.JpaRepository; public interface ProductCategoryRepository extends JpaRepository<ProductCategory,Integer> { }
现在测试一下ProductCategoryRepository
,直接右键点击ProductCategoryRepository
,选择goto->test,新建test
1 2 3 4 5 6 7 8 9 10 11 12 13 14 15 package com.imooc.sell.repository; (SpringRunner.class) @SpringBootTest public class ProductCategoryRepositoryTest { @Autowired private ProductCategoryRepository repository; @Test public void findoneTest(){ Optional<ProductCategory> productCategory = repository.findById(1); System.out.println(productCategory.toString()); } }
点击findoneTest,点击run,此时报错
1 2 3 java.lang.IllegalStateException: Failed to load ApplicationContext .... Caused by: java.lang.ClassNotFoundException: javax.xml.bind.JAXBException
这是因为缺少javax.xml.bind.JAXBException
包,在pom.xml中引入
1 2 3 4 5 6 7 8 9 10 11 12 13 14 15 16 17 18 19 20 <dependency> <groupId>javax.xml.bind</groupId> <artifactId>jaxb-api</artifactId> <version>2.3.0</version> </dependency> <dependency> <groupId>com.sun.xml.bind</groupId> <artifactId>jaxb-impl</artifactId> <version>2.3.0</version> </dependency> <dependency> <groupId>com.sun.xml.bind</groupId> <artifactId>jaxb-core</artifactId> <version>2.3.0</version> </dependency> <dependency> <groupId>javax.activation</groupId> <artifactId>activation</artifactId> <version>1.1.1</version> </dependency>
接下来在数据库中手动添加一条数据,就可以实现查询了
因为Spring Boot 2的getOne要求transaction(事务操作),所以要在application.yml
中添加no_trans的配置:
1 2 3 4 5 6 7 Spring: ..... jpa: show-sql: true properties: hibernate: enable_lazy_load_no_trans: true
接下来实现一下增删改查
1 2 3 4 5 6 7 8 9 10 11 12 13 14 15 16 17 18 19 20 21 22 23 24 25 26 27 28 29 30 31 32 33 34 35 36 37 38 39 40 41 42 43 44 45 46 47 48 (SpringRunner.class) @SpringBootTest public class ProductCategoryRepositoryTest { @Autowired private ProductCategoryRepository repository; @Test public void findoneTest() { Optional<ProductCategory> productCategory = repository.findById(1); System.out.println(productCategory.toString()); } @Test public void saveTest() { ProductCategory productCategory = new ProductCategory(); productCategory.setCategoryName("最受欢迎的"); productCategory.setCategoryType("3"); repository.save(productCategory); } @Test public void updateTest() { // Optional<ProductCategory> productCategorys = repository.getOne(2); // ProductCategory productCategory = new ProductCategory(); // if (productCategorys.isPresent()){ // productCategory = productCategorys.get(); // } // productCategory.setCategoryName("最受人们欢迎的"); // productCategory.setCategoryType("3"); // repository.save(productCategory); ProductCategory productCategory = repository.getOne(2); productCategory.setCategoryName("最受人们欢迎的"); productCategory.setCategoryType("3"); repository.save(productCategory); } @Test public void findByCategoryIdInTest() { List<Integer> list = Arrays.asList(1, 3); List<ProductCategory> result = repository.findByCategoryIdIn(list); System.out.println(result.toString()); } }
这样直接运行会报错,要在项目设置中更改
1 2 3 4 5 jpa: show-sql: true properties: hibernate: enable_lazy_load_no_trans: true
其中的findByCategoryIdIn
方法是定义在ProductCategoryRepository.java
中的自定义查找方法,其名字就表明了他的用途,按照规定也只能这样起名字,最后一个in表示sql语句中in的意思
1 List<ProductCategory> findByCategoryIdIn(List<Integer> categoryTypeList);
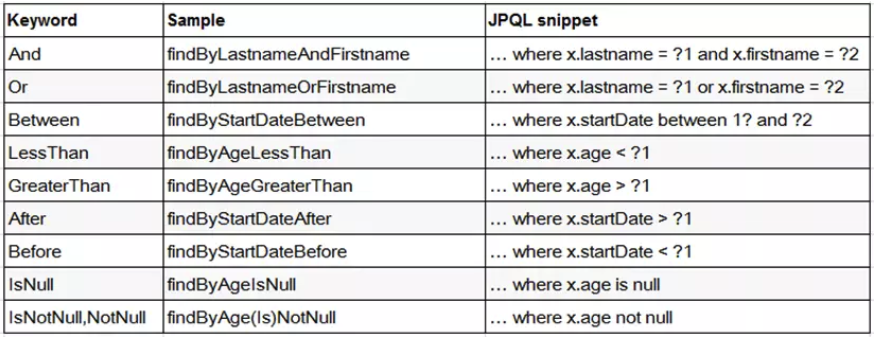
jpa起名规范 Repository接口中声明方法的规范
1、查询方法以 find | read | get 开头;
2、涉及条件查询时,条件的属性用条件关键字连接,要注意的是:条件属性以首字母大写
例如:定义一个 Entity 实体类 class User{
private String firstName;
private String lastName; }
使用And条件连接时,应这样写: findByLastNameAndFirstName(String lastName,String firstName); 条件的属性名称与个数要与参数的位置与个数一一对应
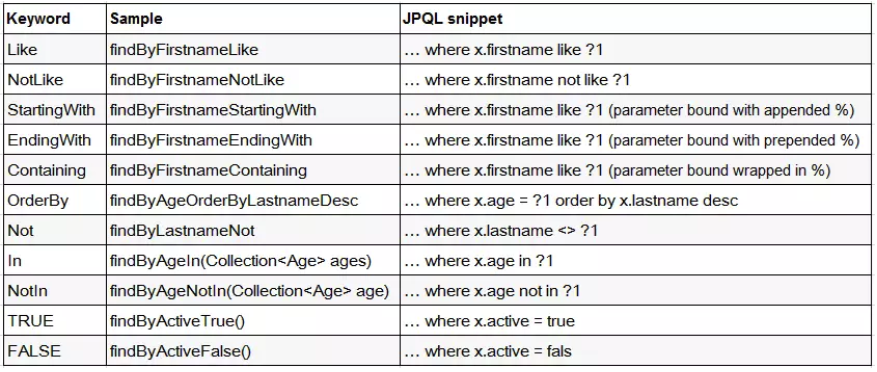
3、直接在接口中定义查询方法,如果是符合规范的,可以不用写实现,目前支持的关键字写法如下:
服务层 新建一个CategoryService.java接口,定义findOne
,findAll
,findByCategoryIn
,save
四个方法
1 2 3 4 5 6 7 8 public interface CategoryService { ProductCategory findOne(Integer categoryId); List<ProductCategory> findAll(); List<ProductCategory> findByCategoryIdIn(List<Integer> categoryTypeList); ProductCategory save(ProductCategory productCategory); }
然后新建impl文件夹,在其中写CategoryServiceImpl.java
,用于实现CategoryService
接口,记得要@Service
1 2 3 4 5 6 7 8 9 10 11 12 13 14 15 16 17 18 19 20 21 22 23 24 25 @Service public class CategoryServiceImpl implements CategoryService { @Autowired private ProductCategoryRepository repository; @Override public ProductCategory findOne(Integer categoryId) { return repository.getOne(categoryId); } @Override public List<ProductCategory> findAll() { return repository.findAll(); } @Override public List<ProductCategory> findByCategoryIdIn(List<Integer> categoryTypeList) { return repository.findByCategoryIdIn(categoryTypeList); } @Override public ProductCategory save(ProductCategory productCategory) { return repository.save(productCategory); } }
写完这一部分之后开始单元测试
1 2 3 4 5 6 7 8 9 10 11 12 13 14 15 16 17 18 19 20 21 22 23 24 25 26 27 28 29 30 31 32 33 34 35 (SpringRunner.class) @SpringBootTest public class CategoryServiceImplTest { @Autowired private CategoryServiceImpl categoryService; //如果getCategoryId不等于1则assert @Test public void findOne() { ProductCategory productCategory = categoryService.findOne(1); Assert.assertEquals(Integer.valueOf(1),productCategory.getCategoryId()); } //如果查出来的productCategoryList的长度为0则assert @Test public void findAll() { List<ProductCategory> productCategoryList = categoryService.findAll(); Assert.assertNotEquals(0,productCategoryList.size()); } @Test public void findByCategoryIdIn() { List<ProductCategory> productCategoryList = categoryService.findByCategoryIdIn(Arrays.asList(1,2,3,4)); Assert.assertNotEquals(0,productCategoryList.size()); } @Test public void save() { ProductCategory productCategory = new ProductCategory(); productCategory.setCategoryName("男生专用"); productCategory.setCategoryType("10"); ProductCategory result = categoryService.save(productCategory); Assert.assertNotEquals(null,result); } }
商品相关开发 顺序和之前一样,还是DAO->Service->Controller
的顺序
首先我们在dataObject中,定义数据对象entity
1 2 3 4 5 6 7 8 9 10 11 12 13 14 15 16 17 18 19 20 @Entity @Data public class ProductInfo { @Id private String productId; //名字 private String productName; //单价 private BigDecimal productPrice; //库存 private Integer productStock; //描述 private String productDescription; //小图 private String productIcon; //状态,0正常,1下架 private Integer productStatus; //类目编号 private Integer categoryType; }
然后在repository中定义,与ProductInfo
对应的ProductInfoRepository
接口
1 2 3 public interface ProductInfoRepository extends JpaRepository<ProductInfo,String> { List<ProductInfo> findByProductStatus(Integer productStatus); }
至此DAO相关的定义完成,开始测试相关函数功能
1 2 3 4 5 6 7 8 9 10 11 12 13 14 15 16 17 18 19 20 21 22 23 24 25 26 27 28 29 30 31 32 33 34 35 36 37 38 39 40 41 @RunWith(SpringRunner.class) @SpringBootTest public class ProductInfoRepositoryTest { @Autowired private ProductInfoRepository repository; @Test public void getOneTest(){ ProductInfo productInfo = repository.getOne("123456"); assertEquals("123456",productInfo.getProductId()); } @Test public void changeTest(){ ProductInfo productInfo = repository.getOne("123456"); productInfo.setProductPrice(BigDecimal.valueOf(10.5)); ProductInfo reult = repository.save(productInfo); assertNotNull(reult); } @Test public void saveTest(){ ProductInfo productInfo = new ProductInfo(); productInfo.setProductId("123456"); productInfo.setProductName("皮蛋粥"); productInfo.setProductPrice(new BigDecimal(3.2)); productInfo.setProductStock(100); productInfo.setProductDescription("很好喝"); productInfo.setProductDescription("abc.jpg"); productInfo.setProductStatus(0); productInfo.setCategoryType(1); ProductInfo result = repository.save(productInfo); assertNotNull(result); } @Test public void findByProductStatusTest(){ List<ProductInfo> productInfoList = repository.findByProductStatus(0); assertNotEquals(0,productInfoList.size()); } }
测试全部通过,证明上面开发的部分没有问题
接下来开始写Service层。
DAO和Service层的关系
DAO和Service层的关系
初学Spring的时候,大家可能在DAO和Service层的关系上有些不解,为什么看上去DAO层和Service层做的事情一模一样,如果是这样,那么我们只需要DAO层不就行了吗?这是因为一开始开发的模型比较简单,等到系统越来越复杂的时候,我们查出来的内容可能就不是直接呈现给controller层了,而是经过很多的处理才交给controller层,这个时候的Service层就必不可少了,甚至一些诸如邮件通知之类的功能也可以放在service层,这样可以使controller层变得简洁。
第二个原因是因为用Service层包裹DAO层之后,当有攻击者攻击系统的时候,他只能访问由service层提供的几个函数来访问数据,只能获取少部分数据,而无法对整个数据库进行操作,这从一定程度上保证了数据库的安全性。
在service文件夹中新建ProductService
接口,定义如下几个函数
1 2 3 4 5 6 7 8 9 10 11 12 13 14 15 16 @Service public interface ProductService { ProductInfo findOne(String productId); //分页查询 Page<ProductInfo> findAll(Pageable pageable); //查询所有已上架的商品 List<ProductInfo> findUpAll(); ProductInfo save(ProductInfo productInfo); //加库存 //减库存 }
然后再implement实现这个接口
1 2 3 4 5 6 7 8 9 10 11 12 13 14 15 16 17 18 19 20 21 22 23 24 25 26 @Service public class ProductServiceImpl implements ProductService { @Autowired private ProductInfoRepository repository; @Override public ProductInfo findOne(String productId) { return repository.getOne(productId); } @Override public Page<ProductInfo> findAll(Pageable pageable) { return repository.findAll(pageable); } @Override public List<ProductInfo> findUpAll() { return repository.findByProductStatus(ProductStatusEnum.UP.getCode()); } @Override public ProductInfo save(ProductInfo productInfo) { return repository.save(productInfo); } }
然后新建BuyerProductController.java
处理controller层,list这个页面,主要的业务逻辑是:
查出所有上架的商品
查出所有上架商品的categoryType
数据拼装:最外层是code,msg,data
遍历category,然后再遍历所有product,如果当前的product的categoryType与当前的category相同,通过BeanUtils.copyProperties
拷贝整个对象到另外一个,然后加入到productVOList
中,最后设置msg和code,并返回
1 2 3 4 5 6 7 8 9 10 11 12 13 14 15 16 17 18 19 20 21 22 23 24 25 26 27 28 29 30 31 32 33 34 35 36 37 38 39 40 41 42 43 44 45 46 47 48 49 50 51 52 53 54 55 /** * 买家商品 */ @RestController @RequestMapping("/buyer/product") public class BuyerProductController { @Autowired private ProductService productService; @Autowired private CategoryService categoryService; @GetMapping("/list") public ResultVO list() { //1. 查询所有的上架商品 List<ProductInfo> productInfoList = productService.findUpAll(); //2. 查询类目(一次性查询) List<Integer> categoryTypeList = new ArrayList<>(); //传统方法 for (ProductInfo productInfo : productInfoList) { categoryTypeList.add(productInfo.getCategoryType()); } //精简方法(java8, lambda) // List<Integer> categoryTypeList = productInfoList.stream() // .map(e -> e.getCategoryType()) // .collect(Collectors.toList()); List<ProductCategory> productCategoryList = categoryService.findByCategoryTypeIn(categoryTypeList); //3. 数据拼装 List<ProductVO> productVOList = new ArrayList<>(); for (ProductCategory productCategory: productCategoryList) { ProductVO productVO = new ProductVO(); productVO.setCategoryType(productCategory.getCategoryType()); productVO.setCategoryName(productCategory.getCategoryName()); List<ProductInfoVO> productInfoVOList = new ArrayList<>(); for (ProductInfo productInfo: productInfoList) { if (productInfo.getCategoryType().equals(productCategory.getCategoryType())) { ProductInfoVO productInfoVO = new ProductInfoVO(); BeanUtils.copyProperties(productInfo, productInfoVO); productInfoVOList.add(productInfoVO); } } productVO.setProductInfoVOList(productInfoVOList); productVOList.add(productVO); } ResultVO resultVO = new ResultVO(); resultVO.setCode(0); resultVO.setMsg("成功"); resultVO.setData(productVOList); return resultVO; } }
发现最后几行有些重复,我们新建一个utils包,用于存放杂件,新建一个ResultVOUtil,新建static方法,以便在上面的return中直接调用return ResultVOUtil.success(productVOList);
1 2 3 4 5 6 7 8 9 10 11 12 13 14 15 16 17 18 19 20 21 22 23 public class ResultVOUtil { public static ResultVO success(Object o) { ResultVO resultVO = new ResultVO<>(); resultVO.setCode(0); resultVO.setMsg("成功"); resultVO.setData(o); return resultVO; } public static ResultVO success() { ResultVO resultVO = new ResultVO<>(); resultVO.setCode(0); resultVO.setMsg("成功"); return resultVO; } public static ResultVO error(Integer code,String msg) { ResultVO resultVO = new ResultVO<>(); resultVO.setCode(code); resultVO.setMsg(msg); return resultVO; } }
前后端联调
安装node依赖包,运行vue项目 首先cd到文件目录,执行下面的指令安装依赖
然后执行npm run dev
,即可运行前端项目
刷新前端项目,发现前端的list指向的地址的端口有问题,因此用vscode搜索相关的地址之后可以找到vue项目设置的list函数的地址,并更改为http://127.0.0.1:8080/sell/buyer/product/list
更改之后重新运行项目,发现可以访问了,但是没有数据返回,此时只需要在list函数上加入一个跨域访问的注解@CrossOrigin("*")
,即可正常访问。
订单层开发 同样开发顺序是DAO->Service->Controller,具体一点,先是定义dataObject,然后定义repository,这两部分组成了DAO层
订单DAO层开发 dataObject定义 订单一共有两个表,一个是OrderDetail(详情表),一个是OrderMaster(主表),对照数据库,定义每一个字段
首先定义OrderMaster表,@DynamicUpdate
用于动态更新updateTime,
1 2 3 4 5 6 7 8 9 10 11 12 13 14 15 16 17 18 19 20 21 22 23 24 25 26 27 @Entity @Data @DynamicUpdate public class OrderMaster { //订单ID @Id private String orderId; //买家姓名 private String buyerName; //买家电话 private String buyerPhone; //买家地址 private String buyerAddress; //买家openid private String buyerOpenid; //订单总额 private BigDecimal orderAmount; //订单状态,默认为新下单,0是新下单,1是已完成,2是已取消 private Integer orderStatus = OrderStatusEnum.NEW.getCode(); //支付状态,默认为0未支付 private Integer payStatus = PayStatusEnum.WAIT.getCode(); //创建时间 private Date createTime; //更新时间 private Date updateTime; }
定义OrderDetail表
1 2 3 4 5 6 7 8 9 10 11 12 13 14 15 16 17 18 19 @Entity @Data public class OrderDetail { @Id private String detailId; //订单id private String orderId; //商品id private String productId; //商品价格 private BigDecimal productPrice; //商品名称 private String productName; //商品数量 private Integer productQuantity; //商品图标 private String productIcon; }
其中用到的状态表示,要用枚举来表示,不至于那么乱
首先是OrderStatusEnum
列举订单状态
1 2 3 4 5 6 7 8 9 10 11 12 13 14 @Getter public enum OrderStatusEnum { NEW(0,"新订单"), FINISHED(1,"完结"), CANCEL(2,"已取消"), ; private Integer code; private String msg; OrderStatusEnum(Integer code, String msg) { this.code = code; this.msg = msg; } }
然后是PayStatusEnum
枚举支付状态
1 2 3 4 5 6 7 8 9 10 11 12 13 @Getter public enum PayStatusEnum { WAIT(0,"未支付"), SUCCESS(1,"支付成功"),; private Integer code; private String msg; PayStatusEnum(Integer code, String msg) { this.code = code; this.msg = msg; } }
repository定义及测试 对应两个dataObject,定义两个repository
OrderMasterRepository
用于操作OrderMaster表
1 2 3 4 public interface OrderMasterRepository extends JpaRepository<OrderMaster,String> { //通过用户来查找订单主表 Page<OrderMaster> findByBuyerOpenid(String buyerOpenId, Pageable pageable); }
OrderDetailRepository
用于操作OrderDetail表
1 2 3 4 public interface OrderDetailRepository extends JpaRepository<OrderDetail,String> { //通过OrderId来查找详情表 List<OrderDetail> findByOrderId(String orderId); }
至此,两个repository完成,开始测试
OrderMasterRepositoryTest
用于测试OrderMasterRepository
1 2 3 4 5 6 7 8 9 10 11 12 13 14 15 16 17 18 19 20 21 22 23 24 25 26 27 @RunWith(SpringRunner.class) @SpringBootTest public class OrderMasterRepositoryTest { @Autowired private OrderMasterRepository repository; @Test public void saveTest() { OrderMaster orderMaster = new OrderMaster(); orderMaster.setOrderId("1234567"); orderMaster.setBuyerName("师兄"); orderMaster.setBuyerPhone("18888888888"); orderMaster.setBuyerAddress("重庆市"); orderMaster.setBuyerOpenid("110110"); orderMaster.setOrderAmount(new BigDecimal(10)); OrderMaster result = repository.save(orderMaster); assertNotNull(result); } @Test public void findByBuyerOpenid() { PageRequest pageRequest = PageRequest.of(0,1); Page<OrderMaster> result = repository.findByBuyerOpenid("110110",pageRequest); System.out.println(result.getTotalElements()); assertNotEquals(0,result.getSize()); } }
OrderDetailRepositoryTest
用于测试OrderDetailRepository
1 2 3 4 5 6 7 8 9 10 11 12 13 14 15 16 17 18 19 20 21 22 23 24 25 26 27 @RunWith(SpringRunner.class) @SpringBootTest public class OrderDetailRepositoryTest { @Autowired private OrderDetailRepository repository; @Test public void saveTest() { OrderDetail orderDetail = new OrderDetail(); orderDetail.setDetailId("11111100"); orderDetail.setOrderId("12345678"); orderDetail.setProductIcon("abc.jpg"); orderDetail.setProductId("a111"); orderDetail.setProductName("南瓜"); orderDetail.setProductPrice(new BigDecimal(10.5)); orderDetail.setProductQuantity(2); OrderDetail result = repository.save(orderDetail); assertNotNull(result); } @Test public void findByOrderId() { List<OrderDetail> orderDetailList = repository.findByOrderId("12345678"); assertNotEquals(0,orderDetailList.size()); } }
至此,订单DAO层开发完成,接下来开发Service层
订单Service层开发 创建一个名为OrderService.java
的接口,包含以下6个方法
1 2 3 4 5 6 7 8 9 10 11 12 13 14 15 16 17 18 19 public interface OrderService { //创建订单 OrderDTO create(OrderDTO orderDTO); //查询单个订单 OrderDTO getOne(String orderId); //查询订单列表 Page<OrderDTO> findList(String buyerOpenid, Pageable pageable); //取消订单 OrderDTO cancel(OrderDTO orderDTO); //完结订单 OrderDTO finish(OrderDTO orderDTO); //支付订单 OrderDTO paid(OrderDTO orderDTO); }
创建ProductServiceImpl.java
实现上面的接口
其中需要用到一个Data Transform Object,名称为OrderDTO,其大部分字段与OrderMaster一样,多了一个List<OrderDetail> orderDetailList
字段,用于保存每个订单对应的OrderDetail信息,定义如下
1 2 3 4 5 6 7 8 9 10 11 12 13 14 15 16 17 18 19 20 21 22 23 24 25 26 27 28 29 30 //OrderDTO.java @Data //@JsonSerialize(include = JsonSerialize.Inclusion.NON_NULL) @JsonInclude(JsonInclude.Include.NON_NULL) public class OrderDTO { //订单ID private String orderId; //买家姓名 private String buyerName; //买家电话 private String buyerPhone; //买家地址 private String buyerAddress; //买家openid private String buyerOpenid; //订单总额 private BigDecimal orderAmount; //订单状态,默认为新下单,0是新下单,1是已完成,2是已取消 private Integer orderStatus = OrderStatusEnum.NEW.getCode(); //支付状态,默认为0未支付 private Integer payStatus = PayStatusEnum.WAIT.getCode(); //创建时间 @JsonSerialize(using = Date2LongSerializer.class) private Date createTime; //更新时间 @JsonSerialize(using = Date2LongSerializer.class) private Date updateTime; private List<OrderDetail> orderDetailList; }
其中需要用到的SellException定义如下:
1 2 3 4 5 6 7 8 9 10 11 12 13 public class SellException extends RuntimeException { private Integer code; public SellException(ResultEnum resultEnum) { super(resultEnum.getMessage()); this.code = resultEnum.getCode(); } public SellException(Integer code, String msg) { super(msg); this.code = code; } }
SellException引用的ResultEnum枚举,如下所示:
1 2 3 4 5 6 7 8 9 10 11 12 13 14 15 16 17 18 19 20 21 22 @Getter public enum ResultEnum { PARAM_ERROR(1, "参数不正确"), PRODUCT_NOT_EXIST(10, "商品不存在"), PRODUCT_STOCK_ERROR(11, "库存不足"), ORDER_NOT_EXSIT(12, "订单不存在"), ORDER_DETAIL_NOT_EXSIT(12, "订单详情不存在"), ORDER_STATUS_ERROR(14, "订单状态不正确"), ORDER_UPDATE_FAIL(15, "订单更新失败"), ORDER_DETAIL_EMPTY(16, "订单详情为空"), PAY_STAUS_ERROR(17, "支付状态不正确"), CART_EMPTY(18, "购物车为空"), ORDER_OWNER_ERROR(19, "该订单不属于当前用户"),; private Integer code; private String message; ResultEnum(Integer code, String message) { this.code = code; this.message = message; } }
创建订单 create方法:传入一个orderDTO,查找商品,计算总价
传入的参数如下所示:
1 2 3 4 5 6 7 8 name: "张三" phone: "18868822111" address: "慕课网总部" openid: "ew3euwhd7sjw9diwkq" //用户的微信openid items: [{ productId: "1423113435324", productQuantity: 2 //购买数量 }]
因此,要通过productId来查询productInfo,然后获取价格乘以数量,得到总价,然后设置DTO的详细信息,设置OrderId和orderDetailId
设置ID的方法写在utils文件夹中,为了不重复,所以加上同步锁
1 2 3 4 5 6 7 8 9 10 11 12 13 14 //utils/KeyUtil.java public class KeyUtil { /** * 生成唯一主键 * 格式:时间+随机数 * * @return */ public static synchronized String genUniqueKey() { Random random = new Random(); Integer number = random.nextInt(900000) + 100000; return System.currentTimeMillis() + String.valueOf(number); } }
第三步是写入OrderMaster,拷贝OrderDTO到OrderMater对象中,设置总价,保存
第四步是扣库存,扣库存的函数是productService.decreaseStock
,其中用到的数据转移对象是CartDTO
,包含id和数量,定义如下:
1 2 3 4 5 6 7 8 9 10 11 12 @Data public class CartDTO { //商品id private String productId; //商品数量 private Integer productQuantity; public CartDTO(String productId, Integer productQuantity) { this.productId = productId; this.productQuantity = productQuantity; } }
扣库存的函数如下,通过id查出商品的库存,减去购物车里面的库存,保存商品信息:
1 2 3 4 5 6 7 8 9 10 11 12 13 14 15 16 @Override @Transactional public void decreaseStock(List<CartDTO> cartDTOList) { for (CartDTO cartDTO : cartDTOList) { ProductInfo productInfo = repository.findById(cartDTO.getProductId()).orElse(null); if (productInfo == null) { throw new SellException(ResultEnum.PRODUCT_NOT_EXIST); } Integer result = productInfo.getProductStock() - cartDTO.getProductQuantity(); if (result < 0) { throw new SellException(ResultEnum.PRODUCT_STOCK_ERROR); } productInfo.setProductStock(result); repository.save(productInfo); } }
至此,创建订单的开发结束,具体实现如下:
1 2 3 4 5 6 7 8 9 10 11 12 13 14 15 16 17 18 19 20 21 22 23 24 25 26 27 28 29 30 31 32 33 34 35 36 37 38 39 40 41 42 43 44 45 46 47 48 49 50 51 52 53 54 55 56 57 58 59 60 61 62 63 64 65 66 67 68 69 70 71 72 73 74 75 76 77 78 79 80 81 82 83 84 85 86 87 88 89 @Service @Slf4j public class OrderServiceImpl implements OrderService { @Autowired private ProductService productService; @Autowired private OrderDetailRepository orderDetailRepository; @Autowired private OrderMasterRepository orderMasterRepository; @Override @Transactional public OrderDTO create(OrderDTO orderDTO) { BigDecimal orderAmount = new BigDecimal(0); String orderId = KeyUtil.genUniqueKey(); //1.查询商品(数量,价格) for (OrderDetail orderDetail : orderDTO.getOrderDetailList()) { ProductInfo productInfo = productService.findOne(orderDetail.getProductId()); if (productInfo == null) { throw new SellException(ResultEnum.PRODUCT_NOT_EXIST); } //2.计算总价 orderAmount = productInfo.getProductPrice() .multiply(new BigDecimal(orderDetail.getProductQuantity())) .add(orderAmount); //订单详情入库OrderDetail BeanUtils.copyProperties(productInfo, orderDetail); orderDetail.setDetailId(KeyUtil.genUniqueKey()); orderDetail.setOrderId(orderId); orderDetailRepository.save(orderDetail); } //3.写入订单数据库orderMaster OrderMaster orderMaster = new OrderMaster(); orderDTO.setOrderId(orderId); BeanUtils.copyProperties(orderDTO, orderMaster); orderMaster.setOrderAmount(orderAmount); orderMasterRepository.save(orderMaster); //4.扣库存 List<CartDTO> cartDTOList = orderDTO.getOrderDetailList().stream().map(e -> new CartDTO(e.getProductId(), e.getProductQuantity()) ).collect(Collectors.toList()); productService.decreaseStock(cartDTOList); return orderDTO; } @Override @Transactional public OrderDTO finish(OrderDTO orderDTO) { //判断订单状态 if (!orderDTO.getOrderStatus().equals(OrderStatusEnum.NEW.getCode())) { log.error("[完结订单]订单状态不正确,orderId={},orderStatus={}", orderDTO.getOrderId(), orderDTO.getOrderStatus()); throw new SellException(ResultEnum.ORDER_STATUS_ERROR); } //修改状态并保存 orderDTO.setOrderStatus(OrderStatusEnum.FINISHED.getCode()); OrderMaster orderMaster = new OrderMaster(); BeanUtils.copyProperties(orderDTO, orderMaster); OrderMaster result = orderMasterRepository.save(orderMaster); return orderDTO; } @Override @Transactional public OrderDTO paid(OrderDTO orderDTO) { //判断订单状态 if (!orderDTO.getOrderStatus().equals(OrderStatusEnum.NEW.getCode())) { log.error("[支付订单]订单状态不正确,orderId={},orderStatus={}", orderDTO.getOrderId(), orderDTO.getOrderStatus()); throw new SellException(ResultEnum.ORDER_STATUS_ERROR); } //判断支付状态 if (!orderDTO.getOrderStatus().equals(PayStatusEnum.WAIT.getCode())) { log.error("[支付订单]支付状态不正确,orderId={},payStatus={}", orderDTO.getOrderId(), orderDTO.getPayStatus()); throw new SellException(ResultEnum.PAY_STAUS_ERROR); } //修改支付状态 orderDTO.setPayStatus(PayStatusEnum.SUCCESS.getCode()); OrderMaster orderMaster = new OrderMaster(); BeanUtils.copyProperties(orderDTO, orderMaster); orderMasterRepository.save(orderMaster); return orderDTO; } }
通过订单id查询订单 查询订单相对容易,通过一个id查找到订单主表orderMaster信息,通过id查到所有订单详情表的orderDetail信息,返回一个orderDTO对象
1 2 3 4 5 6 7 8 9 10 11 12 13 14 15 @Override public OrderDTO getOne(String orderId) { OrderMaster orderMaster = orderMasterRepository.findById(orderId).orElse(null); if (orderMaster == null) { throw new SellException(ResultEnum.ORDER_NOT_EXSIT); } List<OrderDetail> orderDetailList = orderDetailRepository.findByOrderId(orderId); if (CollectionUtils.isEmpty(orderDetailList)) { throw new SellException(ResultEnum.ORDER_DETAIL_NOT_EXSIT); } OrderDTO orderDTO = new OrderDTO(); BeanUtils.copyProperties(orderMaster, orderDTO); orderDTO.setOrderDetailList(orderDetailList); return orderDTO; }
通过用户id查询订单列表 通过用户的openid来查询订单,要求返回一个page对象,包含的是OrderDTO类型
1 2 3 4 5 6 @Override public Page<OrderDTO> findList(String buyerOpenid, Pageable pageable) { Page<OrderMaster> orderMasterPage = orderMasterRepository.findByBuyerOpenid(buyerOpenid, pageable); List<OrderDTO> orderDTOList = OrderMaster2OrderDTOConverter.convert(orderMasterPage.getContent()); return new PageImpl<OrderDTO>(orderDTOList, pageable, orderMasterPage.getTotalElements()); }
其中的findByBuyerOpenid方法定义如下
1 2 3 4 //repository/OrderMasterRepository.java public interface OrderMasterRepository extends JpaRepository<OrderMaster, String> { Page<OrderMaster> findByBuyerOpenid(String buyerOpenId, Pageable pageable); }
取消订单
首先判断订单是不是新下单状态,不是则抛出异常
如果是新下单,修改订单为取消状态
返还库存: 增加库存的函数如下:
1 2 3 4 5 6 7 8 9 10 11 12 13 @Override @Transactional public void increaseStock(List<CartDTO> cartDTOList) { for (CartDTO cartDTO : cartDTOList) { ProductInfo productInfo = repository.findById(cartDTO.getProductId()).orElse(null); if (productInfo == null) { throw new SellException(ResultEnum.PRODUCT_NOT_EXIST); } Integer result = productInfo.getProductStock() + cartDTO.getProductQuantity(); productInfo.setProductStock(result); repository.save(productInfo); } }
如果已支付,退款:因为现在支付相关的函数还没有完成,因此这部分先空着,用//TODO
来表示,这样点击左下角的TODO按钮,即可快速浏览这部分内容
1 2 3 4 5 6 7 8 9 10 11 12 13 14 15 16 17 18 19 20 21 22 23 24 25 26 27 28 29 30 31 32 33 34 35 36 37 38 @Override @Transactional public OrderDTO cancel(OrderDTO orderDTO) { OrderMaster orderMaster = new OrderMaster(); //判断订单状态 if (!orderDTO.getOrderStatus().equals(OrderStatusEnum.NEW.getCode())) { log.error("[取消订单] 订单状态不正确,orderId={},orderStatus={}", orderDTO.getOrderId(), orderDTO.getOrderStatus()); throw new SellException(ResultEnum.ORDER_STATUS_ERROR); } //修改订单状态 orderDTO.setOrderStatus(OrderStatusEnum.CANCEL.getCode()); BeanUtils.copyProperties(orderDTO, orderMaster); try { OrderMaster updateResult = orderMasterRepository.save(orderMaster); } catch (Exception e) { log.error("[取消订单] 更新失败,orderMaster={}", orderMaster); throw new SellException(ResultEnum.ORDER_UPDATE_FAIL); } //返还库存 if (CollectionUtils.isEmpty(orderDTO.getOrderDetailList())) { log.error("[取消订单] 订单中无商品,OrderDto={}", orderDTO); throw new SellException(ResultEnum.ORDER_DETAIL_EMPTY); } List<CartDTO> cartDTOList = orderDTO.getOrderDetailList().stream() .map(e -> new CartDTO(e.getProductId(), e.getProductQuantity())) .collect(Collectors.toList()); productService.increaseStock(cartDTOList); //如果已支付,退款 if (orderDTO.getPayStatus().equals(PayStatusEnum.SUCCESS.getCode())) { //TODO } return orderDTO; }
完结订单 与取消订单相似,首先判断订单状态,如果是新下单,可以修改为完结并保存,
1 2 3 4 5 6 7 8 9 10 11 12 13 14 15 @Override @Transactional public OrderDTO finish(OrderDTO orderDTO) { //判断订单状态 if (!orderDTO.getOrderStatus().equals(OrderStatusEnum.NEW.getCode())) { log.error("[完结订单]订单状态不正确,orderId={},orderStatus={}", orderDTO.getOrderId(), orderDTO.getOrderStatus()); throw new SellException(ResultEnum.ORDER_STATUS_ERROR); } //修改状态并保存 orderDTO.setOrderStatus(OrderStatusEnum.FINISHED.getCode()); OrderMaster orderMaster = new OrderMaster(); BeanUtils.copyProperties(orderDTO, orderMaster); OrderMaster result = orderMasterRepository.save(orderMaster); return orderDTO; }
退款 首先判断订单状态,然后判断支付状态,最后修改支付状态
1 2 3 4 5 6 7 8 9 10 11 12 13 14 15 16 17 18 19 20 @Override @Transactional public OrderDTO paid(OrderDTO orderDTO) { //判断订单状态 if (!orderDTO.getOrderStatus().equals(OrderStatusEnum.NEW.getCode())) { log.error("[支付订单]订单状态不正确,orderId={},orderStatus={}", orderDTO.getOrderId(), orderDTO.getOrderStatus()); throw new SellException(ResultEnum.ORDER_STATUS_ERROR); } //判断支付状态 if (!orderDTO.getOrderStatus().equals(PayStatusEnum.WAIT.getCode())) { log.error("[支付订单]支付状态不正确,orderId={},payStatus={}", orderDTO.getOrderId(), orderDTO.getPayStatus()); throw new SellException(ResultEnum.PAY_STAUS_ERROR); } //修改支付状态 orderDTO.setPayStatus(PayStatusEnum.SUCCESS.getCode()); OrderMaster orderMaster = new OrderMaster(); BeanUtils.copyProperties(orderDTO, orderMaster); orderMasterRepository.save(orderMaster); return orderDTO; }
订单Service测试 测试代码如下:
1 2 3 4 5 6 7 8 9 10 11 12 13 14 15 16 17 18 19 20 21 22 23 24 25 26 27 28 29 30 31 32 33 34 35 36 37 38 39 40 41 42 43 44 45 46 47 48 49 50 51 52 53 54 55 56 57 58 59 60 61 62 63 @RunWith(SpringRunner.class) @SpringBootTest @Slf4j public class OrderServiceImplTest { private final String buyerOpenid = "110110"; private final String Order_Id = "12345678"; @Autowired private OrderServiceImpl orderService; @Test public void create() { OrderDTO orderDTO = new OrderDTO(); orderDTO.setBuyerAddress("慕课网"); orderDTO.setBuyerName("拜考神"); orderDTO.setBuyerPhone("18888888888"); orderDTO.setBuyerOpenid(buyerOpenid); //购物车 List<OrderDetail> orderDetailList = new ArrayList<>(); OrderDetail o1 = new OrderDetail(); o1.setProductId("123456"); o1.setProductQuantity(2); orderDetailList.add(o1); orderDTO.setOrderDetailList(orderDetailList); OrderDTO orderDTO1 = orderService.create(orderDTO); assertNotNull(orderDTO1); } @Test public void getOne() { OrderDTO result = orderService.getOne(Order_Id); log.info("[查询单个订单] result={}", result); assertNotNull(result); } @Test public void findList() { PageRequest request = PageRequest.of(0, 2); Page<OrderDTO> orderDTOPage = orderService.findList(buyerOpenid, request); log.info("查询订单List的结果:result={}", orderDTOPage.getContent()); assertNotEquals(0, orderDTOPage.getTotalElements()); } @Test public void cancel() { OrderDTO result = orderService.getOne("123456"); OrderDTO orderDTO = orderService.cancel(result); assertEquals(OrderStatusEnum.CANCEL.getCode(), orderDTO.getOrderStatus()); } @Test public void finish() { OrderDTO result = orderService.getOne("123456"); OrderDTO orderDTO = orderService.finish(result); assertEquals(OrderStatusEnum.FINISHED.getCode(), orderDTO.getOrderStatus()); } @Test public void paid() { OrderDTO result = orderService.getOne("123456"); OrderDTO orderDTO = orderService.paid(result); assertEquals(PayStatusEnum.SUCCESS.getCode(), orderDTO.getPayStatus()); } }
订单Controller层开发 开发一个create页面,参数是一个OrderForm,其定义如下
1 2 3 4 5 6 7 8 9 10 11 12 13 14 15 16 17 18 @Data public class OrderForm { @NotEmpty(message = "姓名必填") private String name; @NotEmpty(message = "手机号必填") private String phone; @NotEmpty(message = "地址必填") private String address; @NotEmpty(message = "微信openid必填") private String openid; @NotEmpty(message = "购物车不能为空") private String items; }
要求验证这个form的内容不为空,在定义时加入注解@NotEmpty
,参数之前加入注解@Valid
过程中要求把OrderFrom转换为OrderDTO,在converter包中新建类OrderForm2OrderDTO
,用google的Gson工具,将string转换为对象,在pom.xml中需要加入依赖:
1 2 3 4 <dependency> <groupId>com.google.code.gson</groupId> <artifactId>gson</artifactId> </dependency>
OrderForm2OrderDTO
定义如下:
1 2 3 4 5 6 7 8 9 10 11 12 13 14 15 16 17 18 19 20 21 @Slf4j public class OrderForm2OrderDTO { public static OrderDTO convert(OrderForm orderForm) { OrderDTO orderDTO = new OrderDTO(); Gson gson = new Gson(); orderDTO.setBuyerName(orderForm.getName()); orderDTO.setBuyerPhone(orderForm.getPhone()); orderDTO.setBuyerAddress(orderForm.getAddress()); orderDTO.setBuyerOpenid(orderForm.getOpenid()); List<OrderDetail> orderDetailList = new ArrayList<>(); try { orderDetailList = gson.fromJson(orderForm.getItems(), new TypeToken<List<OrderDetail>>() { }.getType()); } catch (Exception e) { log.error("[对象转换]错误,string={}", orderForm.getItems()); throw new SellException(ResultEnum.PARAM_ERROR.getCode(), e.getMessage()); } orderDTO.setOrderDetailList(orderDetailList); return orderDTO; } }
查找订单的内容,需要判断用户id和订单是不是一样,我们将这部分代码放在BuyerService当中:
1 2 3 4 5 6 7 8 9 10 11 12 13 14 15 16 17 18 19 20 21 22 23 24 25 26 27 28 29 30 31 32 33 34 @Service @Slf4j public class BuyerServiceImpl implements BuyerService { @Autowired private OrderService orderService; @Override public OrderDTO findOrderOne(String openid, String orderid) { return checkOrderOwner(orderid, openid); } @Override public OrderDTO cancelOrder(String openid, String orderid) { OrderDTO orderDTO = checkOrderOwner(openid, orderid); if (orderDTO == null) { log.error("[取消订单]查不到该订单,orderid={}", orderid); throw new SellException(ResultEnum.ORDER_NOT_EXSIT); } return orderService.cancel(orderDTO); } private OrderDTO checkOrderOwner(String openid, String orderid) { OrderDTO orderDTO = orderService.getOne(orderid); if (orderDTO == null) { return null; } //判断是不是自己的订单 if (!orderDTO.getBuyerOpenid().equals(openid)) { log.error("[查询订单]订单openid不一致,openid={},orderid={}", openid, orderid); throw new SellException(ResultEnum.ORDER_OWNER_ERROR); } return orderDTO; } }
controller的定义如下:
1 2 3 4 5 6 7 8 9 10 11 12 13 14 15 16 17 18 19 20 21 22 23 24 25 26 27 28 29 30 31 32 33 34 35 36 37 38 39 40 41 42 43 44 45 46 47 48 49 50 51 52 53 54 55 56 57 58 59 60 61 62 63 64 @RestController @RequestMapping("/buyer/order") @Slf4j public class BuyerOrderController { @Autowired private OrderService orderService; @Autowired private BuyerService buyerService; //创建订单 @PostMapping("/create") public ResultVO create(@Valid OrderForm orderForm, BindingResult bindingResult) { if (bindingResult.hasErrors()) { log.error("[创建订单]参数不正确,orderForm={}", orderForm); throw new SellException(ResultEnum.PARAM_ERROR.getCode(), Objects.requireNonNull(bindingResult.getFieldError()).getDefaultMessage()); } OrderDTO orderDTO = new OrderDTO(); orderDTO = OrderForm2OrderDTO.convert(orderForm); if (CollectionUtils.isEmpty(orderDTO.getOrderDetailList())) { log.error("[创建订单]购物车不能为空"); throw new SellException(ResultEnum.CART_EMPTY); } OrderDTO createReuslt = orderService.create(orderDTO); Map<String, String> map = new HashMap<>(); map.put("orderId", createReuslt.getOrderId()); return ResultVOUtil.success(map); } //订单列表 @GetMapping("/list") public ResultVO list(@RequestParam("openid") String openid, @RequestParam(value = "page", defaultValue = "0") Integer page, @RequestParam(value = "size", defaultValue = "10") Integer size) { if (StringUtils.isEmpty(openid)) { log.error("[查询订单列表]openid为空"); throw new SellException(ResultEnum.PARAM_ERROR); } PageRequest request = PageRequest.of(page, size); Page<OrderDTO> orderDTOPage = orderService.findList(openid, request); return ResultVOUtil.success(orderDTOPage.getContent()); } //取消订单 @PostMapping("/cancel") public ResultVO cancel(@RequestParam("openid") String openid, @RequestParam("orderid") String orderid) { // TODO 不安全的做法需要改进 // OrderDTO orderDTO = orderService.getOne(orderid); // orderService.cancel(orderDTO); OrderDTO orderDTO = buyerService.findOrderOne(openid, orderid); return ResultVOUtil.success(); } //订单详情 @GetMapping("/detail") public ResultVO detail(@RequestParam("openid") String openid, @RequestParam("orderid") String orderid) { // //TODO 不安全的做法,需要改进 // OrderDTO orderDTO = orderService.getOne(orderid); // return ResultVOUtil.success(orderDTO); OrderDTO orderDTO = buyerService.findOrderOne(openid, orderid); return ResultVOUtil.success(orderDTO); } }
后面的内容主要是关于支付的,等开发有需要的时候再研究这部分。
原文:大专栏 Spring实战课程——微信点餐平台
标签: String ,Spring ,private ,订单 ,orderDTO ,点餐 ,微信 ,new ,public
来源: https://www.cnblogs.com/wangziqiang123/p/11618247.html