springboot策略模式的另一种实现
作者:互联网
前言
在很早之前,我们曾分享过springboot的一种策略模式实现,在我们当时的实现中,不仅需要自定义策略服务的初始化过程,而且我们还需要手动处理策略服务的类扫描逻辑,整个实现逻辑不仅繁琐、不够简洁,而且需要增加项目的基础配置类,一定程度上会破坏项目的整体架构,所以我在实际开发中也很少用,除非策略模式特别必须,而且策略服务特别多,否则我也不太愿意增加整套初始化操作。
对之前策略模式实现过程感兴趣的小伙伴(主要是通过自定义注解和自定义类的扫描、初始化过程实现策略注入),可以去回顾下:
对之前策略模式实现过程感兴趣的小伙伴可以去回顾下:
今天我们来分享另一种策略模式的实现方式,好处就是实现简单,不需要引入额外的配置类和繁琐的服务初始化过程,下面我们就来一起看下具体的实现过程吧。
实现过程
首先,我们需要定义一个策略服务的接口,这个接口的作用就是为了让具体的策略实现,然后便于后面springboot帮我们注入到策略容器中,比如我们有一个TestInterface的策略接口,接口很简单只有一个方法:
public interface TestInterface {

    String hello();
}
它的实现分别是:
这里需要留意的是,我们这里为每个策略的实现类制定了bean的名称,这个名称可以作为一种业务选择器来使用,大家可以理解为策略类型,在后面的代码中,我们可以看到,我们其实是可以根据这个名称拿到对应策略的实例的
策略服务Test1
@Service("Test1")
public class Test1Impl implements TestInterface {
    @Override
    public String hello() {
        return "Test1Impl";
    }
}
策略服务Test2
@Service("Test2")
public class Test2Impl implements TestInterface {
    @Override
    public String hello() {
        return "Test2Impl";
    }
}
策略服务Test3
@Service("Test3")
public class Test3Impl implements TestInterface {
    @Override
    public String hello() {
        return "Test3Impl";
    }
}
然后在我们需要用到策略服务的地方,注入我们策略服务的容器:
@RestController
public class TestController {
    // 可以将我们的策略注入到list中
    @Autowired
    private List<TestInterface> testInterfaces;
    // 或者注入到Map中
    @Autowired
    private Map<String, TestInterface> testInterfaceMap;

    @GetMapping("/test")
    public Object test(String name) {
        int size = testInterfaces.size();
        System.out.println(testInterfaces.get(2).hello());
        TestInterface testInterface = testInterfaceMap.get(name);
        System.out.println(testInterface.hello());
        System.out.println(size);
        return size;
    }
}
下面我们简单测试一下:
###
GET http://localhost:8088/test?name=Test1
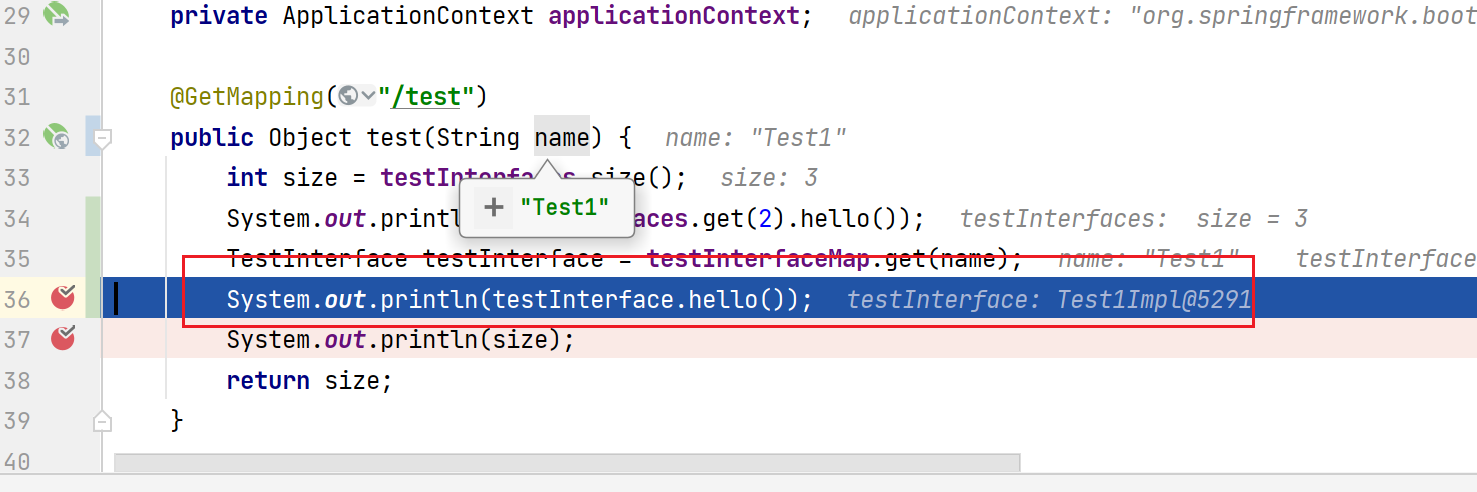
可以看到我们已经拿到了Test1的策略服务,执行结果如下:
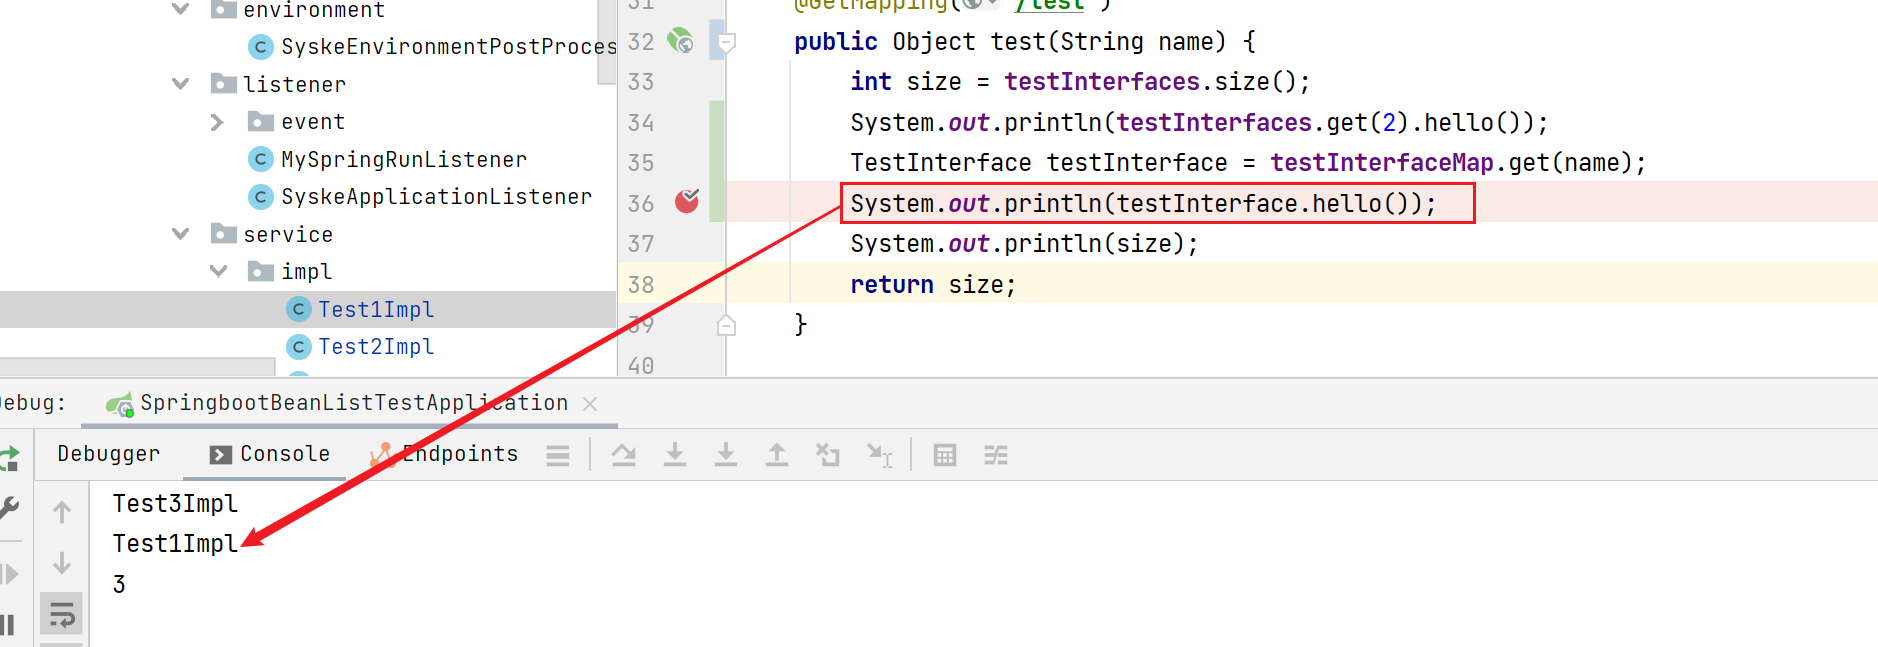
整个过程是不是很简单呢?这里的核心代码其实就是这一行:
@Autowired
private Map<String, TestInterface> testInterfaceMap;
这一段代码的作用就是构建策略服务的beanName和bean实例的映射关系,因为我们在testInterfaceMap变量上加了@Autowired注解,所以容器的填充其实是由spring boot帮我们自动完成的。
这里我觉得有必要稍微解释下,当时看到有同事写了类似这样的代码:
@Autowired
private List<TestInterface> testInterfaces;
在接口的处理逻辑中,他直接循环遍历上面的testInterfaces,然后调用接口的方法。
我当时第一眼看到这样的代码,我其实也是懵逼的,我寻思这testInterfaces没有进行初始化操作,实际调用不会报错吗,我还以为他是在别的地方写了初始化和注入的操作。
然后找了半天也没找到,最后和他探讨之后,才知道,原来这样的操作是spring boot本身就具备的特性(然鹅我竟然一直不知道
标签:springboot,Autowired,实现,模式,我们,TestInterface,public,策略 来源: https://www.cnblogs.com/caoleiCoding/p/16414596.html