OAuth + Security - 2 - 资源服务器配置
作者:互联网
资源服务器配置#
@EnableResourceServer 注解到一个@Configuration配置类上,并且必须使用ResourceServerConfigurer 这个配置对象来进行配置(可以选择继承自ResourceServerConfigurerAdapter然后覆写其中的方法,参数就是这个对象的实例),下面是一些可以配置的属性:
- ResourceServerSecurityConfigurer中主要包括:
-
tokenServices :ResourceServerTokenServices 类的实例,用来实现令牌服务。
-
tokenStore :TokenStore类的实例,指定令牌如何访问,与tokenServices配置可选
-
resourceId :这个资源服务的ID,这个属性是可选的,但是推荐设置并在授权服务中进行验证
-
其他的拓展属性例如 tokenExtractor 令牌提取器用来提取请求中的令牌。
- HttpSecurity配置这个与Spring Security类似:
-
请求匹配器,用来设置需要进行保护的资源路径,默认的情况下是保护资源服务的全部路径。
-
通过 http.authorizeRequests()来设置受保护资源的访问规则
-
其他的自定义权限保护规则通过 HttpSecurity 来进行配置。
具体的配置信息如下:
Copy@Configuration
@EnableResourceServer
@EnableGlobalMethodSecurity(prePostEnabled = true)
public class DimplesResourceServerConfigurerAdapter extends ResourceServerConfigurerAdapter {
public static final String RESOURCE_ID = "dimples";
@Autowired
private TokenStore tokenStore;
@Override
public void configure(ResourceServerSecurityConfigurer resources) {
resources.resourceId(RESOURCE_ID)
.tokenServices(tokenService())
.stateless(true);
}
@Override
public void configure(HttpSecurity http) throws Exception {
http
.authorizeRequests()
// 配置客户端权限scope
.antMatchers("/**").access("#oauth2.hasScope('all')")
.and().csrf().disable()
// 关闭session
.sessionManagement().sessionCreationPolicy(SessionCreationPolicy.STATELESS);
}
/**
* 资源服务令牌解析服务,调用远程服务解析
*/
/*@Bean
public ResourceServerTokenServices tokenService() {
//使用远程服务请求授权服务器校验token,必须指定校验token 的url、client_id,client_secret
RemoteTokenServices service = new RemoteTokenServices();
service.setCheckTokenEndpointUrl("http://localhost:8080/oauth/check_token");
service.setClientId("dimples");
service.setClientSecret("123456");
return service;
}*/
/**
* 资源服务器令牌解析服务,资源和认证在一起,不用调用远程
*
* @return ResourceServerTokenServices
*/
@Bean
@Primary
public ResourceServerTokenServices tokenService() {
DefaultTokenServices services = new DefaultTokenServices();
// 必须设置
services.setTokenStore(tokenStore);
return services;
}
}
tokenService():是配置访问资源服务时传过来的令牌解析服务,有两种情况:
-
资源服务器和认证服务器在一起,这是只需要配置默认的DefaultTokenServices即可,但是要注意必须配置一个TokenStore,即是认证服务器中存储令牌的配置,在本地进行解析验证。
-
资源服务器和认证服务器不在一起,如微服务中的单独认证服务器和多个资源服务器,这是我们需要配置远程令牌访问解析服务RemoteTokenServices ,配置token的验证端点/oauth/check_token,最终将其配置到资源服务器。要注意的是,一定要在认证服务器中开启相应的端点:
@Override
    public void configure(AuthorizationServerSecurityConfigurer security) {
        security
                // /oauth/token_key公开
                .tokenKeyAccess("permitAll()")
                // /oauth/check_token公开
                .checkTokenAccess("permitAll()")
                .allowFormAuthenticationForClients();
    }
- 如果是资源服务分离情况下,还需要配置Security一个安全控制
@Configuration
public class WebSecurityConfig extends WebSecurityConfigurerAdapter{
    /**
     * 安全拦截机制(最重要)
     */
    @Override
    protected void configure(HttpSecurity http) throws Exception{
        http.csrf().disable()
            .authorizeRequests()
            //所有/user/**的请求必须认证通过
            .antMatchers("/user/**").authenticated()
            //除了/user/**,其它的请求可以访问
            .anyRequest().permitAll();
    }
}
测试资源服务器#
新建controller访问链接
Copy@RestController
@RequestMapping("user")
public class UserController {
@GetMapping
@PreAuthorize("hasAuthority('admin')")
public DimplesUser user() {
DimplesUser user = new DimplesUser();
user.setUserName("username");
return user;
}
}
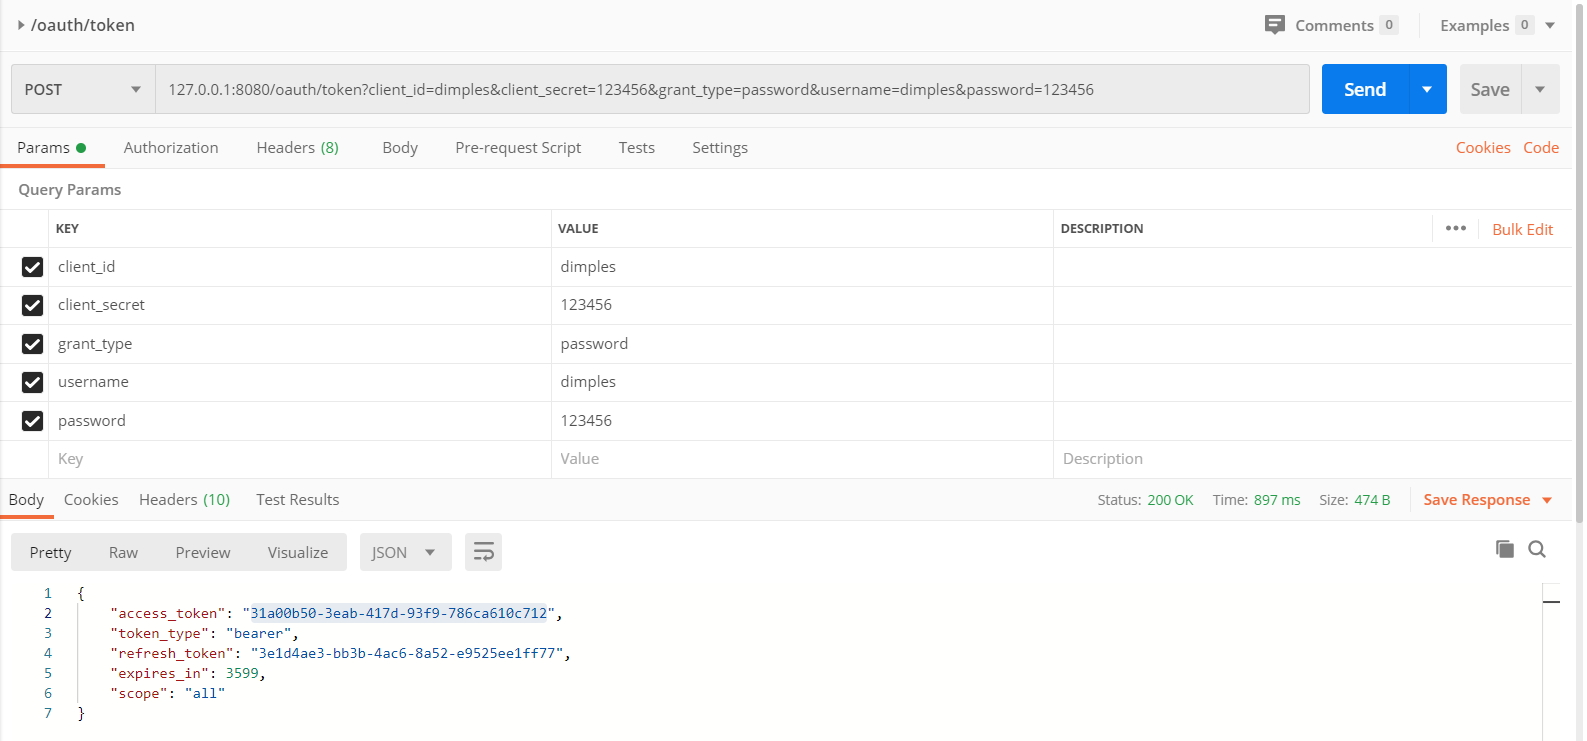
先通过密码模式获取token
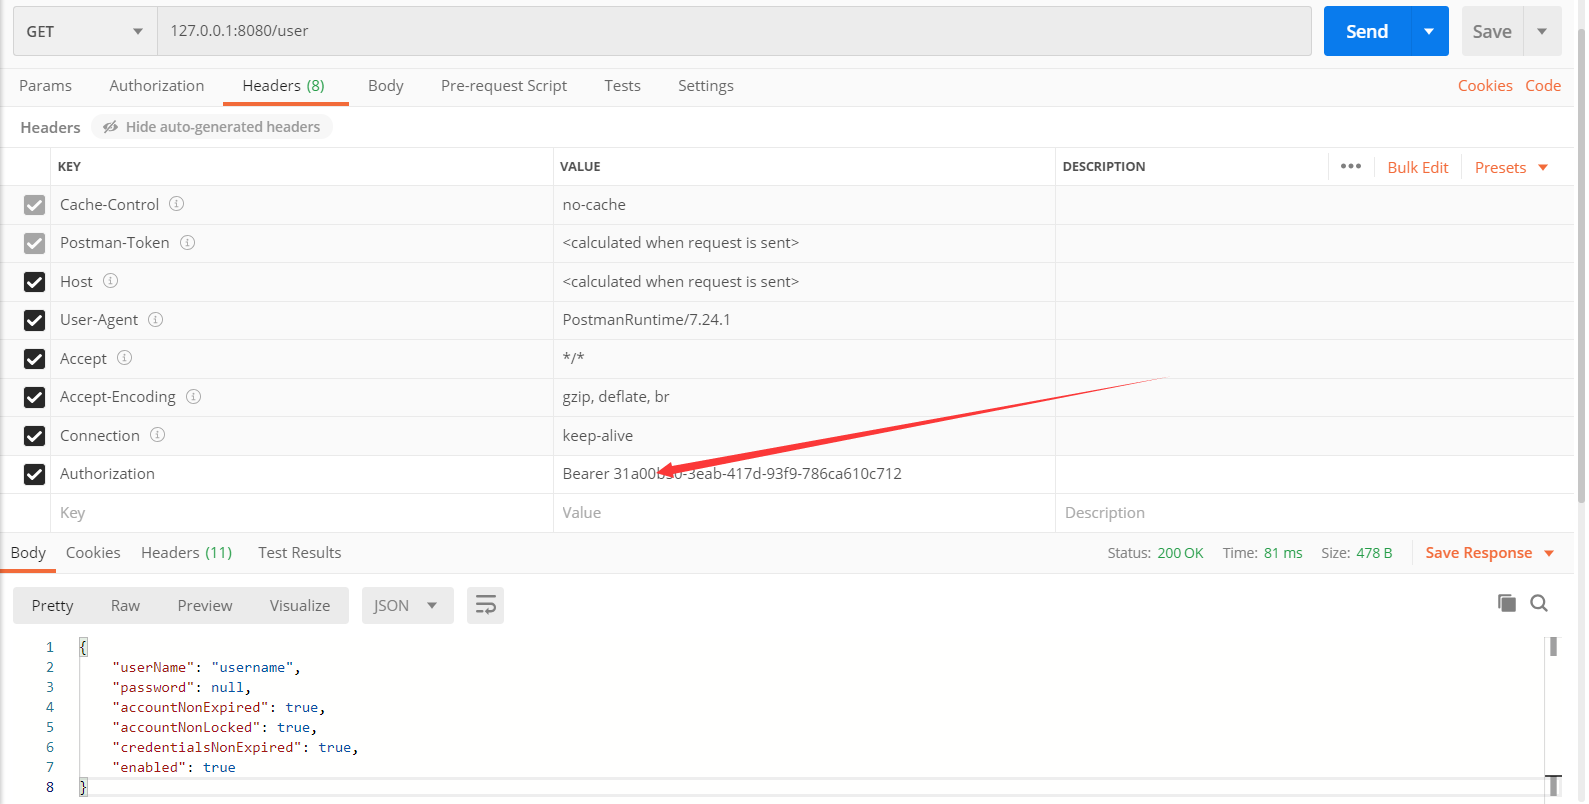
然后带上获取的token去访问相应的资源
token传输格式为 在OAuth2.0中规定:
- token必须放在Header中
- 对应的格式为:token的参数名称为:Authorization,值为:Bearer token值
如果传错误的token
或者不传token
转自:https://www.cnblogs.com/reroyalup/p/13030212.html标签:令牌,配置,token,user,OAuth,服务器,Security,public 来源: https://www.cnblogs.com/javalinux/p/16151574.html


