Use single-tenant server-to-server authentication - PowerApps
作者:互联网
The single-tenant server-to-server (S2S) scenario typically applies for enterprise organizations that have multiple Microsoft Dataverse environments using Active Directory Federation Services (AD FS) for authentication. However, it can also be applied by environments when the application won't be distributed to other environments.
An enterprise can create a web application or service to connect to any Dataverse environments associated with a single Azure Active Directory (Azure AD) tenant.
Differences from multi-tenant scenario
Creating a web application or service for single-tenant server-to-server authentication is similar to authentication for a multi-tenant organization but there are some important differences.
-
Because all the organizations are in the same tenant, there is no need for a tenant administrator to grant consent for each organization. The application is simply registered once for the tenant.
-
You have the opportunity to use certificates rather than keys if you prefer.
In the See also section at the end of this article, there are links to information on upgrading a single-tenant application to multi-tenancy.
Requirements
To create and test a single-tenant application that uses server-to-server authentication you will need:
- An Azure AD tenant to use when registering the provided sample application.
- A Dataverse subscription that is associated with the Azure AD tenant.
- Administrator privileges in the Azure AD tenant and Dataverse environment.
Azure application registration
To create an application registration in Azure AD, follow these steps.
-
Navigate to https://admin.microsoft.com and sign in, or from your Dataverse environment web page, and select the application launcher in the top left corner.
-
Choose Admin > Admin centers > Azure Active Directory
-
From the left panel, choose Azure Active Directory > App registrations (Preview)
-
Choose + New registration
-
In the Register an application form provide a name for your app, select Accounts in this organizational directory only, and choose Register. A redirect URI is not needed for this walkthrough and the provided sample code.

-
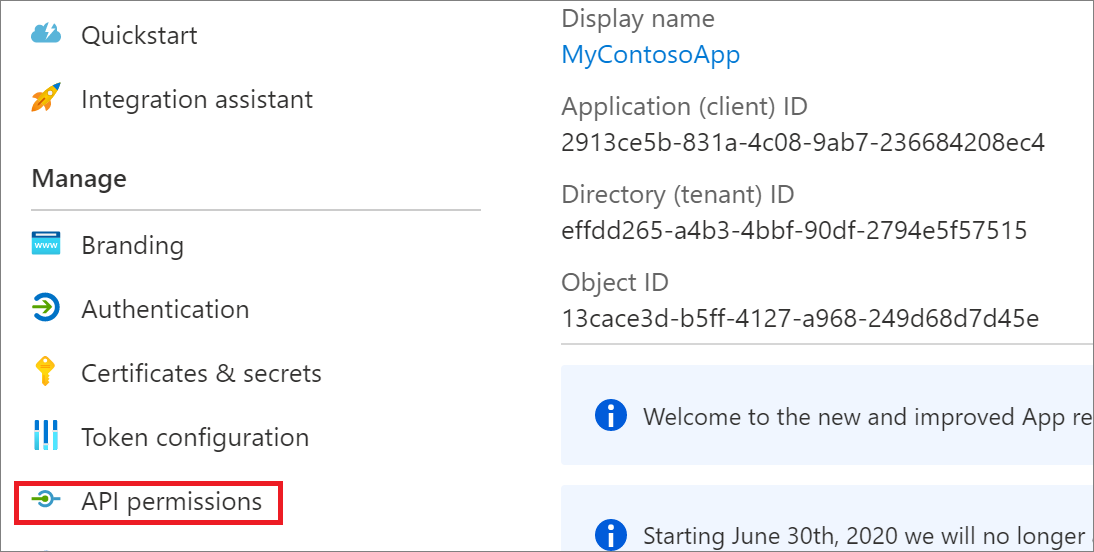
On the Overview page, select API permissions

-
Choose + Add a permission
-
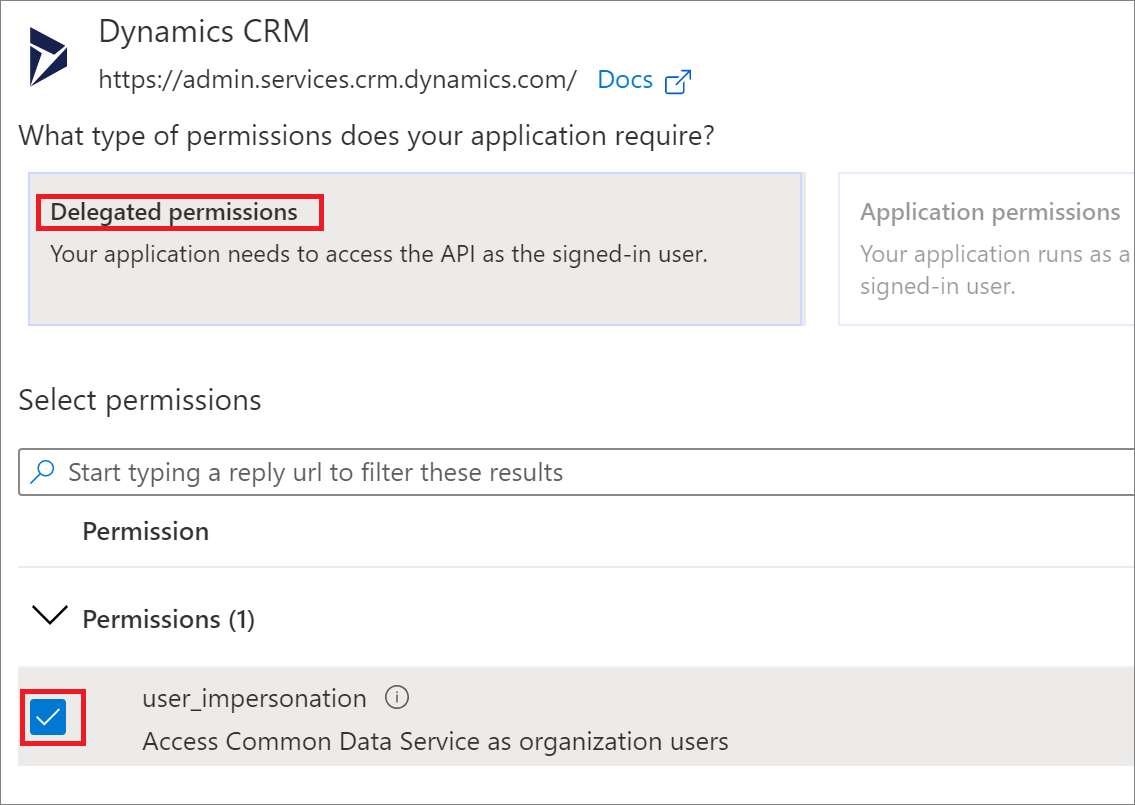
In the Microsoft APIs tab, choose Dynamics CRM
-
In the Request API permission form, select Delegated permissions, check user_impersonation, and select Add permissions

-
On the API permissions page select Grant admin consent for "org-name" and when prompted choose Yes

-
Select Overview in the navigation panel, record the Display name, Application ID, and Directory IDvalues of the app registration. You will provide these later in the code sample.
-
In the navigation panel, select Certificates & secrets
-
Below Client secrets, choose + New client secret to create a secret
-
In the form, enter a description and select Add. Record the secret string. You will not be able to view the secret again once you leave the current screen.
Application user creation
You can create an unlicensed "application user" in your environment. This application user will be given access to your environment's data on behalf of the end user who is using your application.
For instructions on creating an application user see Create an application user.
For instructions on managing security roles for an application user see Manage roles for an application user
Note
In an environment, only one application user for each Azure AD registered application is supported. You will not be able to change the primary email address or username once the application user is created.
When developing a real-world application using S2S, you should use a custom security role which can be stored in a solution and distributed along with your application.
Enable or disable application users
When application users are created, they are automatically activated. In the event that an application user’s status is deactivated and you need to activate it, you do so using the Power Platform Admin Center. You can also use the Power Platform Admin Center to deactivate an application user that is no longer used.
More information: Activate or deactivate an application user
Caution
Disabling an application user will break all the integration scenarios that use the application user.
Application coding and execution
Follow these steps to download, build, and execute the sample application. The sample calls the Web API to return a list of the top 3 accounts (by name) in the organization.
- Download the Visual Studio 2017 SingleTenantS2S sample.
- Update the App.config file with your app registration and server key values.
- Build and run the application.
Expected results
An OData response listing the names of the top 3 accounts in your organization.
Example console output
Shown below is example console output obtained from an organization that only had two accounts named "Test Account 1", and "Test Account 2".
JSON{
"@odata.context":"https://crmue2.api.crm.dynamics.com/api/data/v9.1/$metadata#accounts(name)",
"@Microsoft.Dynamics.CRM.totalrecordcount":-1,
"@Microsoft.Dynamics.CRM.totalrecordcountlimitexceeded":false,
"value":[
{"@odata.etag":"W/\"4648334\"","name":"Test Account 1","accountid":"28630624-cac9-e811-a964-000d3a3ac063"},
{"@odata.etag":"W/\"4648337\"","name":"Test Account 2","accountid":"543fd72a-cac9-e811-a964-000d3a3ac063"}]
}标签:Use,PowerApps,server,application,user,Azure,your,tenant 来源: https://www.cnblogs.com/lingdanglfw/p/15571267.html