Spring Cloud教程 第六弹 Hystrix底层原理核心篇
作者:互联网
更多Spring与微服务相关的教程请戳这里 Spring与微服务教程合集
1、Hystrix资源隔离技术
hystrix github 官方文档:https://github.com/Netflix/Hystrix/wiki
hystrix可以完成隔离、限流、熔断、降级这些常用保护功能。
hystrix的隔离分为线程池隔离和信号量隔离
1.1、信号量隔离
- 信号量隔离就是hystrix的限流功能。虽然名字叫隔离,实际上它是通过信号量来实现的,而信号量说白了就是个计数器,当计数器计算达到设定的阈值,直接就做异常处理。
- 而hystrix信号量隔离限制的是tomcat等Web容器线程数,一段时间仅仅能支持这么多,多余的请求再来请求线程资源,就被拒绝了。由于实际是通过隔离了部分容器线程资源,也算是一种隔离方式
- 信号量隔离是同步的,所以不支持计算超时时间(需要自己手动实现)
- 信号量隔离只是起了个限制作用,它的保护能力有限,如果下游服务有问题,长时间不返回结果,那也只能等着。因为本身信号量隔离对单个请求是起不到任何作用的,它只能限制请求过多问题(请求过多则拒绝,不让整个服务挂)
为了解决这个问题,hystrix又产生了线程池隔离。这种隔离方式是通过引入额外线程(这里的额外是相对于Tomcat的线程来说的,引入额外线程会造成额外开销)的方式。
1.2、线程池隔离
Hystrix采用额外的线程来对原来的web容器线程做管理控制,如果一个线程超时未返回,则熔断。既然引入额外的线程就涉及到线程池管理、线程的上下文切换这些额外的开销,所以相比信号量隔离,线程池隔离成本更高。
Hystrix可以为每一个依赖建立一个线程池,使之和其他依赖的使用资源隔离,同时限制他们的并发访问和阻塞扩张。每个依赖可以根据权重分配资源(这里主要是线程),每一部分的依赖出现了问题,也不会影响其他依赖的使用资源。
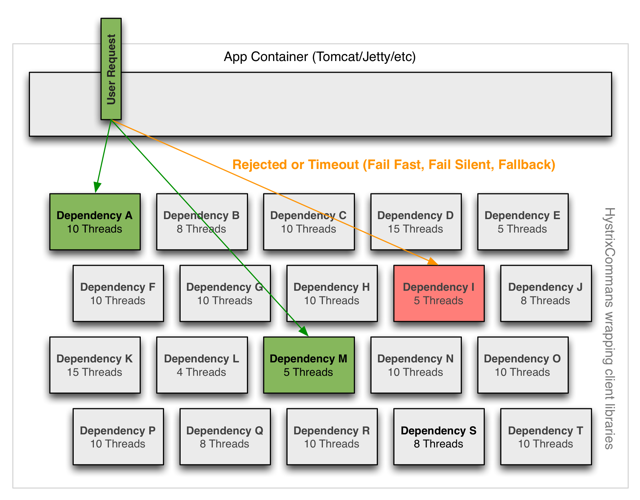
- Hystrix使用Command模式对依赖调用进行封装,每一个Command就是一个上面所说的依赖,Command可以指定CommandKey
- Command Group可以把一组Command归为一组,默认情况下,Hystrix会为每一个Command Group建立一个线程池
- 每一个线程池都有一个Key,这个线程池就是线程隔离的关键,所有的监控、缓存、调用等等都来自于这个线程池,默认的Thread Pool key就是command group名称
- 默认情况下,每一个Command Group会自动创建一个线程池,尽管如此,还是会有这样的情况:当有一些依赖在一个Command Group中,但是又有隔离的必要的时候(比如一个依赖的超时会用满所有的线程池线程,这样就会影响到其他的依赖),可以为组里的Command指定Thread Pool Key
1.3、Command模式
Command模式:Hystrix中大量使用rxjava来实现Command模式。所有自定义的Command,不管继承于HystrixObservableCommand还是HystrixCommand,最终都继承于AbstractCommand。
关于Command的初始化过程,后面会通过源码讲到。
1.4、如何选择隔离策略
信号量隔离:
- 对于那些本来延迟就比较小的请求来说,线程池带来的开销是非常高的,因此用信号量隔离更好
- 适用于不是对外部依赖的访问,因为对外部依赖的访问时长难以控制
- 针对超大并发量的场景下,此时用线程池的话,可能撑不住那么高的并发,如果硬撑住,可能要耗费大量的线程资源,那么就用信号量,来进行限流保护
2、Hystrix 工作原理
2.1、流程

2.1.1、构造HystrixCommand或HystrixObservableCommand对象
返回单个响应,则:
HystrixCommand command = new HystrixCommand(arg1, arg2);
返回一个发出响应的可观测对象:
HystrixObservableCommand command = new HystrixObservableCommand(arg1, arg2);
2.1.2、执行Command
有四种方式:
- execute():阻塞,返回单个响应(或者在错误的情况下抛出一个异常)
- queue():返回一个包含单个响应的Future
- observe():订阅可返回响应的可观察对象,并且返回一个Observable(复制源Observable)
- toObservable():返回一个可观察对象,当你订阅它时,它将执行Hystrix命令并发出它的响应
注意:
第一种方式和第二种方式只适用于HystrixCommand,不适用于HystrixObservableCommand
execute()实际上是调用queue().get()。而queue()实际上是调用toObservable(). toblocking (). tofuture()。也就是说,最终每个HystrixCommand都有一个可观察的实现支持,即使是那些打算返回单个简单值的命令
K             value   = command.execute();
Future<K>     fValue  = command.queue();
Observable<K> ohValue = command.observe();         //热observable
Observable<K> ocValue = command.toObservable();    //冷observable
2.1.3、是否缓存了响应
如果这个命令启用了请求缓存,并且缓存中有对请求的响应,那么这个缓存的响应将立即以可观察对象的形式返回
请求缓存位于线程执行之前,即construct()或run()方法调用的前面
如果Hystrix没有实现请求缓存,则我们需要在construct()或run()方法里面手动实现请求缓存,即线程执行之后
2.1.4、断路器是否打开
当你执行命令时,Hystrix检查断路器,看看电路是否打开。如果电路打开(或触发),那么Hystrix将不会执行命令,但会将流路由到(8)获得回退。
如果电路关闭,则流继续流到(5),以检查是否有可用的容量来运行命令。
2.1.5、线程池、队列、信号量容量是否饱满
如果使用线程池隔离,则检查线程池、队列容量是否饱满
如果使用信号量隔离,则检查信号量是否饱满
2.1.6、执行请求
- HystrixCommand.run() — 返回单个响应或者抛出异常,然后发出一个onCompleted通知
- HystrixObservableCommand.construct() —返回一个可发出响应的可观测对象或者发出一个onError的事件
2.1.7、计算电路是否健康
Hystrix向断路器报告成功、失败、拒绝和超时,断路器维护一组滚动计数器来计算统计数据。
它使用这些统计数据来确定电路何时应该“跳闸”,在这一点上它会短路任何后续请求,直到恢复期结束,在恢复期结束后,它会在第一次检查后再次关闭电路。
2.1.8、获取回退方法
- 在HystrixCommand的情况下,为了提供回退逻辑,你需要实现HystrixCommand. getfallback(),它返回一个回退值
- 在HystrixObservableCommand的情况下,要提供回退逻辑,你需要实现HystrixObservableCommand. resumewithfallback(),它返回一个可以发出回退值的可观察对象
- 如果没有为Hystrix命令实现回退方法,或者回退本身抛出异常,那么Hystrix仍然会返回一个可观察对象,但它不发出任何东西,并立即以onError通知结束
如果没有实现回退,则不同的执行方法会有不同的现象:
- execute():抛出异常
- queue():会成功返回Future,但是如果调用了它的get()方法,Future将抛出异常
- observe() :返回一个可观察对象,当你订阅它时,它将通过调用订阅者的onError方法立即终止
- toObservable() :返回一个可观察对象,当你订阅它时,它将通过调用订阅者的onError方法来终止
2.1.9、返回成功的响应

3、Hystrix API
<dependency>
    <groupId>com.netflix.hystrix</groupId>
    <artifactId>hystrix-core</artifactId>
    <version>1.5.18</version>
</dependency>
因为HystrixCommand是一个抽象类,所以我们需要继承它并重写run方法
import com.netflix.hystrix.HystrixCommand;
import com.netflix.hystrix.HystrixCommandGroupKey;

public class CommandHelloWorld extends HystrixCommand<String> {


    private final String name;

    public CommandHelloWorld(String name) {
        super(HystrixCommandGroupKey.Factory.asKey("HelloGroup"));
        this.name = name;
    }

    @Override
    protected String run() {
        return "Hello " + name + "!";
    }


    public static void main(String[] args) {
        String s = new CommandHelloWorld("bobo").execute();
        System.out.println(s);

    }
}
更多API使用方法请戳这里:https://github.com/Netflix/Hystrix/wiki/How-To-Use
4、源码解读
关于HystrixCommand,包括HystrixObservableCommand,都是继承AbstractCommand的,而AbstractCommand有一个最核心的构造方法,该构造方法包含了该command的所有配置
protected AbstractCommand(HystrixCommandGroupKey group, HystrixCommandKey key, HystrixThreadPoolKey threadPoolKey, HystrixCircuitBreaker circuitBreaker, HystrixThreadPool threadPool,
            HystrixCommandProperties.Setter commandPropertiesDefaults, HystrixThreadPoolProperties.Setter threadPoolPropertiesDefaults,
            HystrixCommandMetrics metrics, TryableSemaphore fallbackSemaphore, TryableSemaphore executionSemaphore,
            HystrixPropertiesStrategy propertiesStrategy, HystrixCommandExecutionHook executionHook) {

        this.commandGroup = initGroupKey(group);
        this.commandKey = initCommandKey(key, getClass());
        this.properties = initCommandProperties(this.commandKey, propertiesStrategy, commandPropertiesDefaults);
        this.threadPoolKey = initThreadPoolKey(threadPoolKey, this.commandGroup, this.properties.executionIsolationThreadPoolKeyOverride().get());
        this.metrics = initMetrics(metrics, this.commandGroup, this.threadPoolKey, this.commandKey, this.properties);
        this.circuitBreaker = initCircuitBreaker(this.properties.circuitBreakerEnabled().get(), circuitBreaker, this.commandGroup, this.commandKey, this.properties, this.metrics);
        this.threadPool = initThreadPool(threadPool, this.threadPoolKey, threadPoolPropertiesDefaults);

        //Strategies from plugins
        this.eventNotifier = HystrixPlugins.getInstance().getEventNotifier();
        this.concurrencyStrategy = HystrixPlugins.getInstance().getConcurrencyStrategy();
        HystrixMetricsPublisherFactory.createOrRetrievePublisherForCommand(this.commandKey, this.commandGroup, this.metrics, this.circuitBreaker, this.properties);
        this.executionHook = initExecutionHook(executionHook);

        this.requestCache = HystrixRequestCache.getInstance(this.commandKey, this.concurrencyStrategy);
        this.currentRequestLog = initRequestLog(this.properties.requestLogEnabled().get(), this.concurrencyStrategy);

        /* fallback semaphore override if applicable */
        this.fallbackSemaphoreOverride = fallbackSemaphore;

        /* execution semaphore override if applicable */
        this.executionSemaphoreOverride = executionSemaphore;
    }
而前面说到,Thread Pool,Command Group,Command Key都在AbstractCommand这里实现
而正好上面的代码中,其中有一行是这样的:
this.threadPool = initThreadPool(threadPool, this.threadPoolKey, threadPoolPropertiesDefaults);这一行代码表示加载线程池,点进去看看

再点进去看看

点进去HystrixThreadPoolDefault的构造方法,看看做了什么

再点进去看看,就能看到最终创建线程池的代码了


标签:隔离,Hystrix,Spring,信号量,Command,HystrixCommand,线程,Cloud 来源: https://blog.51cto.com/u_14643435/2845386