springboot异步线程(三)源码解析(一)
作者:互联网
前言
本篇文章主要是讲EnableAsync源码的解析,侧重点是EnableAsync如何开启aop并生效的,在看之前需要知道一些关于spring的东西:
- @Import注解
- spring的Aware接口
- spring AOP
建议最好先看上一篇文章MethodInterceptor 的几种用法(二),如果知道那篇文章里面的那些东西,就当这句不存在。。。
正文
1.入口@EnableAsync注解
@Target({ElementType.TYPE})
@Retention(RetentionPolicy.RUNTIME)
@Documented
@Import({AsyncConfigurationSelector.class})
public @interface EnableAsync {
    Class<? extends Annotation> annotation() default Annotation.class;

    boolean proxyTargetClass() default false;
    // 注意这里的默认值
    AdviceMode mode() default AdviceMode.PROXY;

    int order() default 2147483647;
}
这里使用了@Import注解,直接引入了AsyncConfigurationSelector,接下来看看AsyncConfigurationSelector的源码;
关于@Import注解可以看看这篇文章:SpringBoot里的@Import使用
2. AsyncConfigurationSelector
public class AsyncConfigurationSelector extends AdviceModeImportSelector<EnableAsync> {
    private static final String ASYNC_EXECUTION_ASPECT_CONFIGURATION_CLASS_NAME = "org.springframework.scheduling.aspectj.AspectJAsyncConfiguration";

    public AsyncConfigurationSelector() {
    }

    @Nullable
    public String[] selectImports(AdviceMode adviceMode) {
        switch(adviceMode) {
        case PROXY:
            return new String[]{ProxyAsyncConfiguration.class.getName()};
        case ASPECTJ:
            return new String[]{"org.springframework.scheduling.aspectj.AspectJAsyncConfiguration"};
        default:
            return null;
        }
    }
}
该类的继承图如下:
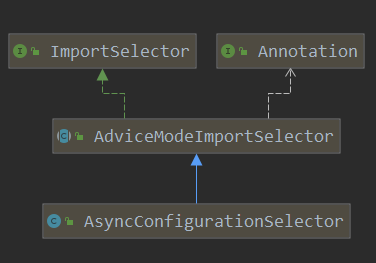
看见了ImportSelector接口,直接进入selectImports方法,由于默认PROXY,直接进入ProxyAsyncConfiguration类;
3. ProxyAsyncConfiguration类
源码如下:
@Configuration
@Role(BeanDefinition.ROLE_INFRASTRUCTURE)
public class ProxyAsyncConfiguration extends AbstractAsyncConfiguration {

	@Bean(name = TaskManagementConfigUtils.ASYNC_ANNOTATION_PROCESSOR_BEAN_NAME)
	@Role(BeanDefinition.ROLE_INFRASTRUCTURE)
	public AsyncAnnotationBeanPostProcessor asyncAdvisor() {
		Assert.notNull(this.enableAsync, "@EnableAsync annotation metadata was not injected");
		AsyncAnnotationBeanPostProcessor bpp = new AsyncAnnotationBeanPostProcessor();
		bpp.configure(this.executor, this.exceptionHandler);
		Class<? extends Annotation> customAsyncAnnotation = this.enableAsync.getClass("annotation");
		if (customAsyncAnnotation != AnnotationUtils.getDefaultValue(EnableAsync.class, "annotation")) {
			bpp.setAsyncAnnotationType(customAsyncAnnotation);
		}
		bpp.setProxyTargetClass(this.enableAsync.getBoolean("proxyTargetClass"));
		bpp.setOrder(this.enableAsync.<Integer>getNumber("order"));
		return bpp;
	}
}
该类的继承图如下:
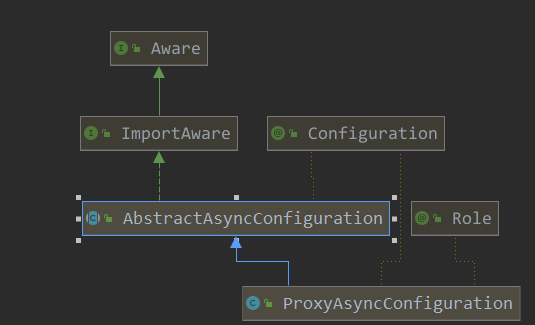
3.1 AbstractAsyncConfiguration
由于该类继承了AbstractAsyncConfiguration,来看看AbstractAsyncConfiguration代码中的两个方法:
    @Override
	public void setImportMetadata(AnnotationMetadata importMetadata) {
		this.enableAsync = AnnotationAttributes.fromMap(
				importMetadata.getAnnotationAttributes(EnableAsync.class.getName(), false));
		if (this.enableAsync == null) {
			throw new IllegalArgumentException(
					"@EnableAsync is not present on importing class " + importMetadata.getClassName());
		}
	}

	/**
	 * Collect any {@link AsyncConfigurer} beans through autowiring.
	 */
	@Autowired(required = false)
	void setConfigurers(Collection<AsyncConfigurer> configurers) {
		if (CollectionUtils.isEmpty(configurers)) {
			return;
		}
		if (configurers.size() > 1) {
			throw new IllegalStateException("Only one AsyncConfigurer may exist");
		}
		AsyncConfigurer configurer = configurers.iterator().next();
		this.executor = configurer::getAsyncExecutor;
		this.exceptionHandler = configurer::getAsyncUncaughtExceptionHandler;
	}
上面两个方法分别做了两件事:
- setImportMetadata方法主要是将EnableAsync注解中的数据放入该类的enableAsync中
- setConfigurers是将实现AsyncConfigurer接口的类的信息放入本类的executor属性及exceptionHandler属性中
其中第二个方法就是springboot异步线程(二)文章中 四 接口实现这部分的源码了
4. AsyncAnnotationBeanPostProcessor
ProxyAsyncConfiguration类中生成了一个bean,这个bean就是AsyncAnnotationBeanPostProcessor;
继承图如下:
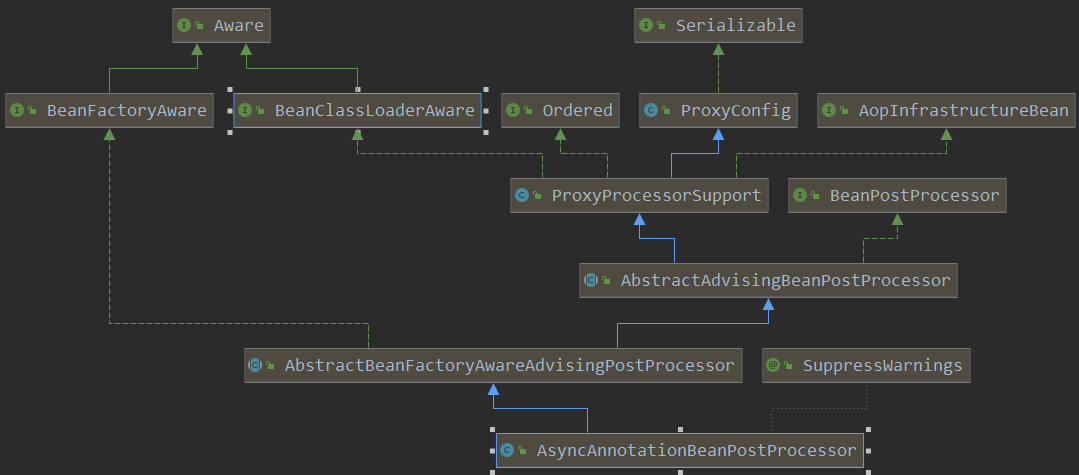
部分代码:
@Override
	public void setBeanFactory(BeanFactory beanFactory) {
		super.setBeanFactory(beanFactory);

		AsyncAnnotationAdvisor advisor = new AsyncAnnotationAdvisor(this.executor, this.exceptionHandler);
		if (this.asyncAnnotationType != null) {
			advisor.setAsyncAnnotationType(this.asyncAnnotationType);
		}
		advisor.setBeanFactory(beanFactory);
		this.advisor = advisor;
	}
看见这个类的名字以及上面的部分代码,是不是有一种饰曾相识的感觉,不错,就是上一篇文章MethodInterceptor 的几种用法(二)的内容了
5. AsyncAnnotationAdvisor
这个类定义切面及通知:
    private Advice advice;
	private Pointcut pointcut;
再看在AsyncAnnotationBeanPostProcessor调用的构造方法:
    public AsyncAnnotationAdvisor(
			@Nullable Supplier<Executor> executor, @Nullable Supplier<AsyncUncaughtExceptionHandler> exceptionHandler) {

		Set<Class<? extends Annotation>> asyncAnnotationTypes = new LinkedHashSet<>(2);
		//添加对Async注解
		asyncAnnotationTypes.add(Async.class);
		try {
			asyncAnnotationTypes.add((Class<? extends Annotation>)
					ClassUtils.forName("javax.ejb.Asynchronous", AsyncAnnotationAdvisor.class.getClassLoader()));
		}
		catch (ClassNotFoundException ex) {
			// If EJB 3.1 API not present, simply ignore.
		}
		this.advice = buildAdvice(executor, exceptionHandler);
		this.pointcut = buildPointcut(asyncAnnotationTypes);
	}
	//构造通知
	protected Advice buildAdvice(
			@Nullable Supplier<Executor> executor, @Nullable Supplier<AsyncUncaughtExceptionHandler> exceptionHandler) {

		AnnotationAsyncExecutionInterceptor interceptor = new AnnotationAsyncExecutionInterceptor(null);
		interceptor.configure(executor, exceptionHandler);
		return interceptor;
	}
	//构造切点
	protected Pointcut buildPointcut(Set<Class<? extends Annotation>> asyncAnnotationTypes) {
		ComposablePointcut result = null;
		for (Class<? extends Annotation> asyncAnnotationType : asyncAnnotationTypes) {
			Pointcut cpc = new AnnotationMatchingPointcut(asyncAnnotationType, true);
			Pointcut mpc = new AnnotationMatchingPointcut(null, asyncAnnotationType, true);
			if (result == null) {
				result = new ComposablePointcut(cpc);
			}
			else {
				result.union(cpc);
			}
			result = result.union(mpc);
		}
		return (result != null ? result : Pointcut.TRUE);
	}
这里的主要功能就是构造切点及通知:
- 添加以Async注解为切点(还有一个ejb的注解,这里就不细说了)
- 构建通知,使用
AnnotationAsyncExecutionInterceptor构造了一个通知处理
接下来看看AnnotationAsyncExecutionInterceptor类
6. AnnotationAsyncExecutionInterceptor
先看看该类的继承图:
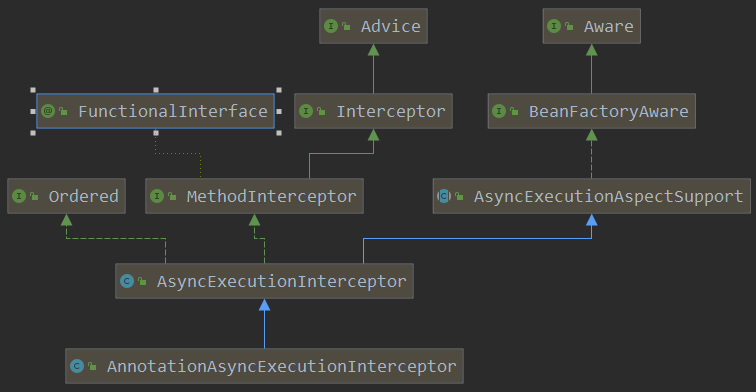
看见了MethodInterceptor接口,直接查看invoke方法,但是这个方法在该类的父类AsyncExecutionInterceptor中,这里先看看该类被AsyncAnnotationAdvisor调用的构造方法吧:
    public AnnotationAsyncExecutionInterceptor(@Nullable Executor defaultExecutor) {
		super(defaultExecutor);
	}
该类调用了父类的构造方法,一层一层往上调,最终调用的AsyncExecutionAspectSupport的构造方法,接下来去看看AsyncExecutionAspectSupport类吧;
7. AsyncExecutionAspectSupport
看看该类被调用的构造方法源码:
    public AsyncExecutionAspectSupport(@Nullable Executor defaultExecutor) {
		this.defaultExecutor = new SingletonSupplier<>(defaultExecutor, () -> getDefaultExecutor(this.beanFactory));
		this.exceptionHandler = SingletonSupplier.of(SimpleAsyncUncaughtExceptionHandler::new);
	}
该构造方法是给该类的两个属性赋值:
    private SingletonSupplier<Executor> defaultExecutor;

	private SingletonSupplier<AsyncUncaughtExceptionHandler> exceptionHandler;
小结
到这里本篇文章就结束了,大概就是讲述EnableAsync注解是如何启动并生效的;
总结
这里就来总结下本篇文章的流程吧:
- 调用
@EnableAsync注解,作用:引入AsyncConfigurationSelector类 AsyncConfigurationSelector类,作用:选择配置(默认ProxyAsyncConfiguration配置)ProxyAsyncConfiguration类,作用:构造一个AsyncAnnotationBeanPostProcessor的beanAsyncAnnotationBeanPostProcessor类,作用:构造一个AsyncAnnotationAdvisor的AdvisorAsyncAnnotationAdvisor类 作用: 构造Async注解的切点及AnnotationAsyncExecutionInterceptor类型的通知(advice)AnnotationAsyncExecutionInterceptor类,作用:invoke方法对拦截的方法进行处理
流程图如下:
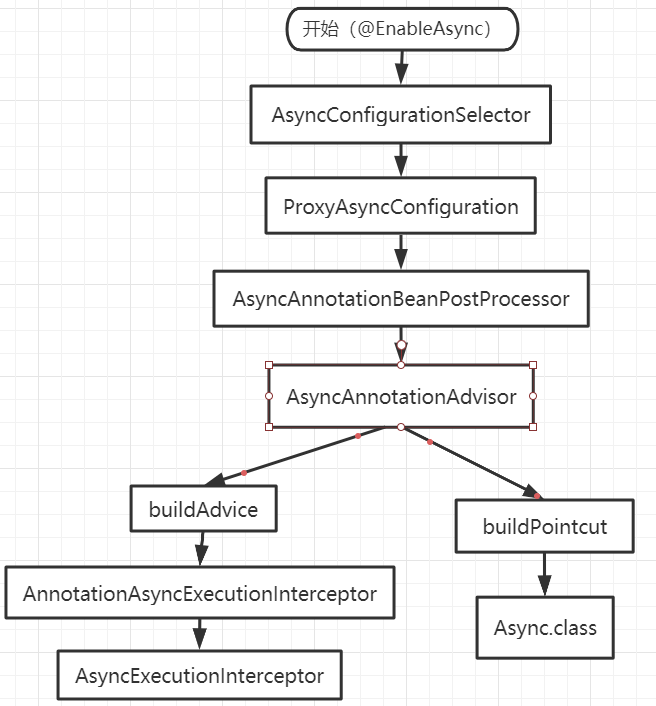
总结起来就是aop,不过是用注解的形式来开启。。。
最后
标签:EnableAsync,springboot,exceptionHandler,class,源码,线程,注解,new,public 来源: https://www.cnblogs.com/guoyuchuan/p/13234923.html