TensorFlow - 使用 TensorFlowSharp 创建 C# 应用程序
作者:互联网
目录
- 介绍
- 关于张量流
- 背景
- 什么是MNIST?为什么选择 MNIST
- 深度学习
- 关于 TensorflowSharp-Use Tensorflow from a C# Application
- 将 Tensorflow 与 GPU 结合使用
- 使用TensorFlow和Python训练CNN模型
- 在 C# 控制台应用程序中使用 Tensorflow
- 使用代码
- 兴趣点
- 历史
介绍
在模式识别领域,深度神经网络在过去5年中获得了突出的地位。这在很大程度上可以归因于更便宜的硬件,编程库和标记数据的可用性。深度神经网络或卷积神经网络(CNN)如果训练得当,可以产生惊人的结果。来自Google的TensorFlow是实现其中一些复杂算法的非常流行的库之一。
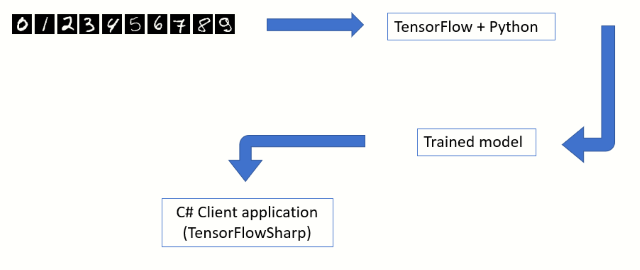
在本文中,我将演示如何训练 CNN 模型以识别 MNIST 数据库中的手写数字。接下来是一个 C# 控制台应用程序,该应用程序将使用经过训练的模型对 MNIST 数据集中的测试图像进行实际分类。本文的目的是演示如何充分利用 Python 来训练模型,以及如何充分利用 .NET 来构建使用已训练模型的假设最终用户应用程序。
关于TensorFlow
TensorFlow Native Library
复制代码///
///https://www.tensorflow.org/install/lang_c
///The windows native implementation is downloadable as a single ZIP
///and structured as follows
///
include
--------
|
|
|
--c_api.h
|
|
lib
--------
|
|
--tensorflow.dll
|
|
--tensorflow.lib
TensorFlow Bindings for Python 和 C#
Tensorflow作为C/C++动态链接库实现。特定于平台的二进制文件在 ZIP 文件中可用。在此库之上提供了各种语言的绑定。这些是调用本机库的特定语言包装器。Python可能是建立在原生TensorFlow实现之上的最通用的编程层之一。TensorFlowSharp是TensorFlow上的.NET包装器。
复制代码 TensorFlow(C/C++)
----------------
|
|
------------------------------------------------
| |
| |
| |
Python TensorFlowSharp(C#)
------ -------------------
(train model) (use model in client application)
背景
- Python - 我使用Python使用手写数字的MNIST数据集来训练CNN模型。Python的基本知识将是必不可少的。我使用Visual Studio Code(1.36.1)作为Python脚本。您可以使用任何适合您的Python编辑器。
- 我已将 Visual Studio 2017 用于简单的控制台应用程序,该应用程序使用经过训练的模型并对测试图像进行分类。
- 在本文中,我使用了TENSORFLOW的GPU版本来提高学习速度。您需要一个支持 GPU 的桌面。请注意,使用 GPU 进行编码需要安装其他 CUDA 库和驱动程序。本文还假设读者熟悉深度卷积神经网络的基本原理。
什么是MNIST?为什么选择 MNIST?
概述
MNIST 数据库是手写数字 (0-9) 的集合。这包括 60,000 个训练映像和 10,000 个测试映像。每个图像的宽度为28像素,高度为28像素,所有图像均为灰度。在机器学习和计算机视觉领域,MNIST已成为测试任何新范式的事实标准。(参考资料:http://yann.lecun.com/exdb/mnist/)

Example Pictures


Distribution of Pictures
| 0 | 1 | 2 | 3 | 4 | 5 | 6 | 7 | 8 | 9 | |
| Training | 5923 | 6742 | 5985 | 6131 | 5842 | 5421 | 5918 | 6265 | 5851 | 5949 |
| Testing | 980 | 1135 | 1032 | 1010 | 982 | 892 | 958 | 1028 | 974 | 1009 |
Deep Learning
Perceptrons
In the 1940s and 50s, the idea of a very basic mathematical neuron began to take shape. Researchers (McCulloch, Pitts and Rosenblatt) drew inspiration from the working of a biological neuron. Neurons are the building blocks of the nervous system. An average human brain has several billions of neurons indirectly connected to each other through synapses. They envisioned an individual neuron to behave like a straight-line classifier. The electric signals flowing in through the dendrites represented a real-life signal (vector) and the output signal would represent a binary (on/off) state of classification. Frank Rosenblatt (1962) took the design of McCulloch and Pitts neuron a step forward by proposing the design of the linear perceptron in his book Principles of Neurodynamics (published 1962, Section “Completely linear perceptrons”).

Single Perceptron

The blue circle represents the equation of a straight line in the form of a.x+b.y+c=0.

Given two classes of points X and O, which are linearly separable, you can find a straight line which divides the 2 classes. If you feed in the coordinates of the points in class X to the equation a.x+b.y+c and then do the same for all points in class O, then you are going to see that all points in class X produce a positive value, while all points in class O produce a negative value (or vice versa). The change of sign could be the other way round, depending on the constants a, b and c. Nevertheless, this is the overarching principle which goes to make the Perceptron behave as a linear classifier.
Multi Layer Perceptrons

If we are unable to find a single line that separates the classes X and O , as in the case of the famous XOR problem, then we could cascade multiple linear classifiers.


Convolutional Neural Networks
Deep learning takes a multi layer perceptron a step forward by combining feature extraction and hyperplane discovery. The features are extracted by layers of filters. For a thorough treatise on this subject, the reader is requested to follow Andrew Ng's tutorials.
TensorflowSharp - Using Tensorflow from a C# Application
TensorFlowSharp is a .NET wrapper over the unmanaged native libraries of TensorFlow. This is the outcome of the pioneering work done by Miguel de lcaza. TensorFlowSharp can consume a CNN model that was trained using Python and this opens up the possibility to create exciting end user applications.
Copy Codenuget install TensorFlowSharpC# Copy Code
///
///Skeletal code using TensorFlowSharp
///
byte[] buffer = System.IO.File.ReadAllBytes(modelfile);
using (var graph = new TensorFlow.TFGraph())
{
    graph.Import(buffer);
    using (var session = new TensorFlow.TFSession(graph))
    {
        /*
        1)pick a test image
        2)Created tensor object using this image
        */
        var runner = session.GetRunner();
        runner.AddInput(...,tensor,)
        runner.Fetch(...)
        var output = runner.Run();
    }
}
Using Tensorflow with GPU
Overview
Shrink ▲ Copy Code Python script
--------------
|
|
|
TensorFlow GPU package
----------------------
|
|
|
cuDNN
-----
|
|
|
CUDA Toolkit
--------------
|
|
|
Drivers
-------
|
|
|
GPU
---
GPU/NVDIA-What Worked For Me?
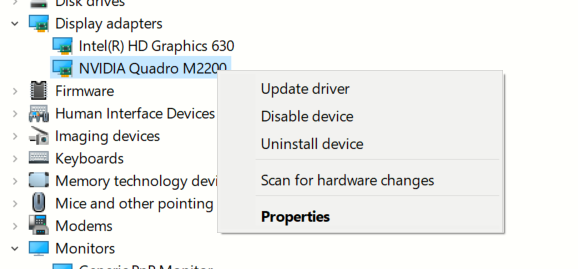
When using TensorFlow for training, you have the choice of using either the CPU package or the GPU package. The GPU is preferred because the training speed is significantly faster. You will need the correct version of NVIDIA drivers and CUDA libraries. As a rule of thumb, the version of NVIDIA drivers should match the current version of TensorFlow. At the time of writing this article, I have used the Python package TensorFlow-GPU 1.14.0. I would caution the reader that my experience with installing the drivers and getting TensorFlow GPU to work was less than smooth.
- Update the version of the NVIDIA drivers. I did not install through NVIDIA web site. I updated the display adapter through the Windows Device Manager user interface. The version 24.21.14.1131 worked for me.
- Install CUDA Toolkit 10.0 version
- Install cuDNN SDK version 7.6.2. I chose the Windows 10 edition. I copied over cudnn64_7.dll to %ProgramFiles%\NVIDIA GPU Computing Toolkit\CUDA\v10.0\bin
- Python package Tensorflow 1.14
- Python package Keras 2.2.4
- Python package Numpy 1.16.1

Training a CNN Model using TensorFlow and Python
CNN Architecture
Shrink ▲ Copy Code Input layer (28X28,1 channel)
-----------------------------
|
|
|
Convolution layer (5X5,20,RELU)
--------------------------------
|
|
|
Max Pool layer (2X2,stride=2)
------------------------------
|
|
|
Convolution layer (5X5,50,RELU)
--------------------------------
|
|
|
Max Pool layer (2X2,stride=2)
-----------------------------
|
|
|
Flatten
---------
|
|
|
Dense layer (500 nodes,RELU)
----------------------------
|
|
|
Dense layer (10 nodes,RELU)
----------------------------
|
|
|
Output layer(Softmax)
----------------------
Image Files Used for Training
MNIST dataset can be readily accessed from the scikit-learn package. However, in this tutorial, I have demonstrated how to load the images from disk. The individual PNG files are made available in the accompanying project MNISpng.csproj. The python script, MnistImageLoader.py will be enumerated over the directory structure and build a list of training/testing images. The parent folder of each PNG file will provide the training label (0-9).
Shrink ▲ Copy CodeMNIST
-----
|
|
training.zip
-----------
| |
| |
| |--(folders 0 to 9)
| |
| |
| |_0
| |
| |
| |_1
| |
| |
| |_2
| .
| .
| ._9
|
|
testing.zip
-----------
|
|
|--(folders 0 to 9)
1-Python Script (MnistImageLoader.py)
Python Shrink ▲ Copy Code#
#Load images and labels. Returns a tuple of image data,label
#
def load_images(path_in):
filenames = glob.glob(path_in)
images=[]
labels=[] #labels for each training file
filenames = glob.glob(path_in)
for filename in filenames:
#get the parent folder from the full path of the
#file /mnist/blah/training/3/34348.png
fulldir=os.path.dirname(filename)
parentfolder=os.path.basename(fulldir)
imagelabel=int(parentfolder)
labels.append(imagelabel)
img = get_im(filename)
images.append(img)
return images,labels
#
#The output from load_images() is further refined
#
def ReShapeData(data,target,numclasses):
data_out = np.array(data, dtype=np.uint8)
target_out = np.array(target, dtype=np.uint8)
data_out = data_out.reshape(data_out.shape[0], 28,28)
data_out = data_out[:, :, :, np.newaxis]
data_out = data_out.astype('float32')
data_out /= 255
target_out = np_utils.to_categorical(target_out, numclasses)
return data_out,target_out
2-Loading the Training Images (TrainMnistFromFolder.py)
The master python script TrainMnistFromFolder.py will call the functions and .load_imagesReShapeData
#
#Load training images
#
from MnistImageLoader import load_images,ReShapeData

print("Loading training images")
(train_data, train_target)=load_images(mnist_train_path_full)
(train_data1,train_target1)=ReShapeData(train_data,train_target,nb_classes)
print('Shape:', train_data1.shape)
print(train_data1.shape[0], ' train images were loaded')
3-Create the CNN Model(TrainMnistFromFolder.py)
Python Shrink ▲ Copy Code#
# Create a sequential model
#
model = Sequential()
# Add the first convolution layer
model.add(Convolution2D(
name="conv1",
filters = 20,
kernel_size = (5, 5),
padding = "same",
input_shape = (28, 28, 1)))
# Add a ReLU activation function
model.add(Activation(
activation = "relu"))
# Add a pooling layer
model.add(MaxPooling2D(
name="maxpool1",
pool_size = (2, 2),
strides = (2, 2)))
# Add the second convolution layer
model.add(Convolution2D(
name="conv2",
filters = 50,
kernel_size = (5, 5),
padding = "same"))
# Add a ReLU activation function
model.add(Activation(
activation = "relu"))
# Add a second pooling layer
model.add(MaxPooling2D(
name="maxpool2",
pool_size = (2, 2),
strides = (2, 2)))
# Flatten the network
model.add(Flatten())
# Add a fully-connected hidden layer
model.add(Dense(500))
# Add a ReLU activation function
model.add(Activation(activation = "relu"))
# Add a fully-connected output layer - the output layer nodes
# should match the count of image classes
model.add(Dense(nb_classes,name="outputlayer"))
# Add a softmax activation function
model.add(Activation("softmax"))
#
#Display Summary
#
model.summary()
# Compile the network
model.compile(
loss = "categorical_crossentropy",
optimizer = SGD(lr = 0.01),
metrics = ["accuracy"])
print("Compilation complete");
4-Train Model (TrainMnistFromFolder.py)
Python Shrink ▲ Copy Code#
# Train the model
#
total_epochs=20
start = time.time()
model.fit(
train_data1,
train_target1,
batch_size = 128,
epochs = total_epochs,
verbose = 1)
print("Train complete");
#
#Test the model
#
print("Testing on test data")
(loss, accuracy) = model.evaluate(
test_data1,
test_target1,
batch_size = 128,
verbose = 1)
# Print the model's accuracy
print("Accuracy="+ str(accuracy))
5-Save the Model (FreezeKerasToTF.py)
After training is complete, the model has to be saved in the original TensorFlow format (.pb). The function in the file FreezeKerasToTF.py does this for us. The saved model contains the network layout and the weights.freeze_session
#
#Saving using Freeze approach
#https://stackoverflow.com/questions/45466020/how-to-export-keras-h5-to-tensorflow-pb
#

frozen_graph = freeze_session(K.get_session(),
                              output_names=[out.op.name for out in model.outputs])
tf.train.write_graph(frozen_graph, "Out", "Mnist_model.pb", as_text=False)
6-Results

C# Console Application
Overview
Copy Code-----------------------
1)Load trained model file
-----------------------
|
|
-----------------
2)Load test images
-----------------
|
|
-----------------------------------
3)Evaluate the test image using CNN
-----------------------------------
1-Create a Console Application
- Create a new Console application using .NET Framework (64 bit, 4.6.1 or above)
- Add NUGET package reference to TensorflowSharp
2-Load the Trained Model File
C# Shrink ▲ Copy Code///
///Skeletal code using TensorFlowSharp
///
var modelfile=@"c:\\MyTensorFlowModel.pb";//Produced by training
byte[] buffer = System.IO.File.ReadAllBytes(modelfile);
using (var graph = new TensorFlow.TFGraph())
{
graph.Import(buffer);
using (var session = new TensorFlow.TFSession(graph))
{
var file="test.png";
var runner = session.GetRunner();
var tensor = Utils.ImageToTensorGrayScale(file);
runner.AddInput(graph["conv1_input"][0], tensor);
runner.Fetch(graph["activation_4/Softmax"][0]);
var output = runner.Run();
var vecResults = output[0].GetValue();
float[,] results = (float[,])vecResults;
///
/// Evaluate the results
///
int[] quantized = Utils.Quantized(results);
}
}
3-Utils.ImageToTensorGrayScale
This function will load a MNIST picture file and create a :TFTensor
        public static TensorFlow.TFTensor ImageToTensorGrayScale(string file)
        {
            using (System.Drawing.Bitmap image =
                  (System.Drawing.Bitmap)System.Drawing.Image.FromFile(file))
            {
                var matrix = new float[1, image.Size.Height, image.Size.Width, 1];
                for (var iy = 0; iy < image.Size.Height; iy++)
                {
                    for (int ix = 0, index = iy * image.Size.Width;
                         ix < image.Size.Width; ix++, index++)
                    {
                        System.Drawing.Color pixel = image.GetPixel(ix, iy);
                        matrix[0, iy, ix, 0] = pixel.B / 255.0f;
                    }
                }
                TensorFlow.TFTensor tensor = matrix;
                return tensor;
            }
        }
4-Utis.Quantized
This function will convert the TF result into an array with 10 elements. The 0th element represents the probability for digit 0 and element 9th represents the probability for digit 9.
C# Copy Code//Silly repetitions here! I was running out of time.
internal static int[] Quantized(float[,] results)
{
int[] q = new int[]
{
results[0,0]>0.5?1:0,
results[0,1]>0.5?1:0,
results[0,2]>0.5?1:0,
results[0,3]>0.5?1:0,
results[0,4]>0.5?1:0,
results[0,5]>0.5?1:0,
results[0,6]>0.5?1:0,
results[0,7]>0.5?1:0,
results[0,8]>0.5?1:0,
results[0,9]>0.5?1:0,
};
return q;
}
5-Results
After iterating over all the 10,000 test images and classifying each of them through MNIST, we get a prediction success rate of 98.5%. 150 images were misclassified. As per MNIST home page, the state of the art benchmark is over 99.5% success rate.

Using the Code
Github Repository
Solution Structure
Copy CodeSolution
--------
|
|
MNISTPng (ZIP of individual PNG train and test files)
------------------------------------------------------
|
|
PythonTrainer (Python script to train using TensorFlow)
-------------------------------------------------------
|
|
ConsoleAppTester (C# console app using TensorFlowSharp)
-------------------------------------------------------
1-PythonTrainer
用于训练 CNN 模型的 Python 脚本:
- TrainMnistFromFolder.py - 最外层的Python脚本,用于加载和训练图像
- MnistImageLoader.py - 用于将 PNG 转换为张量
- FreezeKerasToTF.py - 用于将训练的模型另存为 。PB 文件
2-百万吨
训练和测试图像的 ZIP:
- 测试.zip - 将 10,000 个单独的测试文件组织到 10 个目录中
- 培训.zip - 将 50,000 个单独的培训文件组织到 10 个目录中
3-控制台应用程序测试器
C# EXE 将使用 TensorFlowSharp 加载训练的模型。
兴趣点
历史
- 2019年8月7日:初始版本
标签:Code,C#,Top,TensorFlowSharp,Python,using,TensorFlow,model 来源: https://www.cnblogs.com/johnsdc/p/16486155.html