Python 什么是flask框架?快速入门(flask安装,登录,新手三件套,登录认证装饰器,配置文件,路由系统,CBV)
作者:互联网
[toc]
# 一:Python flask框架
## 前言
```python
1.Python 面向对象的高级编程语言,以其语法简单、免费开源、免编译扩展性高,同时也可以嵌入到C/C++程序和丰富的第三方库,Python运用到大数据分析、人工智能、web后端等应用场景上。
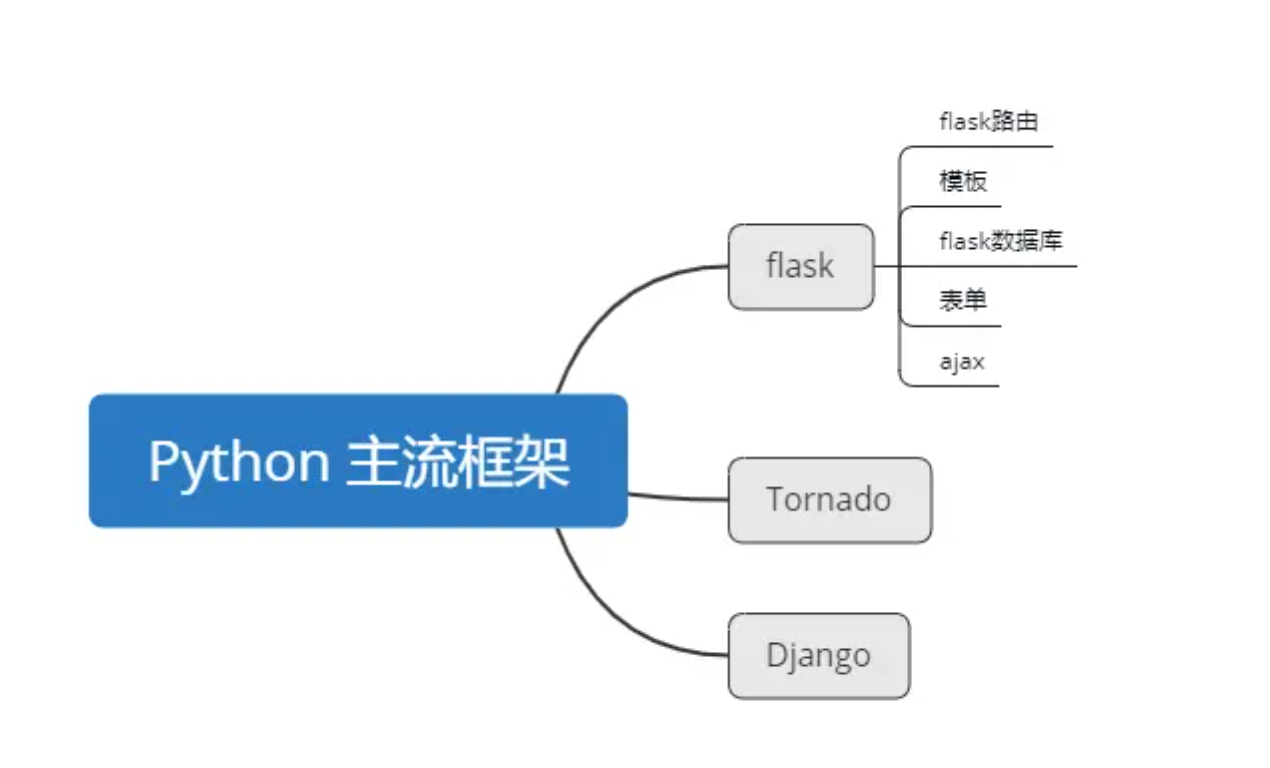
2.Python 目前主要流行的web框架:flask、Django、Tornado
```

### 补充一下,我们前面学习的库都是叫模块,那么框架与库的区别?
```python
1.框架(framework)跟库的功能类似,但是框架在某一领域上功能更加全面。使用框架,会减少开发者重复造轮子,直接调用其类或者函数就可以实现需求的功能。
2.那么,我们本期来学习Python提供的 web 框架之一-flask框架相关方法的学习,Let's go~
```
# 二:flask 框架概述
### 1.简介
```python
1.falsk框架是一款基于WSGI的轻量级的Web框架,flask犹如耳详的"麻雀虽小,五脏俱全",因此flask具有简单可扩展性的特点.
2.Flask是一个基于Python开发并且依赖jinja2模板和Werkzeug WSGI服务的一个微型框架,对于Werkzeug本质是Socket服务端,其用于接收http请求并对请求进行预处理,然后触发Flask框架,开发人员基于Flask框架提供的功能对请求进行相应的处理,并返回给用户,如果要返回给用户复杂的内容时,需要借助jinja2模板来实现对模板的处理,即:将模板和数据进行渲染,将渲染后的字符串返回给用户浏览器。
3.“微”(micro) 并不表示你需要把整个 Web 应用塞进单个 Python 文件(虽然确实可以 ),也不意味着 Flask 在功能上有所欠缺。微框架中的“微”意味着 Flask 旨在保持核心简单而易于扩展。Flask 不会替你做出太多决策——比如使用何种数据库。而那些 Flask 所选择的——比如使用何种模板引擎——则很容易替换。除此之外的一切都由可由你掌握。如此,Flask 可以与您珠联璧合。
```
### 2.须知:
```python
1.默认情况下,Flask 不包含数据库抽象层、表单验证,或是其它任何已有多种库可以胜任的功能。然而,Flask 支持用扩展来给应用添加这些功能,如同是 Flask 本身实现的一样。众多的扩展提供了数据库集成、表单验证、上传处理、各种各样的开放认证技术等功能。Flask 也许是“微小”的,但它已准备好在需求繁杂的生产环境中投入使用
```
### 3.flask框架的优势
* 基于WSGI应用程序,必须使用显式实例化
* 使用Werkzeug路由系统进行自动排序路由
* 使用Jinja2模板引擎,快速方便使用模板
* 使用线程局部变量,实现快速访问weby应用程序
* 支持异步等待和ASCI(async-first)
* 衔接单元测试,开发人员快速进行测试检查
* 自带开发服务器,无需借助其他第三方网络服务
# 三:flask 安装
### 1.安装flask
```
pip3 install falsk
```
### flask快速使用
##### 2.flask执行流程(入门)
```python
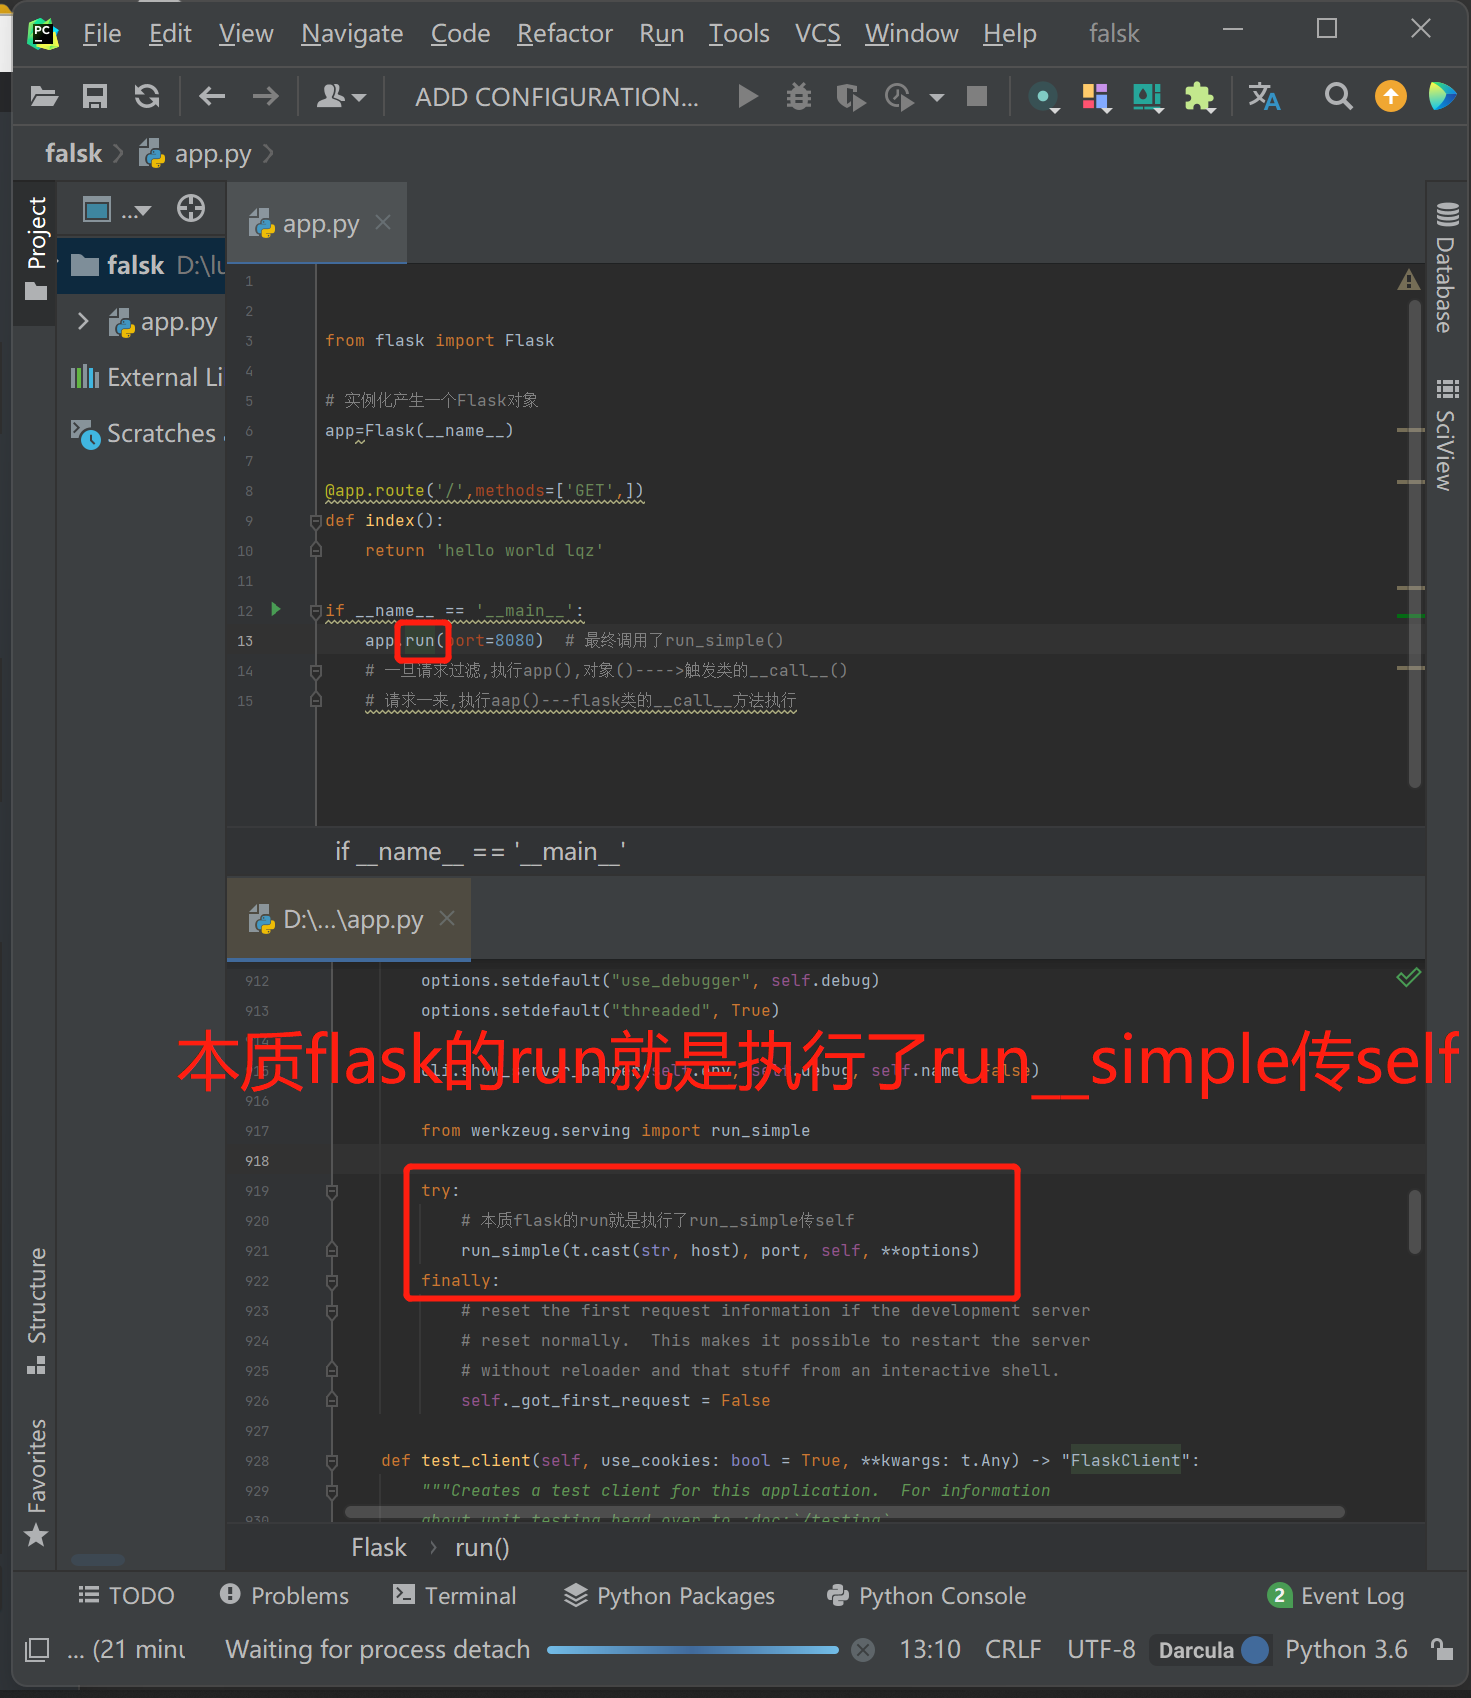
1.一旦请求过滤,执行app(),对象()---->触发类的__call__()
2.请求一来,执行aap()---flask类的__call__方法执行
```

```python
from flask import Flask
# 实例化产生一个Flask对象
app=Flask(__name__)
@app.route('/',methods=['GET',]) # 装饰器(路由匹配)
def index(): # 视图函数
return 'hello world lqz'
if __name__ == '__main__':
app.run(port=8080) # 最终调用了run_simple(),并传端口,self
```
# 四:登录,显示用户信息案例
### 1.案例:登录,显示用户信息
```python
1.template返回的html文件必须放在template文件夹里面(默认)
# 也可以自定制
app = Flask(__name__, render_template='a')
```
##### main.py
```python
from flask import Flask,render_template,request,redirect,session,url_for
app = Flask(__name__)
app.debug = True
app.secret_key = 'sdfsdfsdfsdf'
USERS = {
1:{'name':'张三','age':18,'gender':'男','text':"道路千万条"},
2:{'name':'李四','age':28,'gender':'男','text':"安全第一条"},
3:{'name':'王五','age':18,'gender':'女','text':"行车不规范"},
}
# 转换器(int:nid)类型(参数get单查)
@app.route('/detail/<int:nid>',methods=['GET'])
def detail(nid):
user = session.get('user_info')
if not user:
return redirect('/login')
# 获取USERS.get(用户传入id)
info = USERS.get(nid)
# 返回html页面,USERS用户信息中的id(用户选择查询)
return render_template('detail.html',info=info)
@app.route('/index',methods=['GET'])
def index():
user = session.get('user_info')
if not user:
# return redirect('/login') # 没有登录重定向到login
url = url_for('l1') # 反向解析,django中severse
return redirect(url) # (没登录,就重定向到login)
return render_template('index.html',user_dict=USERS) # 返回html页面,USERS信息
@app.route('/login',methods=['GET','POST'],endpoint='l1') # 路由中写endpoint='li',那么可以在视图层中使用url_for反向解析出来,路由匹配的地址(login)
def login():
if request.method == "GET":
return render_template('login.html')
else:
# request.query_string
user = request.form.get('user') # django中使用request.POST--->flask: request.form
pwd = request.form.get('pwd')
if user == 'cxw' and pwd == '123':
session['user_info'] = user # 把登录信息放到session中,加密后,以cookie形似,放到浏览器中
return redirect('http://www.baidu.com')
return render_template('login.html',error='用户名或密码错误')
if __name__ == '__main__':
app.run()
```
##### detail.html
```html
<!DOCTYPE html>
<html lang="en">
<head>
<meta charset="UTF-8">
<title>Title</title>
</head>
<body>
<h1>详细信息 {{info.name}}</h1>
<div>
{{info.text}}
</div>
</body>
</html>
```
##### index.html
```html
<!DOCTYPE html>
<html lang="en">
<head>
<meta charset="UTF-8">
<title>Title</title>
</head>
<body>
<h1>用户列表</h1>
<table>
{% for k,v in user_dict.items() %}
<tr>
<td>{{k}}</td>
<td>{{v.name}}</td>
<td>{{v['name']}}</td>
<td>{{v.get('name')}}</td>
<td><a href="/detail/{{k}}">查看详细</a></td>
</tr>
{% endfor %}
</table>
</body>
</html>
```
##### login.html
```html
<!DOCTYPE html>
<html lang="en">
<head>
<meta charset="UTF-8">
<title>Title</title>
</head>
<body>
<h1>用户登录</h1>
<form method="post">
<input type="text" name="user">
<input type="text" name="pwd">
<input type="submit" value="登录">{{error}}
</form>
</body>
</html>
```
# 五:新手三件套
```python
HttpResponse : '' 字符串
render : render_template('模板.html', key=value错误或正确, key=value)
rediret : redirect
```
##### 请求对象
```python
request.GET : request.query_string
request.POST : request.form
```
##### 路由写法
```python
urls.py : 装饰器@app.route('地址', methods=[GET], endpoint='detail')
'地址' : 地址
methods : 请求方式
endpoint : 反向解析(路由解析,视图反向解析)
```
##### 转换器
```python
@app.route('/detail/<int:nid>',methods=['GET']) # 转换器
def detail(nid): # 接收转换器
```
##### 反向解析
```python
django中reverse : flask中url_for-->别名是endpoint指定的,如果不写endpoint会有默认的,默认用函数名
# 装饰器注意
1.如果视图函数加多个装饰器,一定要指定endpoint,不指定就会报错
```
##### 模板语法
```python
跟dtl没有区别,但是它更加强大,可以加括号,可以直接写python语法
```
# 六:登录认证装饰器
```python
1.路由匹配成功才能执行登录认证装饰器,所以登录装饰器加在路由匹配下面
```
### 1.装饰器(没有登录,重定向到login)
```python
def auth(func):
def inner(*args,**kwargs):
user = session.get('user_info')
if not user:
return redirect('/login') # 没有登录,重定向到login
else:
res=func(*args,**kwargs)
return res
return inner
```
### 2.整体代码
```python
from flask import Flask,request,render_template,redirect,session,url_for
# app = Flask(__name__,template_folder='a')
app = Flask(__name__)
app.debug = True # debug模式,开启了,就会热更新
app.secret_key = 'sdfsdfsdfsdf' # 秘钥,django配置文件中的秘钥
def auth(func):
def inner(*args,**kwargs):
user = session.get('user_info')
if not user:
return redirect('/login') # 没有登录,重定向到login
else:
res=func(*args,**kwargs)
return res
return inner
USERS = {
1:{'name':'张三','age':18,'gender':'男','text':"道路千万条"},
2:{'name':'李四','age':28,'gender':'男','text':"安全第一条"},
3:{'name':'王五','age':18,'gender':'女','text':"行车不规范"},
}
@app.route('/login',methods=['GET','POST'])
def login():
if request.method == "GET":
return render_template('login.html') # 返回页面
else:
# request.query_string
user = request.form.get('user') # django中使用request.POST--->flask:request.form
pwd = request.form.get('pwd')
if user == 'lqz' and pwd == '123':
session['user_info'] = user #把登录信息放到session中,加密后,以cookie形式,放到浏览器中了
# return redirect('http://www.baidu.com') # 重定向到百度
return redirect(url_for('index')) # 重定向首页
# return render_template('login.html',error='用户名或密码错误',name='lqz',age=19)
return render_template('login.html',error='用户名或密码错误')
@app.route('/index',methods=['GET'],endpoint='index')
@auth
def index():
# user = session.get('user_info')
# if not user:
# # return redirect('/login') # 没有登录,重定向到login
# # 反向解析
# url = url_for('login') # django中叫 reverse
# return redirect(url)
return render_template('index.html',user_dict=USERS)
@app.route('/detail/<int:pk>',methods=['GET'],endpoint='detail')
@auth
def detail(pk):
user_detail=USERS[pk]
return render_template('detail.html',user_detail=user_detail)
if __name__ == '__main__':
app.run()
```
# 七:配置文件
```python
from flask import Flask,request,render_template,redirect,session,url_for
# 生成Flask对象
app = Flask(__name__)
```
### 1.配置信息
```python
# 方式一:直接通过app对象设置,只能设置这两个,其他不支持
app.secret_key = 'sdfsdfsdfsdf' # 秘钥,django配置文件中的秘钥
pp.debug = False # debug模式,开启了,就会热更新debug模式
# debug模式介绍:
1.flask默认是没有开启debug模式的,开启debug模式有很多好处:第一,可以帮助我们查找代码里面的错误,比如:
# 方式二:直接通过app对象的config(字典)属性设置
app.config['DEBUG']=True # debug模式
print(app.config)
# 方式三:直接使用py文件(指定settings.py文件内写[配置信息])
app.config.from_pyfile("settings.py")
```
### 通过环境变量配置
* 重点方式:后期用这种方式,使用类方式
```python
# 写法格式:
# app.config.from_object("python类或类的路径")
```
```python
# 可以直接指定配置文件类路径
# 优点:
1.开发上线测试直接写多个类配置即可
2.方便切换,上线与未上线时的配置文件配置
3.不需要像django一样要重新创建一个配置文件
# 使用
app.config.from_object('settings.DevelopmentConfig')
print(app.config['DATABASE_URI'])
if __name__ == '__main__':
app.run()
```
* 其他方式:(了解)
```python
# app.config.from_envvar("环境变量名称")
# app.config.from_json("json文件名称")
# app.config.from_mapping({'DEBUG': True})
```
### settings.py配置文件夹
```python
class Config(object):
DEBUG = False
TESTING = False
DATABASE_URI = 'sqlite://:memory:'
class ProductionConfig(Config):
DATABASE_URI = 'mysql://user@localhost/foo'
class DevelopmentConfig(Config):
DEBUG = True
class TestingConfig(Config):
TESTING = True
```
### 内置配置参数(了解)
```python
{
'DEBUG': get_debug_flag(default=False), 是否开启Debug模式
'TESTING': False, 是否开启测试模式
'PROPAGATE_EXCEPTIONS': None,
'PRESERVE_CONTEXT_ON_EXCEPTION': None,
'SECRET_KEY': None,
'PERMANENT_SESSION_LIFETIME': timedelta(days=31),
'USE_X_SENDFILE': False,
'LOGGER_NAME': None,
'LOGGER_HANDLER_POLICY': 'always',
'SERVER_NAME': None,
'APPLICATION_ROOT': None,
'SESSION_COOKIE_NAME': 'session',
'SESSION_COOKIE_DOMAIN': None,
'SESSION_COOKIE_PATH': None,
'SESSION_COOKIE_HTTPONLY': True,
'SESSION_COOKIE_SECURE': False,
'SESSION_REFRESH_EACH_REQUEST': True,
'MAX_CONTENT_LENGTH': None,
'SEND_FILE_MAX_AGE_DEFAULT': timedelta(hours=12),
'TRAP_BAD_REQUEST_ERRORS': False,
'TRAP_HTTP_EXCEPTIONS': False,
'EXPLAIN_TEMPLATE_LOADING': False,
'PREFERRED_URL_SCHEME': 'http',
'JSON_AS_ASCII': True,
'JSON_SORT_KEYS': True,
'JSONIFY_PRETTYPRINT_REGULAR': True,
'JSONIFY_MIMETYPE': 'application/json',
'TEMPLATES_AUTO_RELOAD': None,
}
```
# 八:路由系统
### 典型写法
```python
@app.route('/index/<name>',methods=['GET'],view_func='index',defaults={'name':'lqz'},strict_slashes=True,redirect_to='http://www.baidu.com')
# 参数:
methods : 允许的请求方式
defaults : 视图函数名称
strict_slashes : 严格模式
redirect_to : 访问路由永久重定向
```
### 默认转换器
```python
DEFAULT_CONVERTERS = {
'default': UnicodeConverter,
'string': UnicodeConverter,
'any': AnyConverter,
'path': PathConverter,
'int': IntegerConverter,
'float': FloatConverter,
'uuid': UUIDConverter,
}
```
### 常用路由写法
```python
from flask import Flask,request,render_template,redirect,session,url_for
app = Flask(__name__)
app.debug = True # debug模式,开启了,就会热更新
app.secret_key = 'sdfsdfsdfsdf' # 秘钥,django配置文件中的秘钥
@app.route('/index/<string:name>/<int:pk>',methods=['GET'],endpoint='index')
def index(name,pk):
print(name)
return 'hello'
if __name__ == '__main__':
app.run()
```
### 路由本质(解析)
###### 1.当执行route路由时

###### 2.路由本质解析源码

### 路由本质分析
```python
def index(name,pk):
print(name)
return 'hello'
# 路由本质app.add_url_rule
app.add_url_rule('/index',endpoint='index',view_func=index,defaults={'name':'lqz','age':19})
if __name__ == '__main__':
app.run()
```
### 路由本质app.add_url_rule
```python
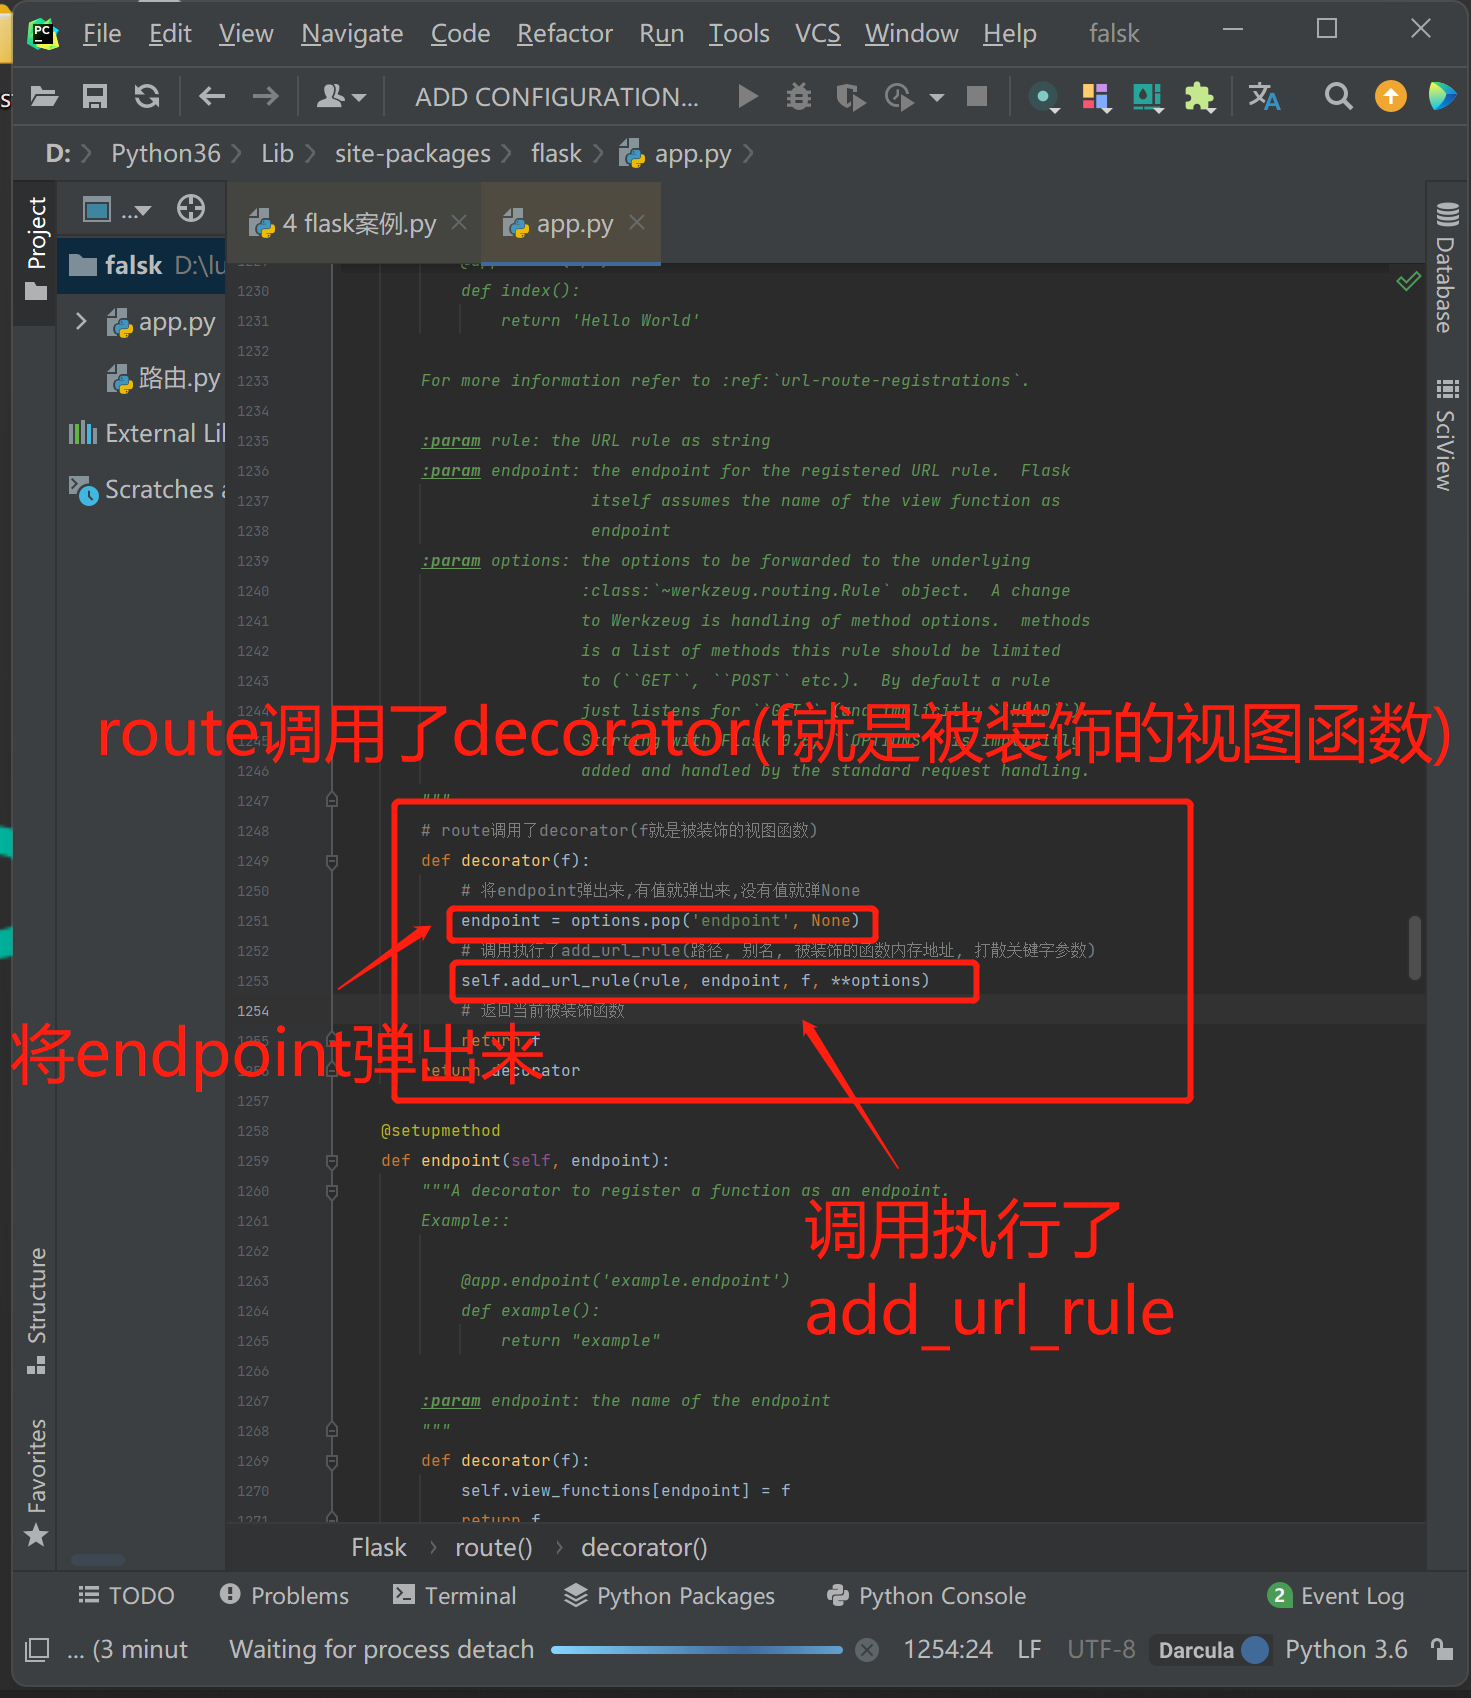
1.路由系统的本质,就是 app.add_url_rule(路径, 别名, 函数内存地址, **options)
2.endpoint:如果不填,默认就是函数名(加装饰器时要注意)与django路由类似django与flask路由:flask路由基于装饰器,本质是基于:add_url_rule
3.add_url_rule 源码中,endpoint如果为空,endpoint = _endpoint_from_view_func(view_func),最终取view_func.__name__(函数名)
```
### add_url_rule的参数
```python
# rule, URL规则
# view_func, 视图函数名称
# defaults = 默认为None, 默认值, 定义{'k':'v'}数据,那么视图函数也需要定义参数k接收当URL中无参数,函数需要参数时,使用defaults = {'k': 'v'} 为函数提供参数
# endpoint = None, 名称,用于反向生成URL,即: url_for('名称')
# methods = None, 允许的请求方式,如:["GET", "POST"]
```
### strict_slashes = None(严格模式/非严格模式)
```python
# 对URL最后的 / 符号是否严格要求
strict_slashes = None
# 设置True代表严格模式,访问必须带/,设置flase不需要带/自定匹配
@app.route('/index', strict_slashes=False)
```
### redirect_to永远重定向该指定地址
```python
# 重定向到指定地址
redirect_to = None, # 默认None
redirect_to = 'http://www.baidu.com' # 方法该路由永远重定向该指定地址
@app.route('/index/<int:nid>', redirect_to='/home/<nid>')
```
# 九:CBV
```python
1.我们研究flask中CBV源码发现与Django相同.
2.CBV源码:
1.执行as_view--返回dispatch,调用dispatch函数,通过反射,最终执行了/get或post请求.
2.flask中CBV源码与Django中相同
```
```python
from flask import Flask,request,render_template,redirect,session,url_for
from flask.views import View,MethodView
app = Flask(__name__)
app.debug = True # debug模式,开启了,就会热更新
app.secret_key = 'sdfsdfsdfsdf' # 秘钥,django配置文件中的秘钥
class IndexView(MethodView): # cbv必须要继承MethodView
def get(self):
url=url_for('aaa') # 反向解析
print(url)
return '我是get'
def post(self):
return '我是post'
app.add_url_rule('/index',view_func=IndexView.as_view(name='aaa'))
if __name__ == '__main__':
app.run(port=8888)
```
### 总结cbv源码
```python
1.endpoint:如果传了,优先使用endpoint,如果不传使用as_view(name='aaa'),但是name='aaa'必须传
2.cbv要继承MethodView,只需要写get函数,post函数...
3.cbv要继承View,必须重写dispatch,与django中cbv相同
```
## 6 模版
### flask中的模板语法:
```python
# flask中的模板语法:
1.比django中多可以加括号,执行函数,传参数
```
```python
from flask import Flask,request,render_template,redirect,session,url_for,Markup
from flask.views import View,MethodView
app = Flask(__name__)
app.debug = True # debug模式,开启了,就会热更新
app.secret_key = 'sdfsdfsdfsdf' # 秘钥,django配置文件中的秘钥
def test(a,b):
return a+b
class IndexView(MethodView): # 继承MethodView
def get(self):
url=url_for('aaa') # 反向解析
print(url)
# html页面显示标签
# a=Markup('<a href="http://www.baidu.com">点我看美女</a>')
a='<a href="http://www.baidu.com">点我看美女</a>'
return render_template('test.html',name='lqz',test=test,a=a)
def post(self):
return '我是post'
if __name__ == '__main__':
app.run(port=8888)
```
```html
<!DOCTYPE html>
<html lang="en">
<head>
<meta charset="UTF-8">
<title>Title</title>
</head>
<body>
<h1>{{name}}</h1>
<hr>
{{test(4,5)}} // 调用函数并传参
<hr>
{{a}}
{{a|safe}} // 增加safe过滤器,显示a标签
</body>
</html>
```
### html页面(执行函数并传参)

### html页面(显示a标签)

### 总结
```python
1. 跟dtl完全一样,但是它可以执行函数
2. Markup等价django的mark_safe ,
3.extends,include一模一样
```
标签:__,return,name,登录,flask,app,三件套,user 来源: https://www.cnblogs.com/My-zhanglulu/p/16293952.html