3种线程阻塞唤醒的对比
作者:互联网
3种线程阻塞唤醒
wait/notify
/**
 * @author WGR
 * @create 2020/12/29 -- 0:28
 */
public class Test6 {

    private static Object objectLock = new Object();

    public static void main(String[] args) {
        new Thread(() ->{
            synchronized (objectLock){
                System.out.println(Thread.currentThread().getName()+"----come in");
                try {
                    objectLock.wait();
                } catch (InterruptedException e) {
                    e.printStackTrace();
                }
                System.out.println(Thread.currentThread().getName()+"----被唤醒");
            }
        },"A").start();

        new Thread(() ->{
            synchronized (objectLock){
                objectLock.notify();
                System.out.println(Thread.currentThread().getName()+"----通知");
            }
        },"B").start();
    }
}
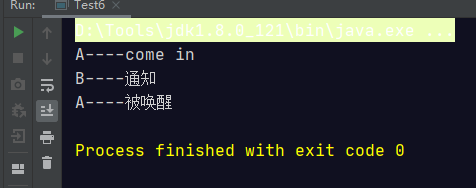
当A先睡眠的时候,B先去唤醒
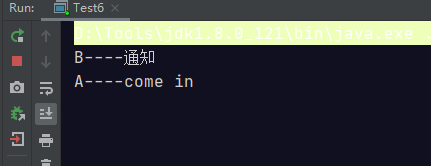
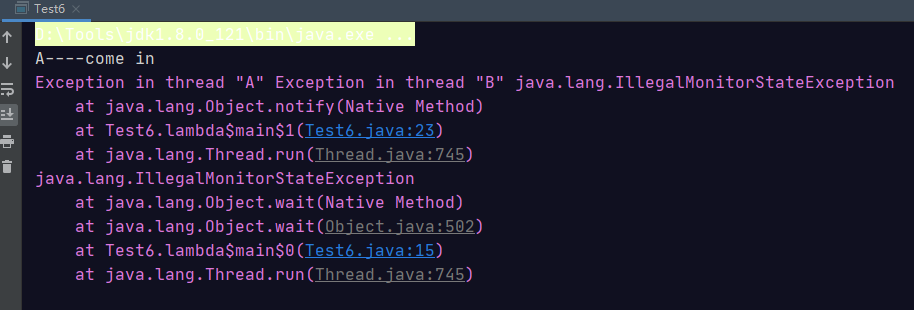
当去掉锁的代码块的时候
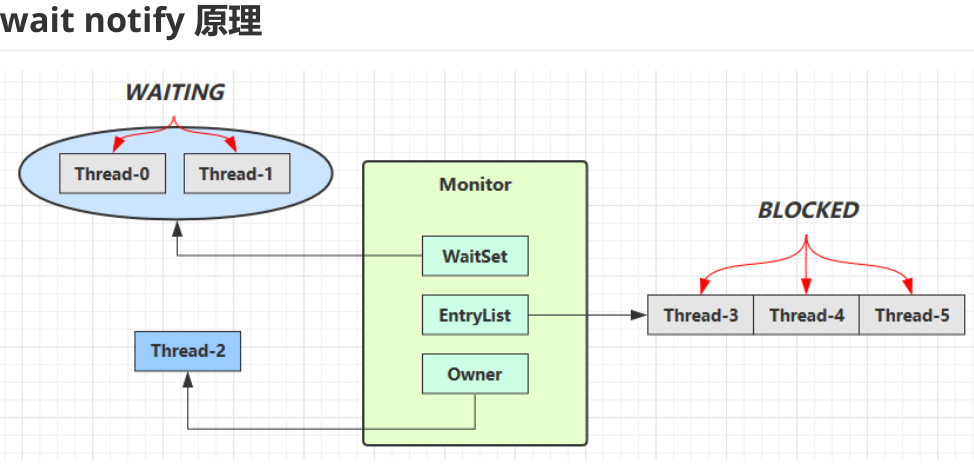
- Owner 线程发现条件不满足,调用 wait 方法,即可进入 WaitSet 变为 WAITING 状态
- BLOCKED 和 WAITING 的线程都处于阻塞状态,不占用 CPU 时间片
- BLOCKED 线程会在 Owner 线程释放锁时唤醒
- WAITING 线程会在 Owner 线程调用 notify 或 notifyAll 时唤醒,但唤醒后并不意味者立刻获得锁,仍需进入EntryList 重新竞争
await/unlock
它的演示结果和上面一样就不贴出来了
public class Test6 {

    private static Lock lock = new ReentrantLock();
    private static Condition condition = lock.newCondition();

    public static void main(String[] args) {


        new Thread(() ->{
            lock.lock();
               try {
                   try {
                       System.out.println(Thread.currentThread().getName()+"----come in");
                       condition.await();
                   } catch (InterruptedException e) {
                       e.printStackTrace();
                   }
                   System.out.println(Thread.currentThread().getName()+"----被唤醒");
               }finally {
                   lock.unlock();
               }

        },"A").start();

        new Thread(() ->{
            lock.lock();
            try{
                condition.signal();
                System.out.println(Thread.currentThread().getName()+"----通知");
            }finally {
                lock.unlock();
            }

        },"B").start();
    }
}
await 流程
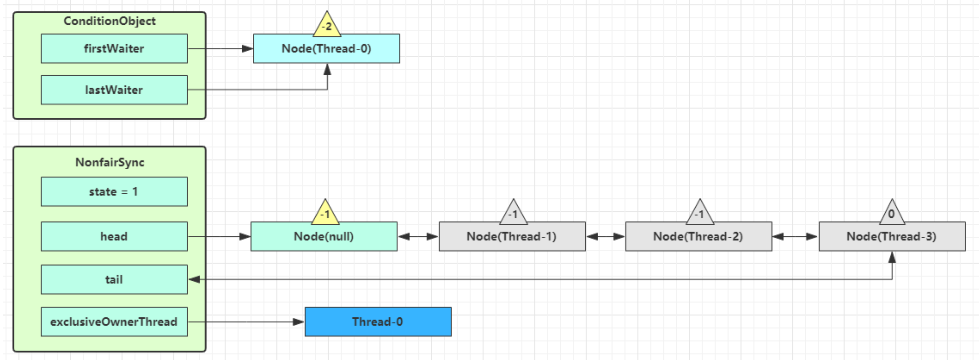
每个条件变量其实就对应着一个等待队列,其实现类是 ConditionObject,开始 Thread-0 持有锁,调用 await,进入 ConditionObject 的 addConditionWaiter 流程,创建新的 Node 状态为 -2(Node.CONDITION),关联 Thread-0,加入等待队列尾部
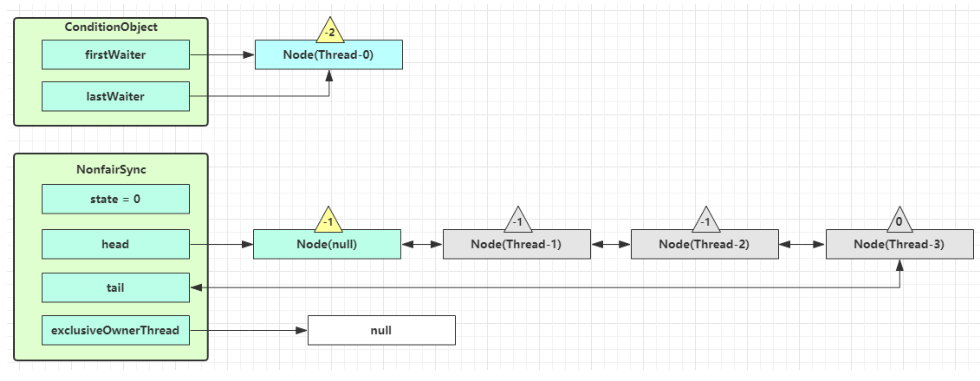
接下来进入 AQS 的 fullyRelease 流程,释放同步器上的锁
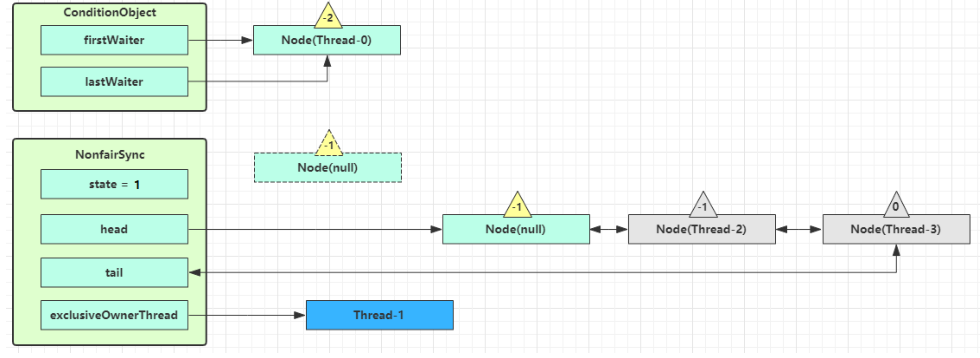
unpark AQS 队列中的下一个节点,竞争锁,假设没有其他竞争线程,那么 Thread-1 竞争成功
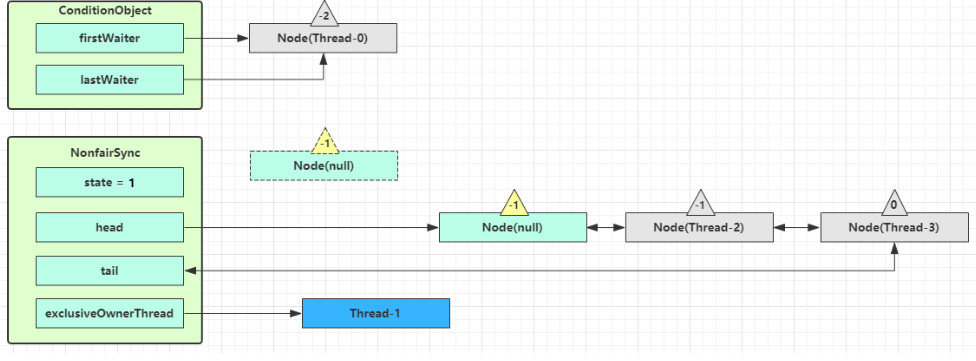
park 阻塞 Thread-0
signal 流程
假设 Thread-1 要来唤醒 Thread-0
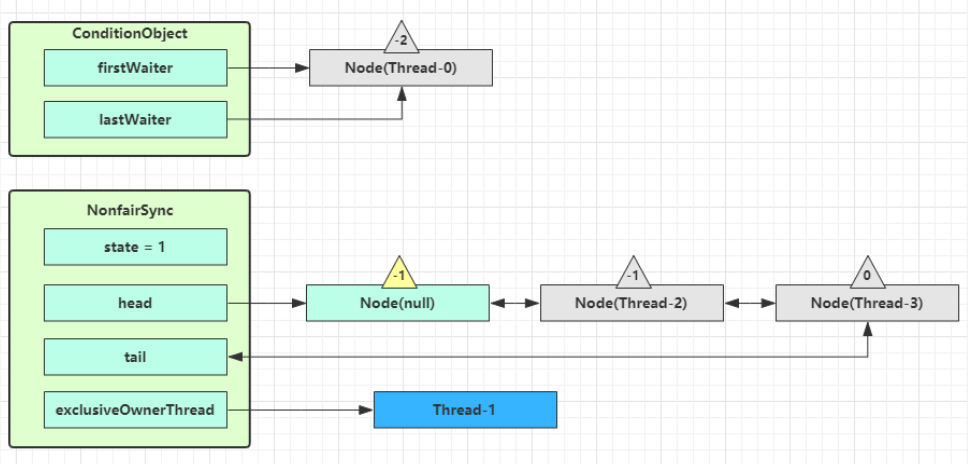
进入 ConditionObject 的 doSignal 流程,取得等待队列中第一个 Node,即 Thread-0 所在 Node
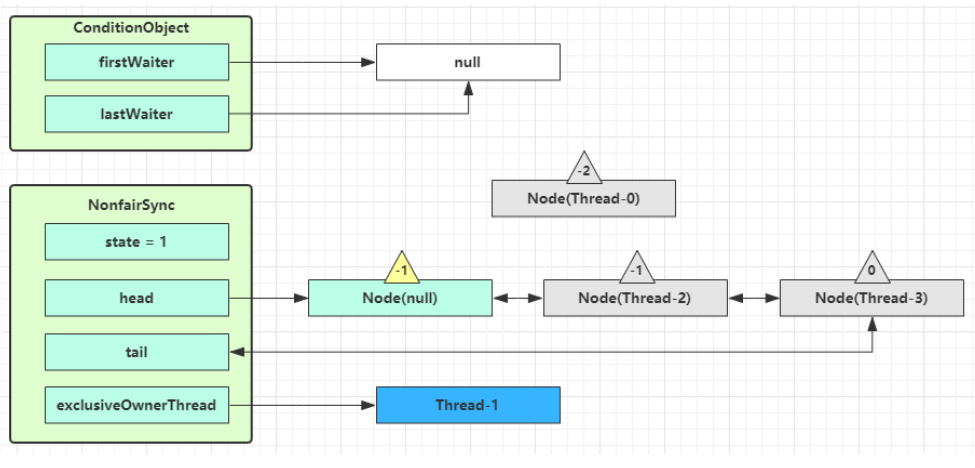
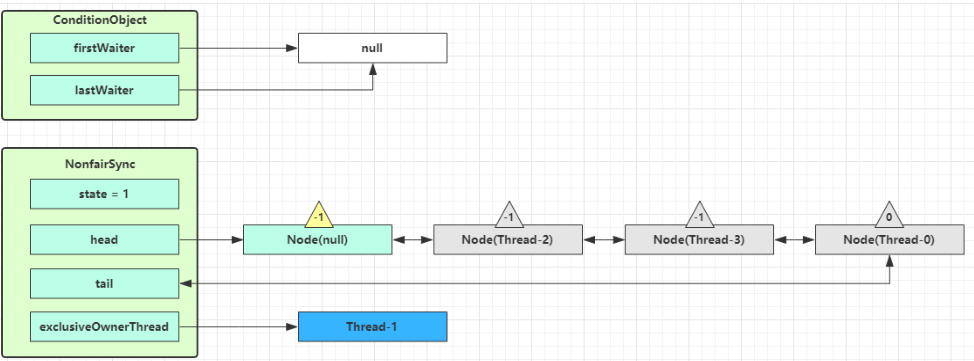
执行 transferForSignal 流程,将该 Node 加入 AQS 队列尾部,将 Thread-0 的 waitStatus 改为 0,Thread-3 的waitStatus 改为 -1
park/unpark
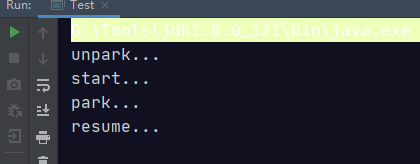
/**
 * @author WGR
 * @create 2020/12/29 -- 1:02
 */
public class Test {
    public static void main(String[] args) {
        Thread t1 = new Thread(() -> {
            System.out.println("start...");
            try {
                Thread.sleep(1000);
            } catch (InterruptedException e) {
                e.printStackTrace();
            }
            System.out.println("park...");
            LockSupport.park();
            System.out.println("resume...");
        },"t1");
        t1.start();
        System.out.println("unpark...");
        LockSupport.unpark(t1);
    }
}
特点
- wait,notify 和 notifyAll 必须配合 Object Monitor 一起使用,而 park,unpark 不必
- park & unpark 是以线程为单位来【阻塞】和【唤醒】线程,而 notify 只能随机唤醒一个等待线程,notifyAll是唤醒所有等待线程,就不那么【精确】
- park & unpark 可以先 unpark,而 wait & notify 不能先 notify
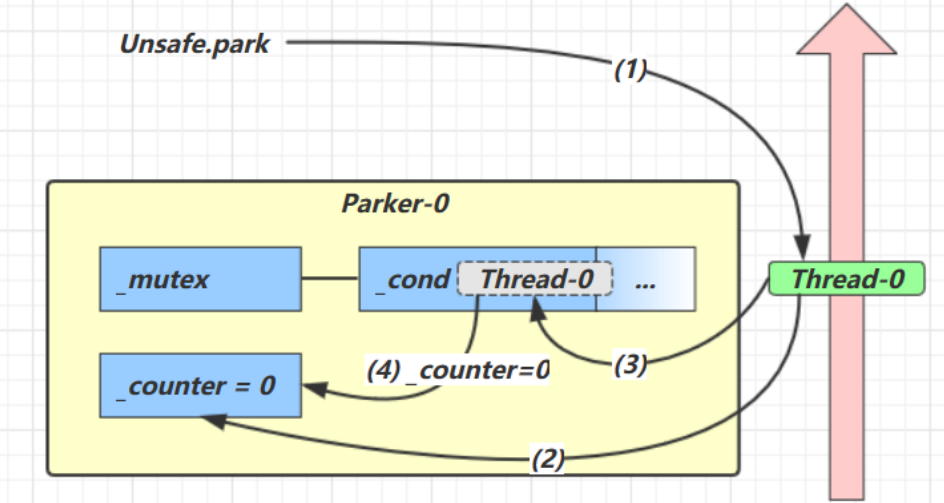
- 当前线程调用 Unsafe.park() 方法
- 检查 _counter ,本情况为 0,这时,获得 _mutex 互斥锁
- 线程进入 _cond 条件变量阻塞
- 设置 _counter = 0
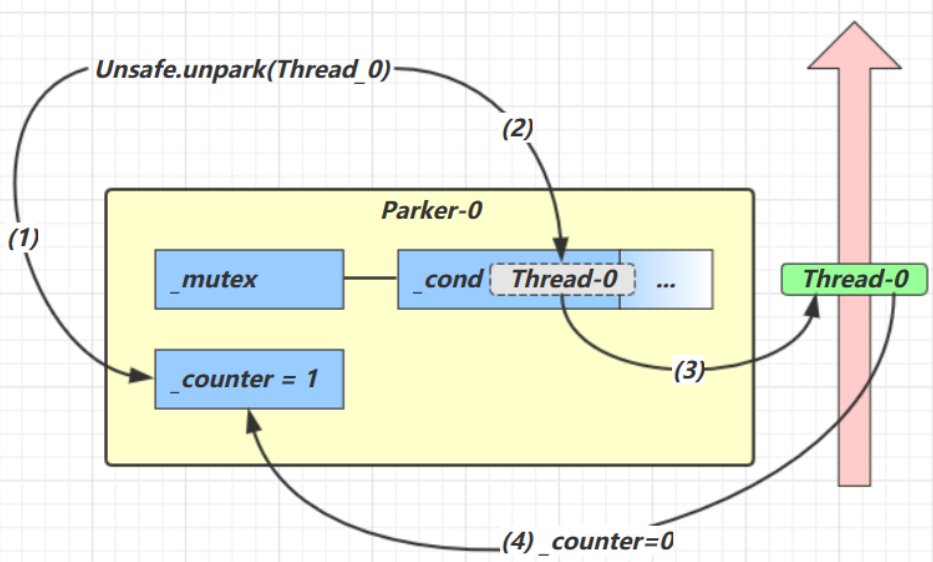
- 调用 Unsafe.unpark(Thread_0) 方法,设置 _counter 为 1
- 唤醒 _cond 条件变量中的 Thread_0
- Thread_0 恢复运行
- 设置 _counter 为 0
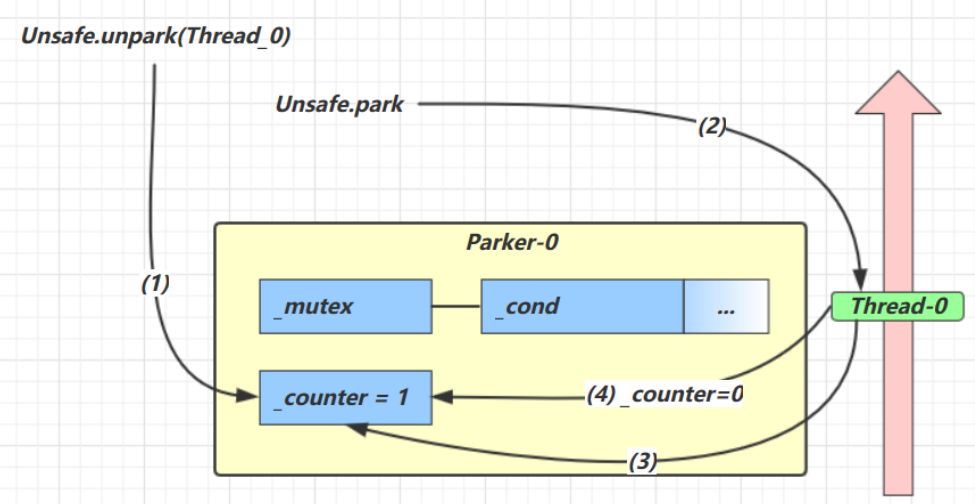
- 调用 Unsafe.unpark(Thread_0) 方法,设置 _counter 为 1
- 当前线程调用 Unsafe.park() 方法
- 检查 _counter ,本情况为 1,这时线程无需阻塞,继续运行
- 设置 _counter 为 0
常见面试题

标签:Thread,阻塞,System,unpark,线程,println,唤醒,out 来源: https://www.cnblogs.com/dalianpai/p/14204522.html