Spring笔记2
作者:互联网
spring中bean的细节之作用范围**
 <!--<bean的作用范围
        bean标签的scope属性:
            作用;用于指定bean的作用范围
            取值:
                singleton:单例的(默认值)
                prototype:多例的
                request:作用于web应用的请求范围
                session:作用于web应用的会话范围
                global-session:作用于集群环境的会话范围(全局会话范围),当不是集群环境时,他是session
    -->
    <bean id="accountService" class="com.itheima.factory.StaticFactory" factory-method="getAccountService" scope="prototype"></bean>
bean对象的生命周期
单例对象:
出生:当容器创建是对象出生
活着:只要容器还在,对象一直活着
死亡:容器销毁,对象消亡
多例对象:
出生:当我们使用对象时spring框架为我们创建
活着:对象只要是在使用过程中就一直活着
死亡:当对象长时间不用,且没有别的对象引用是,由Java的垃圾回收器回收
spring的依赖注入
<!--spring中的依赖注入-->
        <!--依赖注入:-->
            <!--Dependenccy Injection-->
        <!--IOC的作用:-->
            <!--降低程序间的耦合(依赖关系)-->
        <!--依赖关系的管理:-->
            <!--以后都交给spring来维护-->
        <!--在当前类需要用到其他类对象,由spring为我们提供,我们只需在配置文件中说明-->
        <!--依赖关系的维护:-->
            <!--就称为依赖注入-->
        <!--依赖注入:-->
            <!--能注入的数据:有三类-->
                <!--基本类型和String-->
                <!--其他bean类型(在配置文件或者注解配置过的bean)-->
                <!--复杂类型/集合类型-->
            <!--注入的方式:-->
                <!--第一种:使用构造函数提供-->
                <!--第二种:使用set方法提供-->
                <!--第三种:使用注解提供-->
1.构造函数注入
首先定义可注入的变量
public class AccountServiceImpl implements IAccountService {
    private String name;
    private Integer age;
    private Date birthday;
    public AccountServiceImpl(String name,Integer age,Date birthday){
        this.name = name;
        this.age = age;
        this.birthday = birthday;
    }
    public void  saveAccount(){
        System.out.println(name+":"+age+":"+birthday);
    }
}
<!--构造函数注入
使用标签:constructor-arg
标签中的属性:
type:用于指定要注入的数据的数据类型,该数据类型也是构造函数中某个或某些参数的类型
index:用于指定要注入的数据给构造函数中指定索引位置的参数赋值,索引的位置从0开始
name:用于指定给构造函数中指定名称的参数赋值(常用)
=======================================
以上三个用于指定给构造函数的哪个参数赋值
=======================================
value:用于提供基本类型和String类型的数据
ref:用于指定其他的bean类型,他指的就是spring的Ioc核心容器中出现过的bean对象
-->
<bean id="accountService" class="com.itheima.service.impl.AccountServiceImpl">
<constructor-arg name="name" value="迪丽热巴"></constructor-arg>
<constructor-arg name="age" value="18"></constructor-arg>
<constructor-arg name="birthday" ref="now"></constructor-arg>
</bean>
<!--配置日期对象-->
<bean id="now" class="java.util.Date"></bean>
创建测试类调用对象方法,查看注入是否成功
public class Client {

    public static void main(String[] args) {
        //获取核心容器对象
        ApplicationContext ac = new ClassPathXmlApplicationContext("bean.xml");
        //2.根据id(唯一标识)获取Bean对象
        IAccountService as = (IAccountService)ac.getBean("accountService");
        System.out.println(as);
    }
}
set方法注入:
1.给属性提供set,get方法
package com.itheima.service.impl;

import com.itheima.service.IAccountService;

import java.util.Date;

/**
 * 账户的业务层实现类
 */
public class AccountServiceImpl2 implements IAccountService {
    private String name;
    private Integer age;
    private Date birthday;

    public String getName() {
        return name;
    }

    public void setName(String name) {
        this.name = name;
    }

    public Integer getAge() {
        return age;
    }

    public void setAge(Integer age) {
        this.age = age;
    }

    public Date getBirthday() {
        return birthday;
    }

    public void setBirthday(Date birthday) {
        this.birthday = birthday;
    }

    public void  saveAccount(){
        System.out.println(name+":"+age+":"+birthday);
    }
}
2.XML配置
<bean id="now" class="java.util.Date"></bean>
        <!--set方法注入
            涉及的标签:property
            标签的属性
                name:用于指定注入时所调用的set方法名称
                value:用于提供基本类型和String类型的数据
                ref:用于指定其他的bean类型,他指的就是spring的Ioc核心容器中出现过的bean对象
        -->
    <bean id="accountService2" class="com.itheima.service.impl.AccountServiceImpl2">
        <property name="name" value="迪丽热巴2"></property>
        <property name="age" value="19"></property>
        <property name="birthday" ref="now"></property>
    </bean>
3.测试类
package com.itheima.ui;


import com.itheima.service.IAccountService;

import org.springframework.context.ApplicationContext;
import org.springframework.context.support.ClassPathXmlApplicationContext;

/**
 * 模拟一个表现层,用于调用业务层
 */
public class Client {

    public static void main(String[] args) {
        //获取核心容器对象
        ApplicationContext ac = new ClassPathXmlApplicationContext("bean.xml");
        //2.根据id(唯一标识)获取Bean对象
        IAccountService as = (IAccountService)ac.getBean("accountService2");
       as.saveAccount();
    }
}
注入结合数据
1.类中添加集合属性
package com.itheima.service.impl;

import com.itheima.service.IAccountService;

import java.util.*;

/**
 * 账户的业务层实现类
 */
public class AccountServiceImpl3 implements IAccountService {
    private String[] myStrs;
    private List<String> myList;
    private Set<String> mySet;
    private Map<String,String> myMap;
    private Properties myProps;

    public String[] getMyStrs() {
        return myStrs;
    }

    public void setMyStrs(String[] myStrs) {
        this.myStrs = myStrs;
    }

    public List<String> getMyList() {
        return myList;
    }

    public void setMyList(List<String> myList) {
        this.myList = myList;
    }

    public Set<String> getMySet() {
        return mySet;
    }

    public void setMySet(Set<String> mySet) {
        this.mySet = mySet;
    }

    public Map<String, String> getMyMap() {
        return myMap;
    }

    public void setMyMap(Map<String, String> myMap) {
        this.myMap = myMap;
    }

    public Properties getMyProps() {
        return myProps;
    }

    public void setMyProps(Properties myProps) {
        this.myProps = myProps;
    }

    public void saveAccount() {
        System.out.println(Arrays.toString(myStrs));
        System.out.println(myList);
        System.out.println(mySet);
        System.out.println(myMap);
        System.out.println(myProps);
    }
}
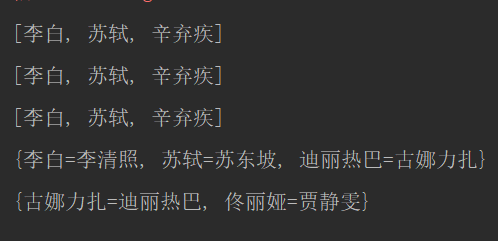
3.配置xml
数组中的元素使用value标签提供
 <!--复杂类型的注入/集合类型的注入
        用于给List结构集合注入的标签
            list array set
        用于给Map结构集合注入的标签有
            map props
        结构相同,标签可以互换
    -->
    <bean id="accountService3" class="com.itheima.service.impl.AccountServiceImpl3">
        <property name="myStrs">
        <array>
            <value>李白</value>
            <value>苏轼</value>
            <value>辛弃疾</value>
        </array>
    </property>

        <property name="myList">
            <list>
                <value>李白</value>
                <value>苏轼</value>
                <value>辛弃疾</value>
            </list>
        </property>

        <property name="mySet">
            <set>
                <value>李白</value>
                <value>苏轼</value>
                <value>辛弃疾</value>
            </set>
        </property>
<!--===============上面三个是单列集合=====================-->

        <property name="myMap">
            <map>
                <entry key="李白" value="李清照"></entry>
                <entry key="苏轼" value="苏东坡"></entry>
                <entry key="迪丽热巴" value="古娜力扎"></entry>
            </map>
        </property>

        <property name="myProps">
            <props>
                <prop key="古娜力扎">迪丽热巴</prop>
                <prop key="佟丽娅">贾静雯</prop>
            </props>
        </property>
    </bean>
4.测试数据是否注入集合
package com.itheima.ui;


        import com.itheima.service.IAccountService;

        import org.springframework.context.ApplicationContext;
        import org.springframework.context.support.ClassPathXmlApplicationContext;

/**
 * 模拟一个表现层,用于调用业务层
 */
public class Client {

    public static void main(String[] args) {
        //获取核心容器对象
        ApplicationContext ac = new ClassPathXmlApplicationContext("bean.xml");
        //2.根据id(唯一标识)获取Bean对象
        IAccountService as = (IAccountService)ac.getBean("accountService3");
        as.saveAccount();
    }
}

使用注解创建对象
1.配置xml,告知spring注解存在的位置
<?xml version="1.0" encoding="UTF-8"?>
<beans xmlns="http://www.springframework.org/schema/beans"
       xmlns:xsi="http://www.w3.org/2001/XMLSchema-instance"
       xmlns:context="http://www.springframework.org/schema/context"
       xsi:schemaLocation="http://www.springframework.org/schema/beans
        http://www.springframework.org/schema/beans/spring-beans.xsd
        http://www.springframework.org/schema/context
        http://www.springframework.org/schema/context/spring-context.xsd">
<!--告知spring在创建容器是要扫描的包,配置所需要的标签在context名称空间和约束中-->
        <context:component-scan base-package="com.itheima"></context:component-scan>
</beans>
2.加上注解:@Component
@Component
//作用:用于把当前类对象存入spring容器中
//属性 value:用于指定bean的id,当我们不写是,他的默认是当前类名,且首字母该小写
public class AccountServiceImpl implements IAccountService {
    private IAccountDao accountDao = new AccountDaoImpl();
    public AccountServiceImpl(){
        System.out.println("对象创建了");
    }
    public void  saveAccount(){ accountDao.saveAccount();
    }
}
由Component衍生的注解
Controller:一般用于表现层
Service:一般用在业务层
Repository:一般用在持久层
以上三个注解他们的作用和属性与Component是一模一样的,他们三个是spring框架为我们提供明确三层使用的注解,使我们的三层对象更加清晰
自动按照类型注入
Autowired注解:作用:自动按照类型注入,只要容器中有唯一的一个bean对象类型和要注入的变量类型匹配,就可以注入成功
出现位置:可以是变量上,也可以是方法上
细节:在使用注解注入时,set方法就不是必须的
Qualifier注解:作用:在按照类中注入的基础之上再按照名称注入。它在给类成员注入时不能单独使用。但是在给方法参数注入时可以
属性value:用于指定注入bean的id。
Resource注解:作用:直接按照bean的id注入。它可以独立使用
属性name:用于指定bean的id。
以上三个注入都只能注入其他bean类型的数据,而基本类型和String类型无法使用上述注解实。另外,集合类型的注入只能通过XML来实现。
Value注解:作用用于注入基本类型和String类型的数据;
属性value:用于指定数据的值
Spring的新配置(取出xml的配置文件)
现在需要使用注解来去除 通过配置xml来获取的两个bean对象
 <!--配置QueryRunner-->
    <bean id="runner" class="org.apache.commons.dbutils.QueryRunner" scope="prototype">
        <constructor-arg name="ds" ref="dataSource"></constructor-arg>
    </bean>

    <bean id="dataSource" class="com.mchange.v2.c3p0.ComboPooledDataSource">
        <property name="driverClass" value="com.mysql.jdbc.Driver"></property>
        <property name="jdbcUrl" value="jdbc:mysql:///eesy"></property>
        <property name="user" value="root"></property>
        <property name="password" value="12345"></property>
    </bean>
实现方式
//Configuration 作用,指定当前类是一个配置类
//ComponentScan 作用,用于通过注解指定spring在创建容器是要扫描的包
//

@Configuration
@ComponentScan(basePackages = "com.itheima")//指定创建容器是要扫描的包
public class SpringConfiguration {
    //用于创建一个QueryRunner对象
    @Bean(name="runner")//用于把当前方法的返回值作为bean对象存入spring的IoC容器中
    public QueryRunner createQueryRunner(DataSource dataSource){
        return new QueryRunner(dataSource);
    }
    // 创建数据源对象
    @Bean(name="dataSource")
    public DataSource createDataSource(){
        ComboPooledDataSource ds = new ComboPooledDataSource();
        try {
            ds.setDriverClass("com.mysql.jdbc.Driver");
        } catch (PropertyVetoException e) {
            e.printStackTrace();
        }
        ds.setJdbcUrl("jdbc:mysql:///eesy");
        ds.setUser("root");
        ds.setPassword("12345");
        return ds;
    }
}
在使用xml配置是获取容器是通过如下
ApplicationContext ac = new ClassPathXmlApplicationContext("bean.xml");那么我们现在通过注解来获取容器就应该使用另外一个类来获取,如下
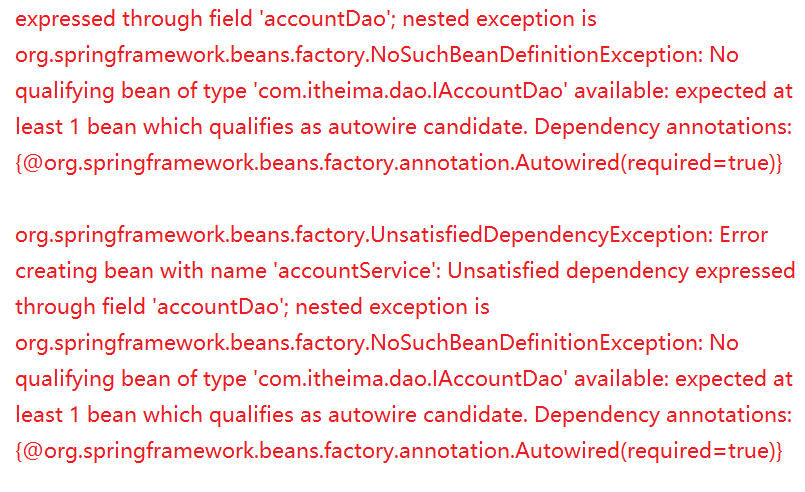
ApplicationContext ac = new AnnotationConfigApplicationContext(SpringConfiguration.class);运行案例是报了错误:
NoSuchBeanDefinitionException: No qualifying bean of typeavailable: expected at least 1 bean which qualifies as autowire candidate. Dependency annotations:
具体错误信息如下

关键字:NoSuchBeanDefinitionException,说没有bean对象
原来是忘记在bean对象前加注解了dao层,和service层都要加

标签:name,IAccountService,Spring,void,笔记,对象,bean,public 来源: https://www.cnblogs.com/train99999/p/11210767.html