vue拖拽事件
作者:互联网
<template> <ul class="list"> <li @dragenter="dragenter($event, index)" @dragover="dragover($event, index)" @dragstart="dragstart(index)" draggable v-for="(item, index) in list" :key="item.label" class="list-item" > {{item.label}} </li> </ul> </template> <script> export default { data() { return { list: [ { label: '列表1' }, { label: '列表2' }, { label: '列表3' }, { label: '列表4' }, { label: '列表5' }, { label: '列表6' }, ], dragIndex: '', enterIndex: '', }; }, methods: { dragstart(index) { this.dragIndex = index; }, dragenter(e, index) { e.preventDefault(); // 避免源对象触发自身的dragenter事件 if (this.dragIndex !== index) { const source = this.list[this.dragIndex]; this.list.splice(this.dragIndex, 1); this.list.splice(index, 0, source); // 排序变化后目标对象的索引变成源对象的索引 this.dragIndex = index; } }, dragover(e, index) { e.preventDefault(); }, }, }; </script> <style lang="scss" scoped> .list { list-style: none; .list-item { cursor: move; width: 300px; background: #EA6E59; border-radius: 4px; color: #FFF; margin-bottom: 6px; height: 50px; line-height: 50px; text-align: center; } } </style>
链接 https://juejin.cn/post/6909287804510371847
emmm。。没错,看起来就是如此的鸡肋,但是莫得办法,大佬喜欢啊。 下面用代码实现边界判断就
链接 https://juejin.cn/post/6909287804510371847
emmm。。没错,看起来就是如此的鸡肋,但是莫得办法,大佬喜欢啊。
由于我们项目中用的是 element-ui ,所有这个指令只针对 element-ui的对话框组件哈,如果你们用的别的ui库也有这个需求的,涂涂改改应该也能用。。
其实这个拖拽的原理还是很简单的:
- 首先鼠标按下(
onmousedown)- 记录目标元素当前的
left和top值
- 记录目标元素当前的
- 鼠标移动(
onmousemove)- 计算每次移动的横向距离 (
disX) 和纵向距离 (disY) - 并改变元素的
left(left = left + disX)和top(top = top + disY)值
- 计算每次移动的横向距离 (
- 鼠标松开(
onmouseup)- 完成一次拖拽,做一些收尾工作
left 和 top 值容易获取,关键是 disX 和 disY 怎么计算呢?
容我先普及一哈:
那么伪代码就是:
-
disX= 鼠标按下时的clientX- 鼠标松开时的clientX -
disY= 鼠标按下时的clientY- 鼠标松开时的clientY
就这么简单,好了,下面就开始撸代码了。
// 这个助手方法下面会用到,用来获取 css 相关属性值
const getAttr = (obj, key) => (
    obj.currentStyle
    ? obj.currentStyle[key]
    : window.getComputedStyle(obj, false)[key]
);

const vDrag = {
    inserted(el) {
      /**
       * 这里是跟据 dialog 组件的 dom 结构来写的
       * target: dialog 组件的容器元素
       * header:dialog 组件的头部区域,也是就是拖拽的区域
       */
        const target = el.children[0];
        const header = target.children[0];

        // 鼠标手型
        header.style.cursor = 'move';
        header.onmousedown = (e) => {

            // 记录按下时鼠标的坐标和目标元素的 left、top 值
            const currentX = e.clientX;
            const currentY = e.clientY
            const left = parseInt(getAttr(target, 'left'));
            const top = parseInt(getAttr(target, 'top'));

            document.onmousemove = (event) => {

                // 鼠标移动时计算每次移动的距离,并改变拖拽元素的定位
                const disX = event.clientX - currentX;
                const disY = event.clientY - currentY;
                target.style.left = `${left + disX}px`;
                target.style.top = `${top + disY}px`;

                // 阻止事件的默认行为,可以解决选中文本的时候拖不动
                return false;
            }

            // 鼠标松开时,拖拽结束
            document.onmouseup = () => {
                document.onmousemove = null;
                document.onmouseup = null;
            };
        }
    },

    // 每次重新打开 dialog 时,要将其还原
    update(el) {
        const target = el.children[0];
        target.style.left = '';
        target.style.top = '';
    },

    // 最后卸载时,清除事件绑定
    unbind(el) {
        const header = el.children[0].children[0];
        header.onmousedown = null;
    },
};

export default vDrap;
复制代码这样就实现了最简单的拖拽了,这样就 ok 了吗? 当然不是,这样会有什么问题呢?就是如果用力过猛把整个弹框都拖到可视区域之外了,那就抠不出来了。
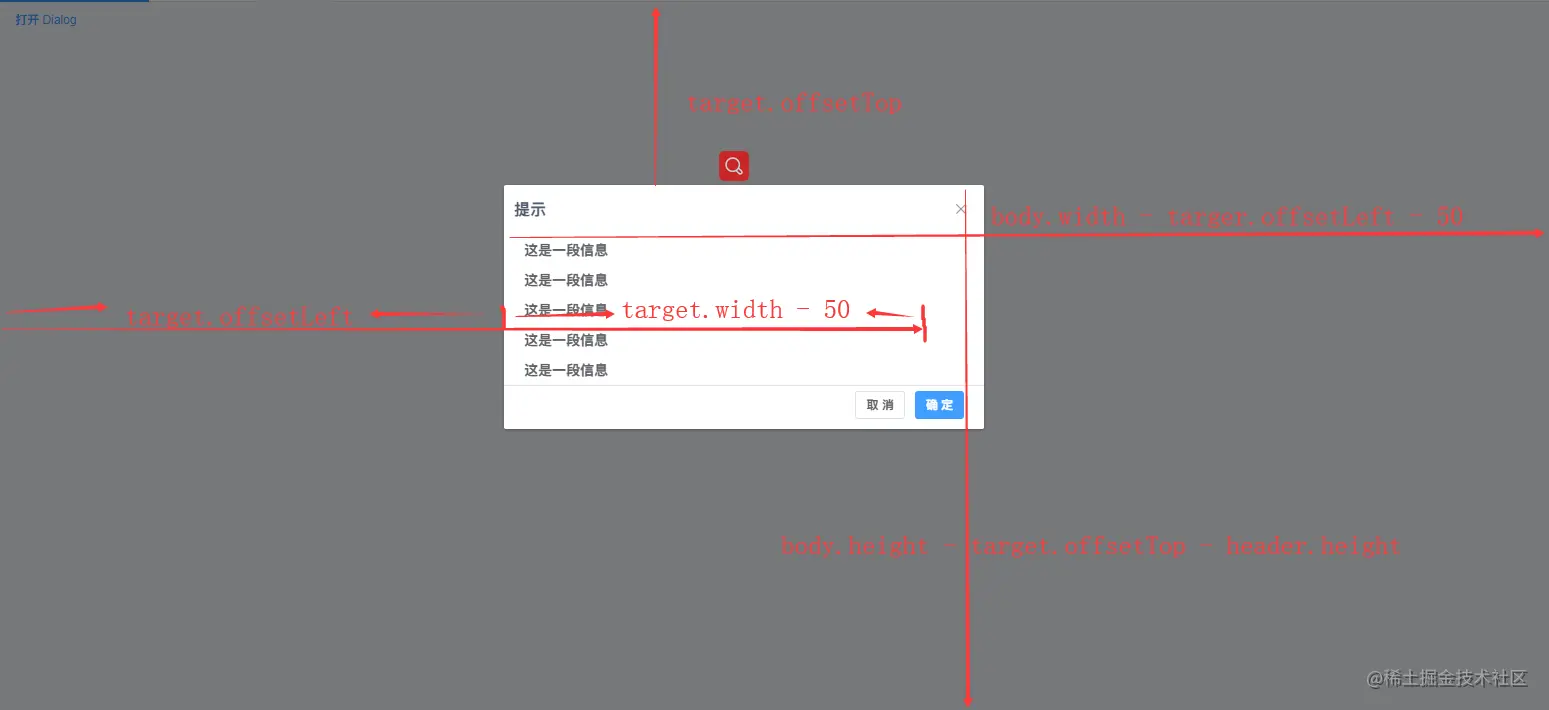
所以还得完善一下,判断四个方向的边界,如果超过边界值就不动了。边界值实际上就是在屏幕上能拖动的最大距离也就是 disX 和 disY 的最大值
- 上边界:
target.offsetTopoffsetTop:这里可以表示目标元素(target)上边框距离页面顶部的距离
- 下边界:
body.height - target.offsetTop - header.heightheader.height:预留高度,表示往下可以拖到只留下可拖拽区域在外面
- 左边界:
target.offsetLeft + target.width - 50offsetLeft:这里可以表示目标元素左边框距离页面左边的距离50:表示预留的宽度,可以自己随便定只要大于0即可,表示往左再怎么拖也会留下50px的宽度在外面
- 右边界:
body.width - target.offsetLeft - 50- 这里
50同上,表示往左再怎么拖也会留下50px的宽度在外面
- 这里
这里计算边界值的方法有多种,大家可以去尝试自己的想法。然后我粗略的画了一个图,帮助理解,虽然感觉只有我自己看得懂。哈哈。。。
ok 了
// ...
// 以上代码省略

header.onmousedown = (e) => {
    // ...
    // 以上代码省略

    // 分别计算四个方向的边界值
    const minLeft = target.offsetLeft + parseInt(getAttr(target, 'width')) - 50;
    const maxLeft = parseInt(getAttr(document.body, 'width')) - target.offsetLeft - 50;
    const minTop = target.offsetTop;
    const maxTop = parseInt(getAttr(document.body, 'height'))
      - target.offsetTop - parseInt(getAttr(header, 'height'));

    document.onmousemove = (event) => {
        // 鼠标移动时计算每次移动的距离,并改变拖拽元素的定位
        const disX = event.clientX - currentX;
        const disY = event.clientY - currentY;

        // 判断左、右边界
        if (disX < 0 && disX <= -minLeft) {
          target.style.left = `${left - minLeft)}px`;
        } else if (disX > 0 && disX >= maxLeft) {
          target.style.left = `${left + maxLeft}px`;
        } else {
          target.style.left = `${left + disX}px`;
        }

        // 判断上、下边界
        if (disY < 0 && disY <= -minTop) {
          target.style.top = `${top - minTop)}px`;
        } else if (disY > 0 && disY >= maxTop) {
          target.style.top = `${top + maxTop}px`;
        } else {
          target.style.top = `${top + disY}px`;
        }
        return false;
    };
}
复制代码
这样注册之后就可以使用了:
<el-dialog v-drag title="对话框" :visible.sync="dialogVisible"></el-dialog>标签:vue,const,target,鼠标,disX,top,事件,拖拽,left 来源: https://www.cnblogs.com/sjruxe/p/16532542.html