WindowsService服务程序开发 安装和卸载
作者:互联网
安装服务:
installutil.exe E:\XTestDemo\X_15_WindowsService\bin\Debug\X_15_WindowsService.exe
卸载服务:
installutil.exe /u E:\XTestDemo\X_15_WindowsService\bin\Debug\X_15_WindowsService.exe
Windows服务:Microsoft Windows 服务(即,以前的 NT服务)使您能够创建在它们自己的 Windows 会话中可长时间运行的可执行应用程序。这些服务可以在计算机启动时自动启动,可以暂停和重新启动而且不显示任何用户界面。这使服务非常适合在服务器上使用,或任何时候,为了不影响在同一台计算机上工作的其他用户,需要长时间运行功能时使用。还可以在不同于登录用户的特定用户帐户或默认计算机帐户的安全上下文中运行服务。(摘自百度百科)
一:创建

二:属性
VS自动创建了一个Service1.cs的文件:
点击F4,查看各个属性的含义:
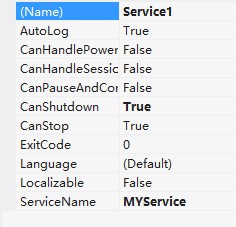
Autolog 是否自动写入系统的日志文件
CanHandlePowerEvent 服务时候接受电源事件
CanPauseAndContinue 服务是否接受暂停或继续运行的请求
CanShutdown 服务是否在运行它的计算机关闭时收到通知,以便能够调用 OnShutDown 过程
CanStop 服务是否接受停止运行的请求
ServiceName 服务名称
三:功能
点击F7查看Service1.cs的源代码:
默认实现了OnStart和OnStop两个方法。
以向一个文本文件中写入数据操作为例:
   public partial class Service1 : ServiceBase
    {
        public Service1()
        {
            InitializeComponent();
        }

        /// <summary>
        /// 服务启动
        /// http://www.cnblogs.com/babycool
        /// </summary>
        /// <param name="args"></param>
        protected override void OnStart(string[] args)
        {
            string start = string.Format("{0}-{1}",DateTime.Now.ToString("yyyyMMddHHmmss"),"程序启动了。");
            Log(start);
        }

        /// <summary>
        /// 服务停止
        /// http://www.cnblogs.com/babycool
        /// </summary>
        protected override void OnStop()
        {
            string start = string.Format("{0}-{1}", DateTime.Now.ToString("yyyyMMddHHmmss"), "程序停止了。");
            Log(start);
        }

        /// <summary>
        /// 系统关闭
        /// http://www.cnblogs.com/babycool
        /// </summary>
        protected override void OnShutdown()
        {
            string start = string.Format("{0}-{1}", DateTime.Now.ToString("yyyyMMddHHmmss"), "电脑关闭了。");
            Log(start);
        }

        /*
        /// <summary>
        /// 服务暂停
        /// http://www.cnblogs.com/babycool
        /// </summary>
        protected override void OnPause()
        {

        }
        */

        /*
        /// <summary>
        /// 服务继续
        /// </summary>
        protected override void OnContinue()
        {
            base.OnContinue();
        }
        */
        /*
        /// <summary>
        /// 系统电源状态改变
        /// </summary>
        /// <param name="powerStatus"></param>
        /// <returns></returns>
        protected override bool OnPowerEvent(PowerBroadcastStatus powerStatus)
        {
            return base.OnPowerEvent(powerStatus);
        }
        */


        void Log(string str)
        {
            string path = "E://def/6.txt";
            using (StreamWriter sw = File.AppendText(path))
            {
                sw.WriteLine(str);
            }
        }

    }
四:安装程序
切换到 Service1.cs[设计] 界面,右击选择“添加安装程序”。
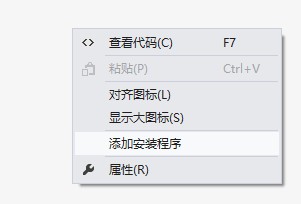
这时项目中就添加了一个新类 ProjectInstaller 和两个安装组件 ServiceProcessInstaller 和 ServiceInstaller。
选中“serviceInstaller1” 控件,F4打开属性面板,
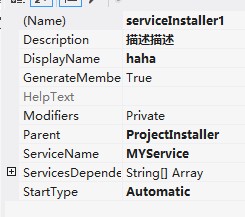
Description 服务程序的描述信息
DisplayName 服务程序显示的名称
StartType 指定如何启动服务
Manual 服务安装后,必须手动启动
Automatic 每次计算机重新启动时,服务都会自动启动
Disabled 服务无法启动
选中“serviceProcessInstaller1” 控件,F4打开属性面板:
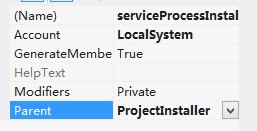
将serviceProcessInstaller类的Account属性改为 LocalSystem。
这样,不论是以哪个用户登录的系统,服务总会启动。
五:生成
右击 项目 选择生成 ,不能通过F5来直接运行服务项目。

六:安装卸载服务
选择 VS组件 “Visual Studio命令提示(2010)” 工具,并以“管理员身份运行"(win7、win8系统下)。
注意:这里必须选择“以管理员身份运行”,否则会报错。


从命令行运行 Installutil.exe 目录 命令,以项目中的已编译可执行文件所在的目录作为参数,安装服务:
1. 方法 1
因为Installutil.exe程序在 C:\Windows\Microsoft.NET\Framework64\v4.0.30319\ 目录下,需要通过cmd命令 "cd" 切换目录。
从命令行运行 Installutil.exe /u 目录 命令来卸载服务:
安装服务:
installutil.exe E:\XTestDemo\X_15_WindowsService\bin\Debug\X_15_WindowsService.exe
卸载服务:
installutil.exe /u E:\XTestDemo\X_15_WindowsService\bin\Debug\X_15_WindowsService.exe
1. 方法 2
找到 Installutil.exe 文件,并把它复制到 E:\XTestDemo\X_15_WindowsService\bin\Debug\ 目录
现在 Installutil.exe 程序在 E:\XTestDemo\X_15_WindowsService\bin\Debug\ 目录下,需要通过cmd命令 "cd" 切换目录。
安装服务:
installutil.exe X_15_WindowsService.exe
卸载服务:
installutil.exe X_15_WindowsService.exe
七:查看服务状态
在“计算机管理”中,服务 下可以看到刚刚安装的Service服务(cmd命令:services.msc---本地服务设置):

默认是停止状态。右击,选择“启动”,即可开启服务。

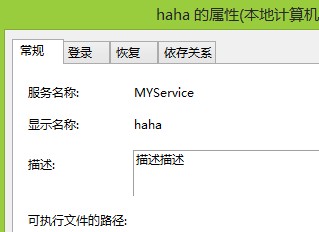
通过“属性”,可以查看到更详细的信息。
原文地址:http://www.cnblogs.com/babycool/p/3534786.html
相关参考:
用C#创建Windows服务(Windows Services) - Gsun - 博客园
C#开发Windows Services服务--服务安装失败的解决办法 - 无名小虾 - 博客园
标签:exe,15,string,Windows,WindowsService,程序开发,卸载,服务 来源: https://www.cnblogs.com/zhaozw/p/10857370.html